Trevi ME 3P08 RC - Meteo Station With External Sensor Manual
- Manual (13 pages)
Advertisement
- 1 COMMANDS DESCRIPTION
- 2 WEATHER STATION POWER SUPPLY
- 3 EXTERNAL SENSOR
- 4 TIME DISPLAY BY RADIO CONTROL
- 5 TIME ZONE
- 6 CLOCK MANUAL ADJUSTMENT
- 7 ALARM ADJUSTMENT
- 8 WEATHER FORECAST
- 9 TEMPERATURE AND INTERNAL / EXTERNAL MOISTURE
- 10 MAXIMUM AND MINIMUM TEMPERATURE STORAGE
- 11 COMFORT GRADE ICONS
- 12 TECHNICAL DATA
- 13 Precautions for correct disposal of the product
- 14 Documents / Resources
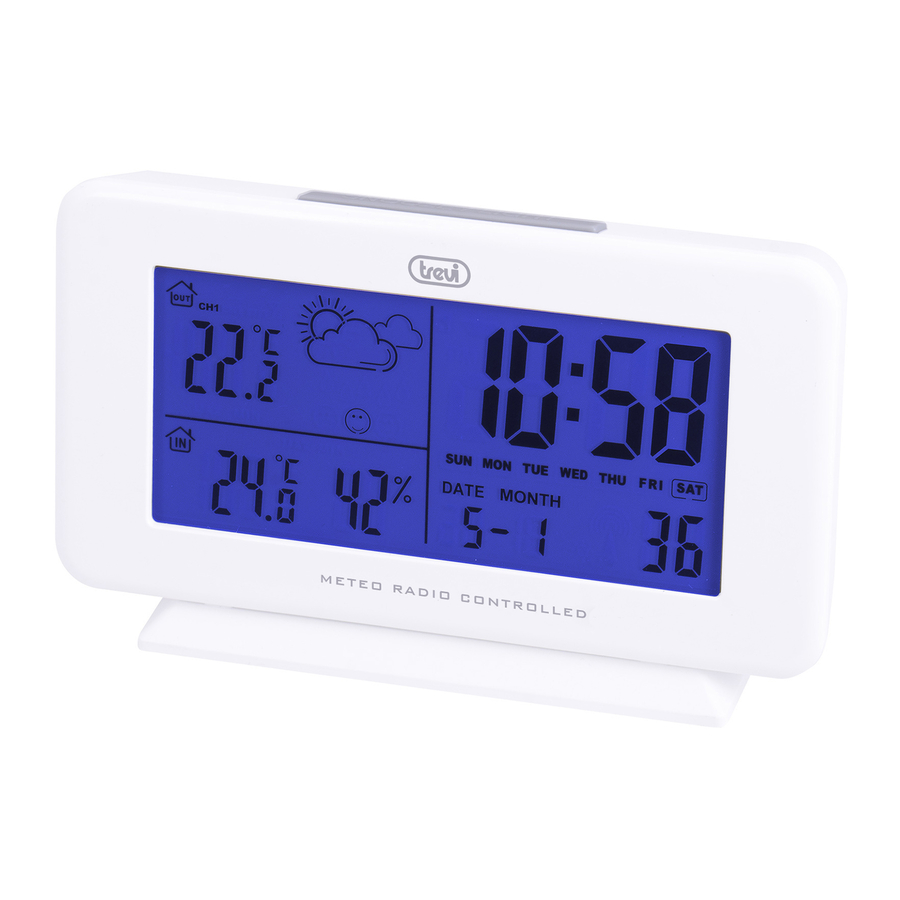
COMMANDS DESCRIPTION

- Weather symbols icons
- External sensor temperature
- Internal temperature / humidity
- Clock
- Date
- External sensor
- MODE button
- UP button
- SNOOZE / LIGHT button
- DOWN key
- MIN / MAX button
- SNZ button
- Battery compartment
WEATHER STATION POWER SUPPLY
Open the battery compartment (13) on the back of the appliance and insert two "AAA" size batteries observing the indicated polarities.
EXTERNAL SENSOR
Open the battery compartment on the back of the appliance, and insert two "AAA" size batteries observing the indicated polarities.
The external sensor is factory set on channel 1 and automatically connects with the weather station, push UP button to change channel.
TIME DISPLAY BY RADIO CONTROL
This device is equipped with a receiver capable of receiving the time signal of the Physikalisch Technische Bundesanstalt Braunschweig (central Germany) receivable within a radius of 1500Km. At the first power-up, after 3 minutes, the weather station will start searching for the control signal (flashing control signal icon).
- While searching for the control signal, keep the DOWN key (10) pressed for a few seconds to deactivate the automatic search function.
- Press the DOWN key for a few seconds to activate the automatic control signal search function.
Once the control signal is attached, the icon will appear fixed.

TIME ZONE
The time is transmitted from central Germany, so if we are in a country with a different time than Germany, we need to set the time zone (see next paragraph).
Not all areas of Europe may be able to receive the radio control signal. In this case it is necessary to set the time manually.
CLOCK MANUAL ADJUSTMENT
- Keep the MODE button (7) pressed until the current year to be set flashes on the display.
- Set the year using the UP (8) or DOWN (10) keys.
- Press the MODE button (7), the month will begin to flash on the display.
- Set the month using the UP (8) or DOWN (10) keys.
- Press the MODE button (7), the day will begin to flash on the display.
- Set the day using the UP (8) or DOWN (10) keys.
- Press the MODE button (7), 12 / 24Hr will start to flash on the display.
- Set the 12 / 24H time display using the UP (8) or DOWN (10) keys.
- Press the MODE button (7), the time zone will begin to flash on the display.
- Set the time zone using the UP (8) or DOWN keys.
- Press the MODE button (7), the time will begin to flash on the display.
- Set the time using the UP (8) or DOWN (10) keys.
- Press the MODE button (7), the minutes will start to flash on the display.
- Set the minutes using the UP (8) or DOWN (10) keys.
ALARM ADJUSTMENT
- Press the MODE button (7), the display will show the alarm function (AL) for a few seconds.
- During the alarm display, long press the MODE button (7) to adjust the time and the minutes to which the alarm will activate and the time in minutes of snooze (alarm reactivation). Press the MODE button (7) to confirm.
- During the alarm display (press the MODE key) press the UP key (8) to activate the alarm, the alarm icon will appear on the display. Press it again to deactivate the alarm.
- To temporarily turn off the alarm, press the SNZ / LIGHT button (9). The alarm will resume sounding after the set snooze minutes.
- To definitively deactivate the alarm press the UP key (8).
WEATHER FORECAST
The digital barometer automatically detects changes in atmospheric pressure and consequently displays the weather forecast symbol (1). This forecast concerns the following 12/24 hours. For example: if the barometer detects a high pressure, the sun symbol will appear on the display, but outside it may rain, because the forecast is for the next 12/24 hours.
N.B. Weather forecast symbols may not reflect current weather conditions. They refer only to future conditions. Forecasts may not be 100% safe due to various factors. The manufacturer is not responsible for any damage or situations caused by an incorrect forecast.
TEMPERATURE AND INTERNAL / EXTERNAL MOISTURE
The indication relating to the outside temperature is located at the top of the display (2), while the temperature and internal humidity value is shown below (3).
Press the DOWN key (10) to select the temperature unit of measurement in °C or °F.
MAXIMUM AND MINIMUM TEMPERATURE STORAGE
- Press the MAX / MIN key (11) in sequence, the stored MAX and MIN temperature peak will be displayed on the display.
- Press and hold the MAX / MIN key (11) to cancel the recording.
COMFORT GRADE ICONS
There are 3 icons (symbolized by smilies) that represent the comfort level temperature / humidity:
Dry: humidity below 40%
Ideal comfort: temperature between 20/28 °, humidity between 40/70%
Moist: humidity over 70%
No indication: temperature below 20 ° or above 28 °, humidity included in comfort values.
TECHNICAL DATA
Weather station: from 0°C to + 50°C
Internal humidity: from 20% to 95%
External sensor: from -20°C to + 60°C
Radio control signal reception: 77.5 KHz
Transmission: 30m, RF 433MHz, 10mW
Unit feed rate:
0.1°C for the temperature,
1% for humidity
Power supply:
2xAAA weather station
2xAAA external sensor
Precautions for correct disposal of the product

The symbol shown on the equipment indicates that waste must be disposed of in "separate collection" and so the product must not be disposed of together with urban waste. The user must take the product to special "separate waste collection centres" provided by local government, or deliver it to the retailer against the purchase of a new product.
Separate collection of waste and subsequent treatment, recycling and disposal operations promotes the production of equipment with recycled materials and limits negative effects on the environment and on health caused by improper handling of waste.
Illegal disposal of the product leads to the enforcement of administrative penalties.

Documents / ResourcesDownload manual
Here you can download full pdf version of manual, it may contain additional safety instructions, warranty information, FCC rules, etc.
Download Trevi ME 3P08 RC - Meteo Station With External Sensor Manual
Advertisement


Need help?
Do you have a question about the ME 3P08 RC and is the answer not in the manual?
Questions and answers