Advertisement
- 1 IMPORTANT SAFETY INSTRUCTIONS
- 2 Overview
- 3 About the Name Card
- 4 Setup
- 5 View Your Device on the EZVIZ App
- 6 EZVIZ Connect
- 7 Documents / Resources
IMPORTANT SAFETY INSTRUCTIONS

- Please read the user manual carefully before installing or using this product.
- If you are installing this product for a third party, please remember to leave the manual or a copy of it with the end user.
Safety measures:
- To operate this system in complete safety, it is essential that the installers, users, and technicians follow all of the safety procedures described in this manual.
- Specific warnings and warning symbols are given for items if necessary.
- The product must be set up according to the applicable standards in the country where it is installed.
Overview
Package Contents

General
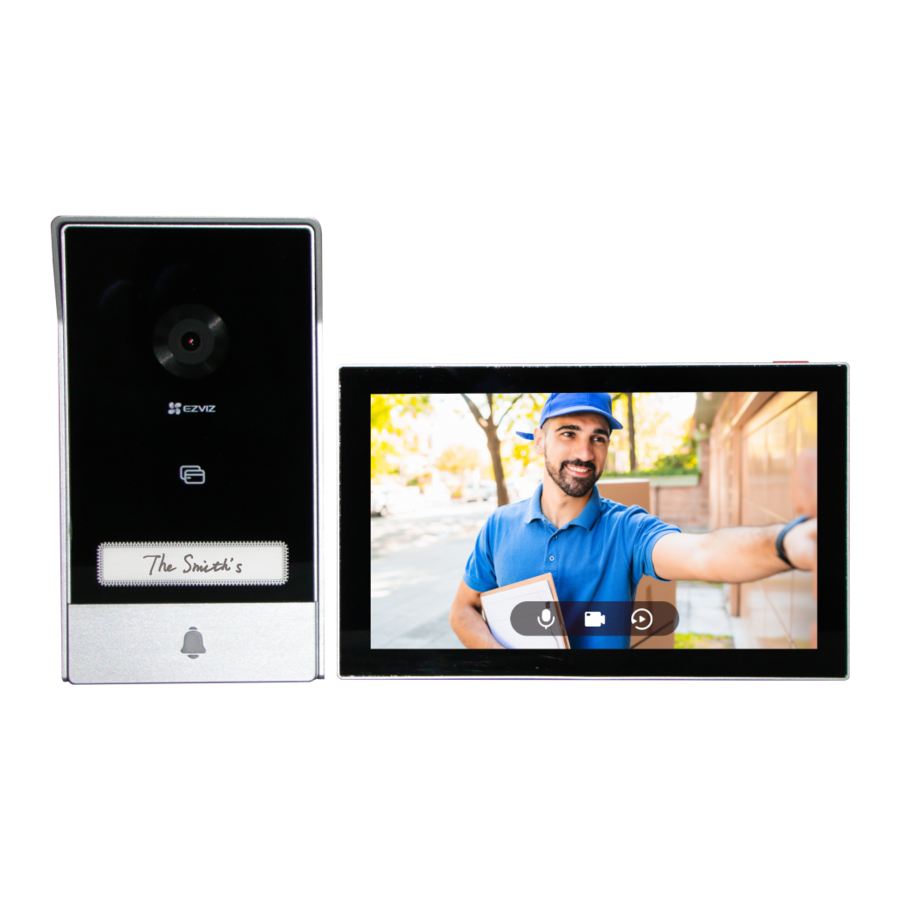
This video doorphone consists of an indoor answering unit with a touch screen and an outdoor panel with an intercom allowing you to see and communicate with the visitor who has pressed the doorbell button. It is easy to install as six wires are needed for all functions: the doorbell, the video feed, the intercom, and the opening controls (strike plate and automated gate opening).
The system can operate up to two monitors and two Intercom Panels.
To get the most out of your intercom, please read this instruction manual carefully.
Basics


- When someone presses the doorbell button, the inside monitor rings and the video is displayed.
- To change the label in the name holder, pull the name holder tray from the left side of the device.
| Name | Description |
| Power Port | For powering up the monitor. |
| Screen On/Off Button |
|
| Micro SD Card (sold separately) | Initialize the card in the EZVIZ app before using it. Recommended compatibility: Class 10, maximum space 512GB. |
About the Name Card
- A name card has been pasted into the intercom panel included in the package, and you can write the name directly on it.
- There are 2 additional name cards included in the package, please keep them for further use.
- The name card can be teared off, and a new name card can be pasted over it.
- If you don't want to stick a name card, you can also use a marker to write the name directly on the name holder.
- The area of the name holder can be lit up, which can be managed through the EZVIZ App.
- We recommend you draw out the name holder and write the name, before installing the intercom panel on the weather-proof shield.
Setup
Follow the steps to set your system:
- Get the EZVIZ app, and log in to your EZVIZ app account.
- Wiring your system.
- Install the Intercom Panel and monitor.
- Add the monitor to your EZVIZ account.
Get the EZVIZ App
- Connect your mobile phone to Wi-Fi (suggested).
- Download and install the EZVIZ app by searching "EZVIZ" in the App Store or Google PlayTM.
- Launch the app and register an EZVIZ user account.
![]()
EZVIZ App


If you have already used the app, please make sure that it is the latest version. To find out if an update is available, go to the app store and search for EZVIZ.
Wiring
In order to avoid the risks of interference and malfunction, do not pass the wires for your video doorphone through the same sheath as the electrical wires.

Do not double up the wires to increase the cross-section under any circumstances

Please make sure that all the wires are well connected before you plug the power adapter into a wall outlet
1-1 wiring diagram
| Ø 2 x 0.75mm² | Ø 2 x 1.5mm2 | Twisted Pair(TP) | |
 | 0-50m | 0-100m | up to 120m |
 | 1-10m | 1-10m | 1-10m |
The remaining 4 terminal blocks (DB-/+, LCD-/+) on the monitor can be left unwired, it will be used for extended in the future
Connect the Video Doorphone (Monitor, Intercom Panel)
Properly connect the wires according to the wiring diagram (1-1). Terminals DB- and DB+ of the monitor to intercom panel DB- and DB+ terminals.
Connect an Electric Strike Plate or Lock
Connect it directly to terminals LOCK- and LOCK+ on the back of the intercom panel.
For wiring, refer to the label on the back of the intercom panel.
Note that this function is only valid if the screen is displaying the exterior video feed. An indicator will appear to confirm.
To ensure that the electric strike plate or lock can be unlocked by the video doorphone, you should meet the following two conditions:
- The electric strike plate or lock that you order must have a mechanical memory.
- The power supply to the electric strike plate or lock must not exceed 12V/1.1A If the power supply to the electric strike plate or lock exceeds 12V/1.1A, do as follows.


Connect a Gate Motor
Directly connect the gate motor wires to terminals GATE- and GATE+ on the back of the intercom panel. The intercom panel provides a 'dry'-contact connection, without an electric current, to connect to the button for your automated gate.
Note that this function is only valid if the screen is displaying the exterior video feed. An indicator will appear to confirm.
The gate control: Breaking Capacity: 12V/2A.
Power on the Monitor
Connect the monitor to power outlet with the power adapter to power on.(AC 100- 240V).
When the monitor is connected to power, the screen turns on automatically.
If the wires in your home cannot be well connected to the terminal blocks on the back of the device (Monitor and Intercom Panel), for example:
Q: How to do with it, when your wires has too large cable diameter, and is a BVR cable, and it cannot be welded?
A: We recommend you try one of the following solutions as you needed.
- Option 1: Use wire stripper to adjust the thickness of the cable
Before Operate After ![]()
![]()
![]()
Connect the wire end to the terminal block - Option 2: Connect your wires to the terminal blocks by using the wires and wire connectors included in the package
Before Operate After ![]()
![]()
![]()
Connect the wire end to the terminal block


Installation
 Advice and important instructions:
- If you test your product before installing it, ensure that you do not test it with the Intercom Panel and the monitor in the same room to avoid the video doorphone emitting a shrill noise.
- Do not expose the intercom panel lens to direct sunlight or a reflective surface.
Tip: we recommend that you use a protective sheath when doing the cabling in order to protect the cables against breakage and bad weather - For the EZVIZ model, so as to get the most out of monitor's Wi-Fi function, we recommend that you check that your Wi-Fi network is accessible in your planned installation location
Install the intercom panel
- Remove the screws under the intercom panel, and tilt the intercom panel forwards.
![]()
- Draw out the name holder and write the name on the name card, take back the name holder.
![]()
- The lens of the panel must be placed at a height around 1.60m.

- Place the drill template, take the wires through the holes of the drill template and the weatherproof shield, then firmly attach the weather-proof shield with anchors and screws to the wall.

- Connect the wires to the terminal blocks of the intercom panel according to the wiring diagram 1-1.(Use the screwdriver included).

- Fit the intercom panel onto its weather-proof shield.
![]()
- Re-Install the attachment screws with the screwdriver (included).
![]()
![]()
For a better image quality, please remove the protective film from the intercom panel before using it.
![]()
Tip: It is recommended that the wires be passed through a sheath to protect them from impacts and weather.


Install the monitor
- Place the drill template for monitor so that the monitor screen is at a height of around 1.60 m above the ground.

- Take the wires coming from the intercom panel through the holes of the drill template and the wall bracket, then fix the wall bracket with anchors and screws to the wall.

- Connect the wires coming from the intercom panel, and connect the power adapter to the power port in the back of the monitor (without plugging it into the wall outlet).

- Position the monitor on the wall bracket.

- Plug the adapter into the wall outlet.

![]()
during this step, do not connect the power supply to a wall outlet.
Tip: The remaining 4 terminal blocks (DB-/+, LCD-/+) on the monitor can be left unwired, it will be used for extended in the future.


Install Micro SD Card (Optional)
- Insert a Micro SD card (sold separately) into the SD card slot as shown in the figure below.
![]()
![information]() After installing the Micro SD card, you should initialize the card in the EZVIZ app before using it.
After installing the Micro SD card, you should initialize the card in the EZVIZ app before using it. - In the EZVIZ app, tap the Record List in the Device Settings interface to check the SD card status.
- If the memory card status displays as Uninitialized, tap to initialize it.
![information]() The status will then change to Normal and it can store videos.
The status will then change to Normal and it can store videos.

Connect Your EZVIZ Video Doorphone To Your Smartphone
- Press the "Screen On/Off Button" to turn on the screen.
![]()
- Follow the screen wizard to connect the monitor to Wi-Fi (recommended).
- On your smartphone, log in to your EZVIZ app account, on the Home screen, tap "+" on the upper-right corner to go to the Scan QR Code interface.
- Scan the QR code on the screen of the monitor.

- Follow the EZVIZ app wizard to add the monitor to the EZVIZ app.
![information]() If you failed to connect the monitor to Wi-Fi, or you skip this step (step(1/2) on the monitor), you can choose to use EZVIZ app to finish Wi-Fi configuration:
If you failed to connect the monitor to Wi-Fi, or you skip this step (step(1/2) on the monitor), you can choose to use EZVIZ app to finish Wi-Fi configuration: - Connect your smartphone to Wi-Fi (suggested)
- Log in to your EZVIZ app, and scan the QR code on the monitor.
- Follow the EZVIZ app wizard to finish Wi-Fi configuration and add the video doorphone to your the EZVIZ app.


Configure the RFID Badge
Add RFID badges
When turning on the device for the first time, it is essential to configure the badges in the EZVIZ app:
- Log in to your EZVIZ app account.
- Go to the Monitor's settings page, choose Card Management > add cards.
- Set the name of the card, and tap "Next step".
- Set the term of validity, and tap "Next step".
- Put the RFID badge on the badge reading zone, the doorbell indicator flash 3 times indicates the badge add successfully.
- Tap "finish".
Delete RFID badges
- Log in to your EZVIZ app account.
- Go to the Monitor's settings page, choose Card Management.
- Tap to choose the card you want to delete, and tap "Delete" ->"OK" to delete the card.
Three Unlocking Methods
Open the gate/door via the monitor
- Go to the main menu on your monitor
- Tap the
![]() or
or ![]() to unlock the lock or gate.
to unlock the lock or gate.
Open the gate/door via the EZVIZ App
- Log in to your EZVIZ app account.
- Go to the intercom panel live view page, Tap the
![]() or
or ![]() to unlock the lock or gate.
to unlock the lock or gate.
Open the gate/door with smart RFID badge
- Unlock the the electric strike plate/Lock:
Quickly swipe your pre-programmed badge on the RFID reading zone. One short beep confirms the opening of the electric strike plate/Lock. - Unlock the Gate motor:
Hold the badge for at least 3 seconds on the RFID reading zone. One short beep confirms the opening of the gate.
![information]() Three short beeps indicates the failure of opening lock/gate.
Three short beeps indicates the failure of opening lock/gate.
View Your Device on the EZVIZ App
The app interface may be different due to version update, and the interface of the app you installed on your phone shall prevail.
Live View
When you launch the EZVIZ app, the device page displays are shown below.
You can view and listen to a live feed, take snapshots, record videos, and choose video definition as needed.

| Icon | Description |
 | Share. Share your device. |
 | Settings. View or change the device settings. |
 | Popup. View the video displayed on top of another app you are using. |
 | Full Screen Display. Tap to enjoy a full screen display for your filed of view. |
 | Snapshot. Take a snapshot. |
 | Record. Manually start/stop recording. |
 | Call Log. View call logs. |
 | Talk. Tap the icon, and then follow the on-screen instructions to talk to or listen to people in front of the camera. |
 | Lock. Tap to unlock the electric strike plate or lock. |
 | Gate. Tap to unlock the gate. |
 | Definition. Select video resolution from Quad HD, Full HD or Hi-Def. |
 | Multi-screen Live. Tap to select window layouts. |
Swipe left and right across the screen to see more icons.
Settings
Intercom Panel (Doorbell)
In the settings page, you can set the parameters of the Intercom Panel.
| Parameter | Description |
| Name | View or tap to customize the name of your device here. |
| Intelligent Detection | You can select between different detection types for your device. |
| Notification | You can manage the device message and EZVIZ App notification. |
| Audio Settings | You can set relevant audio parameters for your device. |
| Image Settings | You can set relevant image parameters for your device. |
| Light Settings | You can set relevant light parameters for your device. |
| Card Management | You can manage the badges here. |
| Cloudplay | You can subscribe and manage the cloud storage. |
| Record List | You can see the device storage status of the memory card. |
| Security Settings | You can customize the privacy area here. |
| Device Information | You can see the device information here. |
| Share Device | You can share the device to you family member or guest. |
| Restart Device | Tap to restart the device. |
Monitor
In the settings page, you can set the parameters of the Monitor.
| Parameter | Description |
| Name | View or tap to customize the name of your device here. |
| Audio Settings | You can set screen ring on/off and choose the doorbell ringtones. |
| Screen Settings | You can set the screen brightness and auto-lock screen time here. |
| Record List | You can see the device storage status of the memory card. |
| Security Settings | You can encrypt your videos with encryption password. |
| Network Settings | You can see the Wi-Fi name and the connection status.
|
| Device Information | You can see the device information here. |
| Restart Device | Tap to restart the device. |
| Delete Device | Tap to delete the device from EZVIZ App. |
EZVIZ Connect
Use Amazon Alexa
These instructions will enable you to control your EZVIZ devices with Amazon Alexa. If you run into any difficulties during the process, please refer to Troubleshooting
Before you start, make sure that
- EZVIZ devices are connected to the EZVIZ app.
- In the EZVIZ app, turn off the "Video Encryption" and turn on the "Audio" in the Device Settings page.
- You have an Alexa-enabled device (i.e Echo Spot, Echo-Show, All-new Echo-Show, Fire TV (all generations), Fire TV stick (second generation only), or Fire TV Edition smart TVs).
- The Amazon Alexa app is already installed on your smart device, and you have created an account.
To Control EZVIZ devices with Amazon Alexa
- Open the Alexa app and select "Skills and Games" from the menu.
- On the Skills and Games screen, search for "EZVIZ", and you will find "EZVIZ" skills.
- Select your EZVIZ device's skill, then tap ENABLE TO USE
- Enter your EZVIZ username and password, and tap Sign in
- Tap the Authorize button to authorize Alexa to access your EZVIZ account, so that Alexa can control your EZVIZ devices.
- You will see "EZVIZ has been successfully linked", then tap DISCOVER DEVICES to allow Alexa to discover all your EZVIZ devices.
- Go back to Alexa app menu and select "Devices", and under devices you will see all your EZVIZ devices.
Voice Command
Discover a new smart device via the "Smart Home" menu in the Alexa app or the Alexa Voice Control function. Once the device is found, you can control it with your voice. Speak simple commands to Alexa.
Answer the EZVIZ Intercom Panel with Alexa
After you've connected your EZVIZ Intercom Panel to your Alexa-enabled device, you can speak to your visitors through your Echo or Fire TV device.
To speak to your visitor, you can say:
- Alexa, answer [EZVIZ Intercom Panel Name].
- Alexa, talk to [EZVIZ Intercom Panel Name].
Your device's name for example: "show xxxx camera," can be changed in the EZVIZ app. Each time you change the name of the device, you will need to discover the device again to update the name.
Troubleshooting
What should I do if Alexa fails to discover my device?
Check if there are any Internet connecting problems.
Try to restart the smart device and re-discover the device on Alexa.
Why the device's status is "Offline" on Alexa?
Your device might have been disconnected from the network. Restart the smart device and re-discover on Alexa.
Check if your router is connected to the Internet and try again.
For details about countries where Amazon Alexa is available, see Amazon Alexa's official website.
Use Google Assistant
With the Google Assistant, you can activate your EZVIZ device and watch live by speaking Google Assistant voice commands.
The following devices and apps are required
- A functional EZVIZ app.
- In the EZVIZ app, turn off the "Video Encryption" and turn on the "Audio" in the Device Settings page.
- A TV with functional Chromecast connecting to it.
- The Google Assistant app on your phone.
To get started, follow the steps below
- Set up the EZVIZ device and make sure it works properly on the app.
- Download the Google Home app from the App Store or Google Play StoreTM and log into your Google account.
- On the Myhome screen, tap "+" on the upper-left corner, and select "Set up device" from the menu list to go to the Set up interface.
- Tap Works with Google, and search for "EZVIZ", where you will find "EZVIZ" skills.
- Enter your EZVIZ username and password, and tap Sign in
- Tap the Authorize button to authorize Google to access your EZVIZ account, so that Google can control your EZVIZ devices.
- Tap Return to app
- Follow the above steps to complete the authorization. When synchronization is completed, EZVIZ service will be listed under your list of services. To see a list of compatible devices under your EZVIZ account, tap on the EZVIZ service icon.
- Now try some commands. Use the name of the camera that you created when you set up the system.
Users can manage devices as a single entity or in a group. Adding devices to a room allows users to control a group of devices at the same time using one command.
See the link for more information: https://support.google.com/googlehome/answer/7029485?co=GENIE.Platform%3DAndroid&hl=en
For additional information about the device, please refer to www.ezviz.com/eu.
Documents / Resources
References
![www.apple.com]() App Store - Apple
App Store - Apple![play.google.com]() Google Play
Google PlaySet up your Google Nest or Home speaker or display - Android - Google Nest Help
![www.ezviz.com]() EZVIZ - Creating Easy Smart Homes
EZVIZ - Creating Easy Smart Homes
Download manual
Here you can download full pdf version of manual, it may contain additional safety instructions, warranty information, FCC rules, etc.
Advertisement


Need help?
Do you have a question about the HP7 and is the answer not in the manual?
Questions and answers