
Related Manuals for Sangamo S250 Series


Summary of Contents for Sangamo S250 Series
- Page 1 SERIES ELECTRO-MECHANICAL ROUND PATTERN TIME SWITCH Installation and User Instructions...
- Page 2 Sangamo S250/Q550 Series, 24 hour and Solar Dial Time Switch. Installation and User Instructions. FIG. 1 Before attempting to install the Sangamo Time Switch, please read these instructions carefully. The Installation of the switch should be carried out by a qualified electrician in accordance with the current edition of the IEE wiring regulations.
- Page 3 Introduction These installation and user instructions cover all variants in the Sangamo S250 & Q550 series – a range of reliable and highly accurate 24-hour time switches which offer, according to model, up to 3 ON/OFF (6 changeover) operations during a 24-hour cycle,...
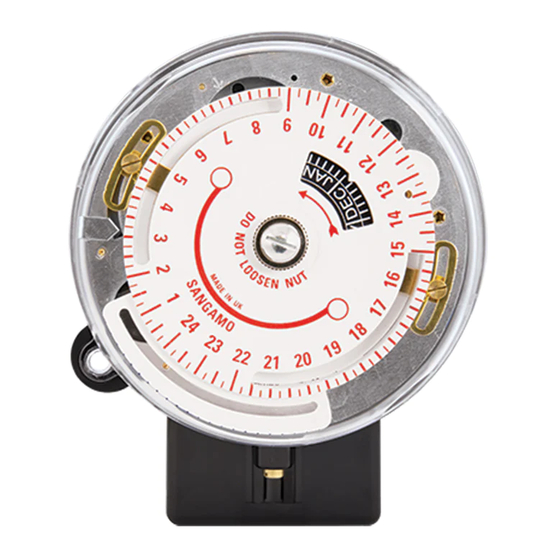
- Page 4 KNOB (H) COVER LUG (Y) TARGET DIAL LEVER (L) SCREW (B) CAPTIVE SCREW (F) FIG. 2 DATE WHEEL (D) TERMINAL OPERATING COVER (E) ARM (A) Sangamo solar dial time switch. Sangamo 24 hour dial time switch. (Q550 shown) (S250 shown)
-
Page 5: Installation Instructions
Installation Instructions Rotate front cover anti-clockwise and lift clear. Remove extended terminal cover E by unscrewing captive screw F. Withdraw plug-in mechanism from switch base by pulling firmly on knob H. Do not pull on dial. Clear plastic from three fixing holes provided, ENSURE THAT NO PARTICLES REMAIN IN BASE. Notes: Use No.8 wood screws or No.2BA countersunk screws for fixing. - Page 6 Setting the 24 Hour Dial Hold dial firmly and turn knob H clockwise until levers L (Fig. 2) are easily movable. Set levers to operating times required. Re-tighten knob H. Turn dial in direction of arrow until pointer P marked ‘time’ indicates the time of day at the moment of setting. e.g.
- Page 7 Minimum Period Between Operations Minimum setting period between levers L, marked ‘on’ and ‘off’ is fifteen minutes. When more than one pair of levers are fitted, minimum period between consecutive “on’, ‘off’, levers is 1 hours. For early operation switches, the hinged lever must be set at least three hours after normal lever L preceding it and at least 1 hours before normal lever L following it.
- Page 8 For convenience, midnight bridge is calibrated in quarter-hour intervals enabling fixed operation to be set at any time between 20.30 and 01.00. To set ‘off’/change-over operation, procedure is as follows: (a)Slacken slotted screw securing operating pin. Move operating pin along slot of midnight bridge S until it corresponds to required operating time. Secure operating pin by tightening screw N.
-
Page 9: Manual Button
Micro-disconnection Important Although every care is taken to ensure the accuracy of the electrical circuit diagrams shown, SANGAMO or associated companies cannot be held responsible or liable for circuit connections other than those directly associated with the S250 & Q550 ranges of time switches. As the control mechanism is similar to that used in an ordinary quartz clock, there will be a perceptual ticking. -
Page 10: Quick Reference Chart
QUICK REFERENCE CHART FUNCTION/ QUARTZ SOLAR NO. OF TIMER BATTERY OMIT EARLY EARLY SWITCH BASE PINS SWITCH ELECTRONIC DIAL CHANNELS PROG. RESERVE DEVICE OPERATIONS ‘DEVICE’ TYPE PER 24 HOURS OPERATIONS (SOLAR MODELS) (STANDARD MODELS (DEPENDING ON FORM TYPE) S251 24 HR ON and OFF SPST 2 or 4... - Page 11 SOLAR MODELS – GEOGRAPHICAL ZONES Because the times of sunrise and sunset vary with latitude, four standard dials are available for use in the UK each corresponding to a geographical zone. ° ZONE 4 ° ZONE 3 ° ZONE 2 °...
- Page 12 ‘non-critical’ and have been inspected to our normal high standards. CUSTOMER CARE POLICY As part of Sangamo’s continuous improvement programme, the Company operates a Customer Care Policy. This means that we welcome your comments and complaints, as it can only help us to improve our services to you, our customer.
Need help?
Do you have a question about the S250 Series and is the answer not in the manual?
Questions and answers