
Related Manuals for Accumet AP71


Summary of Contents for Accumet AP71
- Page 1 OPERATING INSTRUCTIONS accumet ® 13636AP71 and 13636AP72 AP71 and AP72 Portable Waterproof pH/mV/°C Meter 1/02...
-
Page 2: Table Of Contents
P4.4 Selecting °C or °F (AP72 meter only) .................35 4.2 Preparing the meter for calibration ...................13 8.6 Program 5.0: Resetting to factory default settings (AP71 meter only) ......36 4.3 pH calibration........................14-15 8.7 Program 5.0: Setting the real-time clock (AP72 meter only)........37-38 4.4 Relative mV calibration .......................16... -
Page 3: Introduction
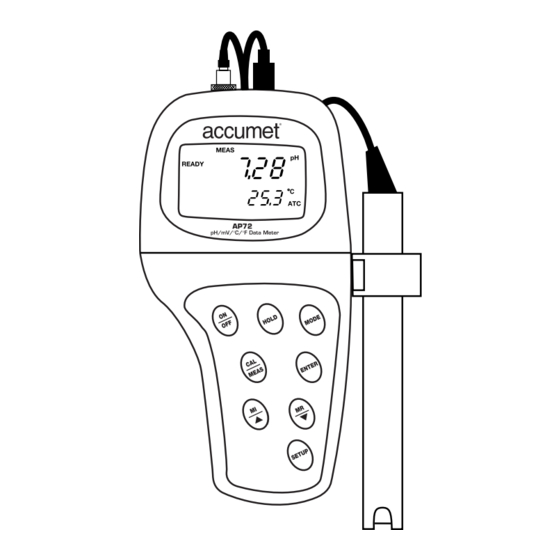
1. Introduction 2. Display and Keypad Functions Thank you for selecting an accumet meter. This accumet portable meter is a microprocessor-based instrument that measures pH, mV, and temperature. Display It’s completely waterproof—and it floats! Your meter has many user-friendly features, all of which are accessible through the membrane keypad. -
Page 4: Keypad
Keypad 3. Preparation The large membrane keypad makes the instrument easy to use. Each button, when pressed, has a corresponding graphic indicator on the LCD. Inserting the Batteries ON/OFF....Powers and shuts off the meter. HOLD ....Freezes the measured reading. To activate, press HOLD while in Four AAA batteries are included with your meter. -
Page 5: Connecting The Electrode And Temperature Probe
Slide the BNC connector of the probe over the BNC connector socket on the This accumet pH/mV meter can use any standard pH, ORP, or ISE electrode with meter. Make sure the slots of the connector are in line with the posts of the a BNC connector. -
Page 6: Attaching The Electrode Holder To The Meter
Inserting the Electrode into the Electrode Holder Attaching the Electrode Holder to the Meter Do not use excessive force when inserting electrodes into the holders. Attaching the electrode holder to the meter Insert the pH electrode into the opening of the first holder until the top housing facilitates one-hand operation. -
Page 7: Calibration
• See section 4.3 on pages 14-15 for pH calibration • See section 4.4 on page 16 for Relative mV calibration The AP71 meter is capable of up to 5-point pH calibration to ensure accuracy across the • See section 4.5 on pages 17 for Temperature Calibration of replacement entire pH range of the meter. -
Page 8: Ph Calibration
pH calibration Press ENTER to confirm calibration. The meter is now calibrated to the NOTE: We recommend that you perform at least a 2-point calibration using standard current buffer. buffers that bracket (one above and one below) the expected sample range. See figure You can perform a 1-point calibration, but make sure that the buffer value is close to the sample value you are measuring. -
Page 9: Relative Mv Calibration
Once you have selected the correct in memory to the factory default settings, temperature, press the ENTER key. use: The meter automatically returns to • AP71 meter: SETUP Program P 5.0. pH measurement mode. See page 36. • AP72 meter: SETUP Program P6.0. Notes See page 39. -
Page 10: Measurement
Manual Temperature Compensation 5. Measurement IMPORTANT: For manual compensation, This meter is capable of taking measurements with automatic or manual temperature you must disconnect the temperature probe compensation. Automatic temperature compensation only occurs when a temperature sensor (see page 9). is plugged into the meter. -
Page 11: Taking Measurements
Taking Measurements Taking measurements with READY indicator selected on If the READY indicator has been activated, the READY annunciator lights when Be sure to remove the electrode soaker bottle or protective rubber cap on the the reading is stable*. Switch the READY indicator on or off in Set up program electrode before measurement. -
Page 12: Hold Function
To hold a measurement, press the HOLD key while in measurement AP71 meter: The AP71 meter can store up to 16 sets of data in any combination of mode. "HOLD" will appear on the values. For example, you can store 7 pH and 9 mV values. -
Page 13: Memory Recall
P3.0: Viewing electrode data (ELE) See figure P4.0: Unit configuration (COF) Press the ENTER key to recall the read- AP71 only: P5.0: Reset to factory default settings (rSt) ing stored under that memory number. AP72 only: P5.0: Setting clock (CLO) See figure AP72 only: P6.0: Reset to factory default settings (rSt) -
Page 14: Advanced Setup Mode Overview
Press the SETUP key to enter Set up mode. Press the keys to scroll through sub groups. • P1.0 Clear all stored readings AP71 meter set up mode Instructions on page 28 P1.0: Memory clear P2.0: Viewing previous calibration data •... - Page 15 P2.0. Press the keys to scroll through subgroups until you view parameter P1.0. AP71 meter only: Press the ENTER key repeatedly to view previous calibration See figure data. Press the ENTER key to enter parameter See figure P1.0.
-
Page 16: P3.1 Electrode Offset
P3.0: Viewing electrode data P3.2: Electrode slope NOTE: this parameter is available in Program 3 has two “view only”options that lets you check the electrode parameters pH measurement mode only. for diagnostic purposes. From measurement mode P3.1: Electrode offset If necessary, press the MODE key to From measurement mode select pH measurement mode. -
Page 17: P4.1: Ready Indicator And Auto Endpoint Function
P4.0: Unit configuration P4.2: Selecting number of pH calibration points Program P4.2 lets you select the number of calibration points that appear in pH P4.1: READY indicator and auto endpoint function calibration mode: 2, 3, 4, or 5. This lets the meter scroll through the calibration points more quickly if you regularly calibrate at less than 5 points. -
Page 18: P4.4 Selecting °C Or °F (Ap72 Meter Only)
P4.3 Calibration buffer selection sets P4.4 Selecting °C or °F Available in AP72 meter only Available in AP72 meter only The AP72 meter lets you select between three standard calibration buffer sets, The AP72 meter lets you select between °C and °F units for temperature readings. depending on your requirements. - Page 19 Available in AP71 meter only Available in AP72 meter only In the AP71 meter, Program 5 lets you reset all parameters to factory default The AP72 meter features a real-time calendar and clock. This helps you meet GLP settings. This clears all calibration data, memory, and any other setup functions (Good Laboratory Practice) standards.
- Page 20 Press the ENTER key to confirm the P6.0: Resetting to factory default settings date and move to “hour” selection. Available in AP72 meter only The “hour” digits will flash. In the AP72 meter, Program 6 lets you reset all parameters to factory default See figure settings.
-
Page 21: Probe Care And Maintenance
pH electrode activation (for glass bodied electrodes only) 9. Probe Care and Maintenance WARNING: Only qualified persons proficient with the safe handling of dangerous Since your pH electrode is susceptible to dirt and contamination, clean it every one chemicals should perform the procedure below. Provide proper containers, fume to three months depending on the extent and condition of use. -
Page 22: Troubleshooting
10. Troubleshooting 11. Error Messages Problem Cause Solution Indicates Cause Solution Display Power on but a) Batteries not in place. a) Check that batteries are in no display place and making good Unrecognized input Wrong input in Release key. Select contact. -
Page 23: Specifications
Offset up to ±150 mV Memory: AP71 meter: up to 16 data sets (pH or mV plus temperature) AP72 meter: up to 50 data sets (pH or mV plus temperature, date, and time) pH slope range: 80% to 110% Temperature compensation: automatic (ATC) or manual from 0 to 100°C...
Need help?
Do you have a question about the AP71 and is the answer not in the manual?
Questions and answers