Table of Contents
Advertisement
Quick Links
Advertisement
Table of Contents

Related Manuals for Venesta Vepps


Summary of Contents for Venesta Vepps
- Page 1 627-191-17 (12/20) Vepps We know washrooms Installation Instructions...
- Page 2 Recommendations for Solid Grade Laminate (SGL) Machining • Pilot hole diameters for screw fixing to SGL to be 0.5mm less than diameter of screw. • Use tungsten carbide tipped blades/cutters or metal cutting tools. Generally; • No 6 screw - 3.5mm •...
- Page 3 Introduction Safety Prerequisites Panel Storage & Conditioning Secure Fixing • To ensure panels and doors remain flat ambient It is vital that the structural integrity of walls, ceilings site conditions must be stable prior to delivery. and floors is capable of taking the dynamic and static Variable temperature and humidity can cause panels loads imposed by the fixings to support the product.
-
Page 4: Table Of Contents
Contents Layout & Levelling page 5 Baserail Fixing page 6 Corner Channel Fixing page 7 Headrail & Tie-Back Preparation page 8 Headrail Fixing: Suspended Ceiling Option page 9 - 10 Headrail Fixing: Solid Ceiling Option page 11 - 12 Headrail Fixing: Shelf Height Option page 13 - 14 Return End &... -
Page 5: Layout & Levelling
Layout & Levelling ! Installers should be highly experienced and be qualified to a carpentry joiner level. ! Before installation, if in any doubt about how to install these products please contact our technical department. ! PPE: Wear personal protection equipment at all times. ! Setting Out: Use layout drawings. -
Page 6: Baserail Fixing
Baserail Fixing *refer to layout drawing If using corner moulding, cut the extrusion 23mm shorter and mitre the rear leg of the baserail Corner detail (if required) Inside view Plugs and screws not supplied Baserail must be level: pack where necessary... -
Page 7: Corner Channel Fixing
Corner Channel Fixing MFC/HPL Flashgaps *SGL Flashgaps can be fixed to the corner channel before fixing to the wall /positioning return ends. The corner channel will sit above the baserail. (see , page 17) Wall end detail u i t ø... -
Page 8: Headrail & Tie-Back Preparation
Headrail & Tie-Back Preparation *Headrail drilling positions for tie-backs Solid ceiling option Shelf height option Suspended ceiling option Tie-backs can be used either to tie to the wall (A) or ceiling (B). *Top drilling only required for suspended ceilings (B) ø... -
Page 9: Headrail Fixing: Suspended Ceiling Option
Headrail Fixing: Suspended Ceiling Option Headrail Arrangement Flashgap Arrangement Suspended ceiling option Wall Return Structural ceiling Suspended ceiling 100 50 Tie-backs can be used either to tie to the wall (A) or ceiling (B). If joint is required: Screw the extrusions together from the rear... - Page 10 Headrail Fixing: Suspended Ceiling Option (Continued) Wall End Fixing Inside view ø Return End Fixing Inside view ø...
-
Page 11: Headrail Fixing: Solid Ceiling Option
Headrail Fixing: Solid Ceiling Option Headrail Arrangement Flashgap Arrangement Solid ceiling option Wall Return 65 varies *baton to suit (not supplied) If joint is required: Screw the extrusions together from the rear ø baton to suit (not supplied) s u i r t o s ( o t r e... - Page 12 Headrail Fixing: Solid Ceiling Option (Continued) t r e c e n u i t ) 6 0 0 t o s ( o r Variable Level ø ø 18mm t h r 3 . 5 MFC/ ø f l a ø...
-
Page 13: Headrail Fixing: Shelf Height Option
Headrail Fixing: Shelf Height Option Flashgap Arrangement Wall Return Headrail Arrangement Shelf height Option 1 Option 2 Option 3 *Baton to suit (not supplied): to be fixed to underside of shelf if required. If joint is required: ø t h r ø... - Page 14 Headrail Fixing: Shelf Height Option (Continued) Wall End Fixing Inside view ø Return End Fixing Inside view ø...
-
Page 15: Return End & Top Flashgap Fixing
Return End & Top Flashgap Fixing *SGL ONLY: Ensure SGL packers are fitted to headrail Headrail Elevation View Return end flashgaps Return End Fixing Lipped flashgap Inside view ø 18mm 3 . 5 MFC/HPL ø Return end 13mm flashgap ½ ” arrangement 18mm MFC/HPL... -
Page 16: Headrail Tie-Back To Wall/Ceiling Fixing
Headrail Tie-Back to Wall/Ceiling Fixing I L I u i t ø t Plugs and screws not supplied I L I Tighten as required... -
Page 17: End Flashgap And Return End Panel Fixing
End Flashgap & Return End Panel Fixing Flashgap Length t i g h Bottom face of t b u top flashgap to j o i n top edge of baserail +10mm Inside view ø 18mm Wall end detail shown 3 . 5 MFC/ Please fix all flashgaps/ ø... -
Page 18: Subframe Preparation
Subframe Preparation Urinal Back-to-Wall WC Wall Hung WC Fixed Lift-off Lift-off Lift-off Lift-off For Multi-Panel (sliding) (sliding) (sliding) (sliding) units subframes are supplied in two pieces to be joined when connecting subframe - see step 12, page 21 Hinged Hinged Hinged Hinged Fixed... - Page 19 Subframe Preparation (Continued) For Multi-Panel units tie-backs are required on top & bottom subframe assemblies secure inside subframe secure outside subframe Inside view...
- Page 20 Subframe Preparation (Continued) FOR WALL HUNG WCs ONLY Inside view...
-
Page 21: Subframe Connection
Subframe Connection *For Multi-Panel units: Fix bottom subframe Slot upper ‘click’ into headrail assembly to baserail and subframe HOLD IN PLACE into lower subframe ‘click’ ‘click’ *Multi-panel variant Slide frame Open hinged into position panel Plugs and screws not supplied u i t ø... - Page 22 Subframe Connection (Continued) FOR WALL HUNG WCs ONLY Inside view Attach the lower panel Inside view Secure WC studding TIGHTLY u i t to the carrier ø t Fix the WC: 1. Secure WC studding (example shown) 2. Fix the WC to the panel Please follow WC installation instructions Anchor bolts recommended...
-
Page 23: Flashgap To Subframe Fixing
Flashgap to Subframe Fixing Flashgap Length SGL ONLY: First, fit SGL packers to subframe Bottom face of Plan View top flashgap to top edge of baserail +10mm Slide frame & flashgap into position t i g h t b u j o i n Repeat steps ø... -
Page 24: Secondary Subframe Fixing
Secondary Subframe Fixing Inside, underside It is CRUCIAL that view screws are fitted at the top of each subframe leg... -
Page 25: Plumbing
Plumbing Ensure all IPS units are securely installed Connect copper supply pipes Connect waste Ensure olives/seals are in position Iso valves not supplied • Ensure seals are in position • Check connections are water tight • Ensure falls are in correct direction... -
Page 26: Panel Fixing
Panel Fixing Inside Inside view view ‘click’ Inside view Inside view Please note: for WC installations bottom panel is fixed... -
Page 27: Shelf Fixing
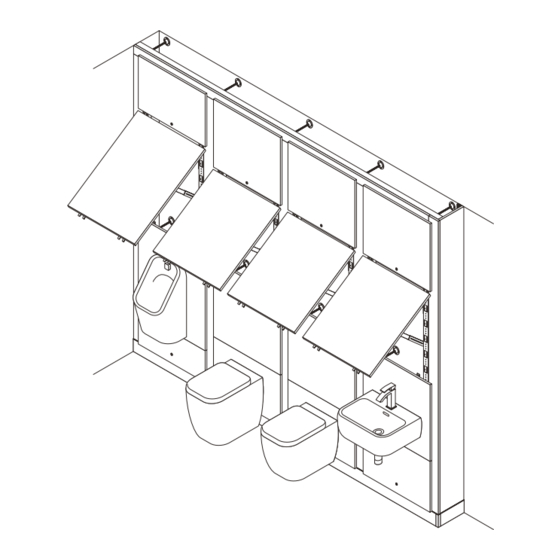
Shelf Fixing Fix clips around shelf height unit & on shelf underside Inside view ‘click’... - Page 28 Vepps Hinged Panel Operation Unlock top panel Lift hinged panel DO NOT remove top panel, the top panel is designed to lift up with the hinged panel Open hinged panel Shower Panels We recommend that all panels are sealed around the perimeter...