
Subscribe to Our Youtube Channel
Related Manuals for AENO TB2


Summary of Contents for AENO TB2
- Page 1 Installation and Operation Manual for the AENO TB2 electric multifunctional blender Model ATB0002 Version 1.0.1 | 27.07.2022...
-
Page 3: Introduction
Installation and Operation Manual for the AENO TB2 electric blender Introduction This manual contains a detailed description of the AENO TB2 blender as well as instructions for its preparation, operation and maintenance. Copyrights Copyright © ASBISc Enterprises PLC. All rights reserved. -
Page 4: Responsibility And Technical Support
The most common problems encountered are described in section 7 "Troubleshooting" of this document. You can download the latest version of this manual at aeno.com/documents. User information, including personal data, is protected from unauthorized access and disclosure in accordance with GDPR requirements. -
Page 5: Standards Compliance
Installation and Operation Manual for the AENO TB2 electric blender Standards compliance The device is CE certified and meets the requirements of the following European Union directives: • Electromagnetic Compatibility Directive 2014/30/EU; • Low Voltage Directive 2014/35/EU; • Directive 2009/125/EU on ecodesign requirements •... -
Page 6: Limitations And Warnings
Installation and Operation Manual for AENO TB2 electric blender Limitations and Warnings Please read the information in this section of the document carefully before you start installing and operating the device. WARNING! The warnings, precautions and instructions in this document may not contain all possible hazards. - Page 7 Installation and Operation Manual for the AENO TB2 electric blender • people with disabilities who are physically able to operate and maintain the device in accordance with this user manual. 3. Place the device on a dry and clean horizontal surface, making sure there is no chance of it toppling over.
- Page 8 Installation and Operation Manual for AENO TB2 electric blender 23. Do not allow the electrical components of the device (handle and base of the jug, motor unit) to come into contact with water. Water can cause contacts to short out, damage to the device, or electrical shock.
-
Page 9: Table Of Contents
AENO TB2 electric blender Contents Introduction ..................................... 3 This manual contains a detailed description of the AENO TB2 blender as well as instructions for its preparation, operation and maintenance............. 3 Copyrights ....................................3 Responsibility and Technical Support ......................... 4 Standards compliance .............................. - Page 10 Installation and Operation Manual for AENO TB2 electric blender 8 Glossary....................................44 Figures and tables Figure 1 – Appearance of the device ........................11 Figure 2 – Elements of the device ......................... 13 Figure 3 – Package * ................................ 16 Figure 4 –...
-
Page 11: General Description And Specifications
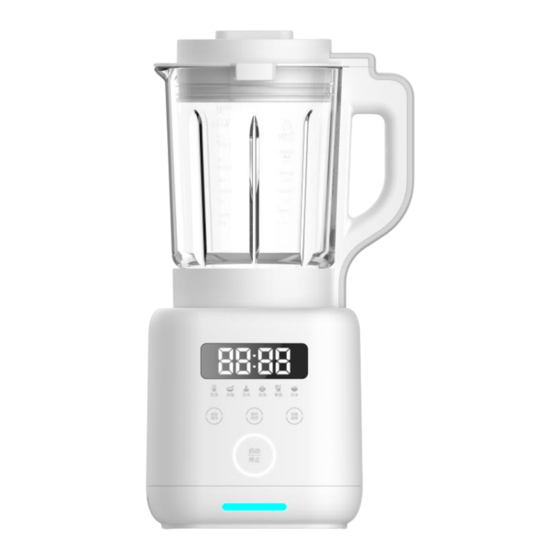
AENO TB2 electric blender 1 General description and specifications 1.1 Purpose of the device Multifunctional electric blender AENO with boiling function is designed for the preparation of various dishes and beverages that require grinding and mixing components. Figure 1 – Appearance of the device ©... - Page 12 Installation and Operation Manual for AENO TB2 electric blender Document version: 1.0.1, aeno.com © ASBISc Enterprises PLC. All rights reserved Page 12 of 44...
-
Page 13: Figure 2 - Elements Of The Device
Installation and Operation Manual for the AENO TB2 electric blender Figure 2 – Elements of the device Elements of the device (see figure 2): – small lid, used to add ingredients to the blender jug during operation – large lid with an opening for a small lid –... -
Page 14: Specifications
Installation and Operation Manual for AENO TB2 electric blender 1.2 Specifications Table 1 – Main technical specifications Parameter Value Product ID Model ATB0002 Control Touchpad Nominal device Input voltage: 220–240 V (AC) parameters Input frequency: 50/60 Hz Input power: 800.0 W Power consumption Standby mode: less than 0.5 W... - Page 15 Installation and Operation Manual for the AENO TB2 electric blender Parameter Value Relative humidity: up to 80 % (no condensation) Storage conditions Temperature: –10...+40 °C Relative humidity: up to 80 % (no condensation) Installation On a flat, horizontal surface Materials...
-
Page 16: Package Contents
Installation and Operation Manual for AENO TB2 electric blender 1.3 Package contents Figure 3 – Package * The AENO multifunction blender comes with the following items (see Table). Table 2 – Scope of supply Figure Name Quantity Blender TB2 1 pc. -
Page 17: Packaging And Labelling
Installation and Operation Manual for the AENO TB2 electric blender 1.4 Packaging and labelling Multifunctional electric blender of the brand AENO is delivered in individual cardboard package of 395×255×300 mm, containing the full name, marking and main technical specifications, as well as date of manufacture and manufacturer information. -
Page 18: Device Control Panel
1.5.1 Control panel buttons Figure 4 – Device control panel On the control panel of the AENO TB2 electric multifunction blender there are 4 (four) indicator buttons, which are used to control the device, as well as 6 indicators of the operating modes. - Page 19 Installation and Operation Manual for the AENO TB2 electric blender Table 3 – Device control panel Symbol Name Description Display operating time heating temperature "ON/OFF" Indicator button for turning the device on or off "Nut/Soy Milk" "Nut/Soy Milk" program indicator "Pastry."...
-
Page 20: Power Monitoring Mode
Installation and Operation Manual for AENO TB2 electric blender 1.5.2 Power monitoring mode To turn the device on in power control mode, place the jug on the motor device and plug the device into the power outlet. The device will go into power monitoring mode. The control panel display will show "- - --". -
Page 21: Self-Cleaning Mode
Installation and Operation Manual for the AENO TB2 electric blender Table 4 – Cooking programs Control panel button Operating time (after Maximum heating boiling) temperature Nut/Soy Milk 23 min 100 °C Pastry 15 min 100 °C Corn/Cereals 18 min 100 °C... - Page 22 Installation and Operation Manual for AENO TB2 electric blender • Press or repeatedly press the "Function" button to select the desired device program. • Press the "ON/OFF" button. The blender will start itself after a set period of time, work the selected program, and then go into standby mode.
-
Page 23: Installation And Operation
AENO TB2 electric blender 2 Installation and operation WARNING! When connecting, operating and storing the AENO electric blender, follow the rules for safe use of the device (see "Limitations and Warnings" section). 2.1 Unpacking and preparing for work Figure 5 – Installation and preparation for operation 1. -
Page 24: Description Of Program Operation
After connecting to the socket the device switches to the power control mode (see paragraph 1.5.2). You can now control it with the touch control panel. 2.2 Description of program operation With the AENO TB2 multifunctional electric blender you can: • Grind the ingredients to a purée;... -
Page 25: Operating The Device
15 seconds. Smoothie Without heating. Grind, mix and whip ingredients at a constant speed for 1 minute. For recipes for cooking with the AENO TB2 multifunctional electric blender, visit aeno.com/recipes. 2.3 Operating the device Prepare the ingredients. It is recommended to cut the ingredients into pieces, no more than 50×50×50 mm. -
Page 26: Figure 6 - Ingredients Preparation
Installation and Operation Manual for AENO TB2 electric blender Figure 6 – Ingredients preparation Place the ingredients in the jug of the blender. Add liquid. There are two vertical scales on the jug: for cold – "Cold" and hot – "Soup" liquids. -
Page 27: Figure 7 - Blender Bowl Label
Installation and Operation Manual for the AENO TB2 electric blender Figure 7 – Blender bowl label Close the large and small covers by turning them counterclockwise. © ASBISc Enterprises PLC. All rights reserved Document version: 1.0.1, aeno.com Page 27 of 44... -
Page 28: Figure 8 - Small Lid Closing Diagram
Installation and Operation Manual for AENO TB2 electric blender Figure 8 – Small lid closing diagram Figure 9 – Large lid closing diagram Document version: 1.0.1, aeno.com © ASBISc Enterprises PLC. All rights reserved Page 28 of 44... -
Page 29: Figure 10 - Installing The Bowl On The Housing
Installation and Operation Manual for the AENO TB2 electric blender NOTE If you open the large lid while the device is running, the blender will stop immediately. If you need to add small amounts of food or spices while the blender is running, you can open the small lid to do so. -
Page 30: Figure 11 - Motor Shaft Connector
Installation and Operation Manual for AENO TB2 electric blender Figure 11 – Motor shaft connector Plug the power cord into a power outlet. After connecting the device to the mains the control panel display will turn on, the "ON/OFF" button will light up blue. The device enters power control mode. -
Page 31: Figure 13 - Extracting The Finished Product
It is not possible to independently set the temperature, cooking time and speed of the knife mechanism in the TB2 model. However, each program can be terminated prematurely by holding down "ON/OFF" button for 3 seconds. -
Page 32: Overload And Overheat Protection
Installation and Operation Manual for AENO TB2 electric blender Then start the self-cleaning mode of the device as described in paragraph 1.5.6 "Self- cleaning mode". It is recommended to clean the device immediately after finishing work to prevent food residue from drying on the walls of the device and the knife mechanism. -
Page 33: Maintenance
Installation and Operation Manual for the AENO TB2 electric blender 3 Maintenance WARNING! Make sure that the device is turned off and disconnected from the power supply before starting maintenance. To maintain optimum condition and stable operation of the device, it is recommended to perform the following actions: •... -
Page 34: Cleaning The Jug And Accessories
Installation and Operation Manual for AENO TB2 electric blender 3.2 Cleaning the jug and accessories To clean the inner surface of the jug use the self-cleaning mode of the device described in paragraph 1.5.6 "Self-cleaning mode". To clean the outer surface of the jug, wipe it with a damp cloth, adding a neutral detergent. -
Page 35: Figure 16 - Electrical Contacts In The Bowl Handle
Installation and Operation Manual for the AENO TB2 electric blender Figure 16 – Electrical contacts in the bowl handle To clean the large and small jug lids and the accessories used during cooking, place them under running water (see figure below). Next, dry thoroughly. The use of neutral detergents is allowed. -
Page 36: Figure 17 - Cleaning The Device Covers
Installation and Operation Manual for AENO TB2 electric blender Figure 17 – Cleaning the device covers WARNING! Do not wash the body of the device, the handle of the jug, as well as the base of the jug with the electrical contacts and the clutch shaft under running water or immerse in water. -
Page 37: Warranty
4.1 AENO Service Centers For a list of cities where the manufacturer's service is available visit aeno.com. © ASBISc Enterprises PLC. All rights reserved Document version: 1.0.1, aeno.com... -
Page 38: Warranty Service Procedure
Installation and Operation Manual for AENO TB2 electric blender 4.2 Warranty service procedure If you discover an assumed flaw or defect in the device, you should contact an authorised service centre before the expiry of the warranty and provide the following: 1. - Page 39 Installation and Operation Manual for the AENO TB2 electric blender • if the serial number (the factory stickers), date of manufacture or model name on the body of the device has been removed, erased, damaged or altered in any way, or is illegible;...
-
Page 40: Storage, Transportation And Disposal
Installation and Operation Manual for AENO TB2 electric blender 5 Storage, Transportation and Disposal The product can be transported at any distance by any type of transport that ensures the safety of the device, in accordance with the rules of cargo transportation operating on a particular type of transport. -
Page 41: Other Information
GSTU EN 50564:2016, 55014-1:2016, 55014-2:2015, 60335- 1:2017, 60335-2-65:2015/ ed. No. 11:2015 November 9, 2021 GSTU EN IEC 63000:2020 of November 9, 2021 The addresses of the service centers can be found at aeno.com under "Service and warranty". © ASBISc Enterprises PLC. All rights reserved Document version: 1.0.1, aeno.com... -
Page 42: Troubleshooting
Installation and Operation Manual for AENO TB2 electric blender 7 Troubleshooting Table 6 shows typical problems that occur when connecting and configuring the device, and possible ways to fix them Table 6 – Typical problems and solutions № Problem Possible causes... - Page 43 Installation and Operation Manual for the AENO TB2 electric blender № Problem Possible causes Solution Blender heats up, Electrical circuit short Contact the service centre blade does not circuit rotate The device shut Overheat or overload fuse Follow the instructions in...
-
Page 44: Glossary
Installation and Operation Manual for AENO TB2 electric blender 8 Glossary Class II The electrical safety class that implies protection against electric shock is provided by the use of double or reinforced insulation. No enclosure grounding is required. The plug does not have a grounding contact.
Need help?
Do you have a question about the TB2 and is the answer not in the manual?
Questions and answers