Table of Contents
Advertisement
Quick Links
Advertisement
Table of Contents

Related Manuals for ERT SpiroSphere


Summary of Contents for ERT SpiroSphere
- Page 1 Instructions for Use ® SpiroSphere 781235 Version 00.16...
-
Page 2: Indications For Use
Indications for Use The SpiroSphere is a diagnostic compact device to measure inspiratory and expiratory lung function parameters in adults and children. In addition the SpiroSphere can collect, store and transfer vital data from other external devices. Federal U.S. law restricts this device to sale by or on the order of a physician. -
Page 3: Table Of Contents
Device Description......................5 Unpacking and Starting Operation ..................5 The SpiroSphere ......................6 Start-Up ...........................7 Troubleshooting .......................9 LED Status SpiroSphere ....................9 LED Status SpiroSphere Sensor ..................9 Sensor insert .........................10 Setup .......................... 11 The Home Screen ......................13 Sensor Check .......................14 Calibration Check ......................14 Linearity Check ......................16 Add Patient ........................17... -
Page 4: Notes On Safety In This Instruction Manual
Additional icons used in this manual: Important information on operation and other useful information. Does not warn of dangerous or harmful situations. Tips, general information and information on operation. Declaration of Conformity The original Declaration of Conformity document can be obtained from ERT. Page 4/84... -
Page 5: Device Description
The SpiroSphere Sensor is paired via Bluetooth with the Main Unit. A printer can be connected with the SpiroSphere and all needed data can be printed. Moreover, it is possible to transfer data via USB, WiFi, 3G and Ethernet. -
Page 6: The Spirosphere
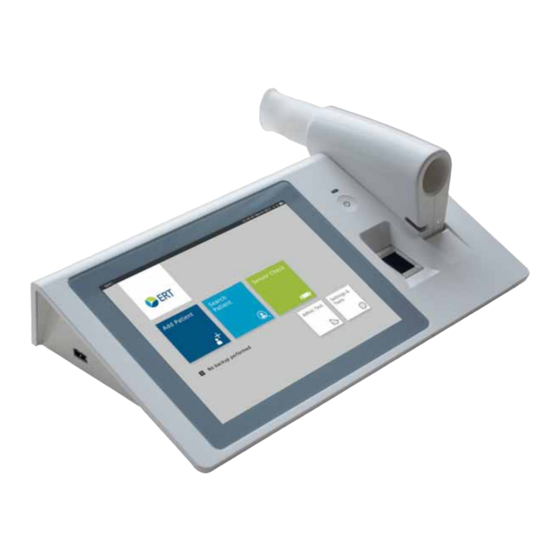
SpiroSphere ® Instructions for Use The SpiroSphere SpiroSphere Sensor Power On/Off Front view: Main Unit: Fingerprint Main Unit Sensor LCD touch display Rear view: Speaker Charging Cradle Power SpiroSphere Sensor: LED Status Indicator ERT PT with Mouthpiece Power On/Off Page 6/84... -
Page 7: Start-Up
SpiroSphere ® Instructions for Use Power supply: Mains adapter Start-Up 1. Connect the SpiroSphere to a power 2. Put the SpiroSphere source complying with local regulations. Sensor into the slot of the main unit as shown below. Power Supply Connection 3. - Page 8 5. Ensure an ERT PT is inserted into the SpiroSphere Sensor. ERT PT with mouthpiece ERT PT is only for single use. Do not reuse the ERT PT due to risk of cross contamination. Do not remove the mouthpiece from the ERT PT. Only use the ERT PT with connected mouthpiece.
-
Page 9: Troubleshooting
Orange LED Low battery Connect Main Unit to a blinking power socket LED Status SpiroSphere Sensor Only the highest priority LED at a time is turned on (LED priority: Orange - Blue). Orange LED On Charging in cradle Orange LED Off... -
Page 10: Sensor Insert
Sensor insert Take care that you have aligned the rail with the sensor holes of the PT tube with the grooved edge of the SpiroSphere Sensor (as below) when inserting the ERT PT into the SpiroSphere Sensor: rail with sensor holes The ERT PT should be inserted fully without force. -
Page 11: Setup
SpiroSphere ® Instructions for Use Setup Enter the Global Password and press <OK>. (The preset global password is "691982".) The System Setup wizard starts automatically. Follow the system setup steps (step 1 - 6) and enter or select the appropriate settings. Tap on <Next... - Page 12 Instructions for Use 3. Sensor Settings Tap on <Scan> to scan for available sensors. Tap on the sensor you want to pair the SpiroSphere with and select <Pair> from the dropdown menu. Next>. 4. Ethernet Settings Choose the appropriate settings Next>.
-
Page 13: The Home Screen
Instructions for Use The Home Screen After the SpiroSphere has been set up, upon powering on the device the following screen appears: Here, you can select the submenus "Add Patient", "Search Patient", "Sensor Check", "Adhoc Test" as well as "Settings and Tools" by tapping on the respective button. -
Page 14: Sensor Check
In order to perform a calibration check, tap on <Calibration Check>. Following screen appears: Ensure a new ERT PT (with mouthpiece removed) is connected to the 3 L calibration syringe via an adapter (as shown). Proceed by tapping <OK>. A zero adjustment of the connected SpiroSphere Sensor will be performed automatically. - Page 15 SpiroSphere ® Instructions for Use The calibration check With each syringe stroke, the volume accuracy should be within ± 3 %. High Ex Mid Ex Low Ex Low In Mid In High In ± 3 % is not relevant and will be discarded. There should be one pump stroke in each of the 1 syringe stroke = pump twice, i.e.
-
Page 16: Linearity Check
SpiroSphere ® Instructions for Use Linearity Check In order to perform a linearity check, tap on <Linearity Check>. Proceed as described in the "Calibration Check" section. With each syringe stroke, the volume accuracy should be within ± 3 %. is not relevant and will be discarded. Three pump strokes are required in each of the 1 syringe stroke = pump twice, i.e. -
Page 17: Add Patient
SpiroSphere ® Instructions for Use Add Patient entered. Predicted values are calculated from patient data, so verify that the entered data are correct. Incorrect patient data produces incorrect predicted values! To add a new patient to your patient directory, tap on the "Add Patient" button on the Home Screen. - Page 18 SpiroSphere ® Instructions for Use Age: The Patient's age will be calculated automatically from the entered date of birth Gender: Select appropriate gender Height: Enter the Patient's height Weight: Enter the Patient's weight Ethnicity: Select the appropriate ethnicity Additionally, there is an option to enter:...
-
Page 19: Search Patient
SpiroSphere ® Instructions for Use Search Patient When a patient whose data is already stored in the database comes for another visit, you can reload his/her data from the patient directory. You do not have to enter the data again. - Page 20 SpiroSphere ® Instructions for Use Tap on <Start> to display the patient's personal data on the left. In the "Actions"section, all conductable actions are listed. The "Previous Actions" section shows the actions already performed for the Tap on <Edit> to display the patient's demographic information. If incorrect patient data was entered or if the patient data need to be updated (e.g.
-
Page 21: Actions
A "Warning" appears: Tapping on "Yes" will irrevocably delete the selected patient including all saved measurements performed for that patient! Actions SpiroSphere is capable of performing different types of measurements. The different options are displayed on the screen. Forced Pre Spirometry... -
Page 22: Preparing A Measurement
Current relative humidity (%) Current barometric pressure (hPa) When the test is started, an automatic zero adjustment of the connected ERT PT is performed. Hold the SpiroSphere Sensor still and wait for the zero adjustment to be completed before approaching the mouthpiece. -
Page 23: Perform A Forced Spirometry Measurement
Therefore, ambient data must be updated at regular intervals. Incorrect or imprecise ambient data will result in incorrect measurement results. The SpiroSphere must not be exposed to direct sunlight nor positioned immediately near heating elements. - Page 24 SpiroSphere ® Instructions for Use Screen display: Tapping on the "i"-symbol will display information on the measurement procedure. Without interruption, the patient should immediately exhale as fast and as much (FEV1) and as FVCin ). According to the ATS/ERS FEV1/FVC...
- Page 25 SpiroSphere ® Instructions for Use The upper left part of the chart section shows the recording of the part shows the volume-time tracing. The lower section of the screen displays the predicted values calculated from the patient data and the actual values measured from...
- Page 26 SpiroSphere ® Instructions for Use Change View: Screen display volume-time tiffaneau curve: curve: Curves superimposed: Return to Home Screen Return to Patient Details Print Report The lower section displays the quality assessment according to ATS/ERS 2005 guidelines: = no acceptability errors...
- Page 27 SpiroSphere ® Instructions for Use Deactivate/reactivate efforts can be deactivated. The system can also automatically deactivate efforts as a result of system detected ATS/ERS acceptability errors. Behaviour Procedure: Mark the effort to be deactivated (in our example Effort 4). Following window appears: Tap on <Deactivate>.
-
Page 28: Perform A Slow Spirometry Measurement
Perform a Slow Spirometry Measurement Make the proper preparations according to ATS/ERS guidance. When the test is started, an automatic zero adjustment of the connected ERT PT is performed. Hold the SpiroSphere Sensor still and wait for the zero adjustment to be completed before approaching the mouthpiece. - Page 29 SpiroSphere ® Instructions for Use ) followed by ). Then, continue to breathe normally. VCin ERV/VCin In order to reach the end-expiratory level the following two criteria must be complied with according to ATS/ERS. 1. Duration of expiration (ERV) Patients must exhale for at least 6 seconds.
- Page 30 SpiroSphere ® Instructions for Use The upper section of the chart section shows the recording of the volume-time curve. The lower section of the screen displays the predicted values calculated from the patient data and the actual values measured from According to ATS/ERS criteria, at least three efforts should be performed.
-
Page 31: Dosing
SpiroSphere ® Instructions for Use Dosing Before the post-measurement is started you can input Medication, the Medication time and the Technician name. Tap <Dosing>. Tap on <Enter Dosing> The following data can be entered: Medication: Enter the Medication, e. g. Albuterol/Salbutamol... -
Page 32: Perform A Post Spirometry Measurement
SpiroSphere ® Instructions for Use Perform a Post Spirometry Measurement The Flow-Volume curve shows the immediate bronchospasmolytic effect. The expiratory portion of the Flow- forced expiratory volume after 1 sec (FEV1) as well as forced vital capacity (FVC) changes. Screen display after the "Pre Measurement": Screen display after the "Post Measurement":... - Page 33 SpiroSphere ® Instructions for Use Report: Page 33/84...
-
Page 34: Adhoc Test
SpiroSphere ® Instructions for Use Adhoc Test With the Adhoc Test application it is possible to perform a Spirometry measurement without having to register the patient beforehand. For example: An Adhoc test can be performed if a prompt measurement of a patient is urgently required (e.g. -
Page 35: Assign Adhoc Test Now
SpiroSphere ® Instructions for Use Assign Adhoc Test now Tap on <Yes>. The "Patient Directory" is displayed: Tap on <Add> and enter the respective patient data (see chapter "Add Patient" for details). Following window appears: Finish by tapping <OK>. Page 35/84... -
Page 36: Assign Adhoc Test Later
SpiroSphere ® Instructions for Use Assign Adhoc Test later Tap on <No>. The patient which is not registered yet will appear as "Adhoc Patient" in the "Patient Directory". In order to assign a patient to the Adhoc test performed, tap on "Adhoc Patient". -
Page 37: Show, Edit, Delete And Print Tests
SpiroSphere ® Instructions for Use Show, Edit, Delete and Print Tests Tap on <Show> to display the results of the selected test on the screen: Page 37/84... - Page 38 SpiroSphere ® Instructions for Use Existing patient data can be edited (if e.g. the patient's body weight or height (e.g. in children) has changed in the meantime) by tapping on <Edit>. The selected test can be deleted with <Delete>: Tapping on <Yes> will irrevocably delete the selected test! Tap on <Print>...
- Page 39 SpiroSphere ® Instructions for Use The selected patient including all measurements performed with the respective patient can be deleted by tapping on <Delete Patient>: Tapping on <Yes> will irrevocably delete the selected patient and all respective tests! Tap on <Delete All Tests> to delete all measurements performed with the selected patient: Tapping on <Yes>...
-
Page 40: Print Recorded Results
Tap on <OK> to send the report to SpiroSphere Report: BestEffortReport_20160815_155247+0200.zip For this option, an USB printer needs to be connected to the SpiroSphere For this option, the SpiroSphere needs to be connected to the network See chapter "Settings and Tools > Report & Printing"... -
Page 41: Settings And Tools
SpiroSphere ® Instructions for Use Settings and Tools The following includes a short description of settings which are not required for daily routine work. Tap on the "Settings & Tools" button on the Home Screen. The following will appear: General Tap on "General"... - Page 42 SpiroSphere ® Instructions for Use Regional Setting options: Preset: English (US), German English (US) cm. in kg. lb Sound Setting options: Preset: select Power Management Preset: select 100% select 100% select 5 min select 2 min select 10 min select...
- Page 43 Tap on "Spirometry Settings" Spirometry Settings - Sensor Sensor Connection Active: The SpiroSphere Sensor is connected to the SpiroSphere via Bluetooth Not paired: The SpiroSphere Sensor is not connected to the SpiroSphere Battery: Indicates the battery status of the SpiroSphere Sensor...
- Page 44 SpiroSphere ® Instructions for Use Spirometry Settings - General Predicted Values Setting options: Preset: None GLI 2012 GLI 2012 NHANES III ECCS/Zapletal Knudson/Crapo Extrapolate Limits from Author Limits from Author No calculation outside limits Module Height range Differentiation acc. to Race...
- Page 45 SpiroSphere ® Instructions for Use Sensor Check Setting options: Preset: 1, 2, 3 1, 2, 3, 4 2, 3, 4, 5, 6, 7, 8 ON, OFF Ambient Conditions Setting options: Preset: °C, °F °C hPa, mmHg Unit Groups Setting options:...
- Page 46 SpiroSphere ® Instructions for Use Decimals Setting options: Preset: 0, 1, 2, 3, 4 0, 1, 2, 3, 4 0, 1, 2, 3, 4 0, 1, 2, 3, 4 0, 1, 2, 3, 4 0, 1, 2, 3, 4 0, 1, 2, 3, 4...
- Page 47 SpiroSphere ® Instructions for Use Setting options: Preset: Automatic Automatic Diagram Scaling Adult Diagram Scaling Child 16 L/s, 12 L/s, 8 L/s , 4 L/s If “Automatic FVC as FEV2 ON, OFF FVC as FEV3 ON, OFF ON, OFF FVC as FEV6 If “ON“...
- Page 48 SpiroSphere ® Instructions for Use Setting options: Preset: FEF calculation Base individual FVC individual FVC FIF calculation Base VC max If “individual FVC“ is selected, the FEF or the FIF values will be calculated based on FVC. Setting options: Preset:...
- Page 49 SpiroSphere ® Instructions for Use Setting options: Preset: Display Inspiratory ON, OFF ON means: the inspiratory portion of the Flow-Volume curve is displayed. OFF means: the inspiratory portion of the curve will not be displayed. The setting can be changed during the measurement.
- Page 50 SpiroSphere ® Instructions for Use Spirometry Settings - Forced Spirometry Quality Feedback Setting options: Preset: ON, OFF ON, OFF ON, OFF Error Error Warning As the quality of a spirometry measurement strongly depends on the patient's Quality Feedback documented in an "Example" report:...
- Page 51 SpiroSphere ® Instructions for Use Spirometry Settings - Slow Spirometry Measurement Setting options: Preset: Automatic, 12, 9, 6, 4 L Automatic Automatic, 12, 9, 6, 4 L Automatic VCin, VCex, VCmax, IC, ERV VCmax ERV VC-, IC VC-Maneuver ERV VC-Maneuver...
- Page 52 SpiroSphere ® Instructions for Use Parameter Selection Forced Spirometry - Displayed Parameters The"Shown Parameters" column displays the parameters shown in the result screen of the forced spirometry measurement. Preset: FEV1 FEV1/FVC MMEF Scroll down to display further parameters FVCin (if applicable) The"Not active parameters"...
- Page 53 SpiroSphere ® Instructions for Use Slow Spirometry - Displayed Parameters The "Shown Parameters" column displays the parameters shown in the result screen of the slow spirometry measurement. Preset: VCin VCmax Scroll down to display further parameters (if applicable) The "Not active parameters" column displays all parameters which can be selected to be shown during a measurement.
-
Page 54: User Management
This tool enables an authorized person to create an Administrator account. The newly created administrator will then be able to create additional accounts for individuals authorized to work with the SpiroSphere. Additionally, it is possible to register your From "Settings" select "User Management"... - Page 55 SpiroSphere ® Instructions for Use The following screen appears: Options for role type: Administator User Support system access. Patients Administrator User Support New patient Search patient View patient details Change patient demographics View measurements Perform measurements Print reports Sensor Check...
- Page 56 SpiroSphere ® Instructions for Use System Administration Add or change user Deactivate/activate user Recover Change date and time settings Update software Select <YES> to register Tap <Next Save”.) The following screen appears: Page 56/84...
- Page 57 SpiroSphere ® Instructions for Use Page 57/84...
- Page 58 SpiroSphere ® Instructions for Use Save>. The following screen appears: Tap <Yes the respective user. Page 58/84...
- Page 59 SpiroSphere ® Instructions for Use You can login via entry of Username and Password. User Directory When User Management is active, additional items appear in the Settings screen: Select "User Directory" The User Directory is displayed: Page 59/84...
- Page 60 SpiroSphere ® Instructions for Use Add User It is possible to add a new user from the User Directory. To add a new user, tap <Add User>. Make the appropriate entries and, if Change Password Access to the User details, and...
- Page 61 SpiroSphere ® Instructions for Use Edit User To edit the currently selected user, tap <User Details appears: Make the appropriate changes and tap <Next registration (see above). Save”.) Deactivate User /Reset Password An Administrator is able to activate/ deactivate a user and to reset the password (with a temporary Tap <Deactivate User>...
- Page 62 SpiroSphere ® Instructions for Use To reset the password for another user, tap <Reset Password>. The following screen appears: The user will be required to change their password upon their login. Change Security Question From "User Management Settings current user.
- Page 63 SpiroSphere ® Instructions for Use Backup & Recover A backup of all saved patient- and test data should be performed and saved to a USB- Stick on a regular basis. Tap on "Backup & Recover". Alternatively, tap on the "No backup performed Home Screen.
- Page 64 Instructions for Use If “Perform Recover“ is selected, the message "Please ensure USB Stick for Recover is Inserted" appears. Recover Insert Backup USB stick Tap on “All Data“ to reload all data into the patient directory of your SpiroSphere. Page 64/84...
- Page 65 SpiroSphere ® Instructions for Use Communication Tap on "Communication" Settings. Network Requirements WiFi Tap on the desired WiFi network. Tap <Connect> to initiate the connection. Page 65/84...
- Page 66 SpiroSphere ® Instructions for Use Enter the password as applicable and tap <Connect>. Ethernet Choose the appropriate settings. If DHCP is set on "Off", then you can manually enter the appropriate settings. Page 66/84...
- Page 67 SpiroSphere ® Instructions for Use Report & Printing SpiroSphere allows for reports to be printed with an external printer. In addition, recipient. Tap on "Report & Printing" Printer Setting options: Preset: Printer, PDF via Email, PDF via USB PDF via Email...
- Page 68 SpiroSphere ® Instructions for Use Reports Setting options: Preset: Input Customer Name Input Customer Address Best Effort Report Best Effort Report All Efforts Report Email Input Username Input Password Input Email Address Input Server Name Input Port Input SSL Print Job...
-
Page 69: Update
SpiroSphere ® Instructions for Use Update Tap on <Search for Update>. The device will search for updates on the connected USB stick. Tap on <Start Update> to begin the update process. List of available updates About Device Restore Default Settings Factory reset A detailed description of this tool is not part of this Instructions for Use. -
Page 70: Cleaning/Hygiene
Dispose nose clips after every patient Reuse may lead to patient infections. ERT PT and mouthpiece are parts for single use only. These parts must be disposed after each single use. If reused, infection may occur. Reprocessing may deteriorate the part, resulting in reduced stability and leakage through micro cracks or releasing micro particles that could be inhaled. - Page 71 If the patient's history shows a dangerous infectious disease (e.g. tuberculosis), all parts which had been in direct or indirect contact with the patients must be disinfected. Do not clean or disinfect the Main Unit or the SpiroSphere Sensor while the devices are in operation. Precleaning and Disinfection parts.
-
Page 72: General Safety Precautions
This medical device safely insulates the subject from the mains power supply as required in the safety regulations on leakage current according to EN 60601-1, Type BF. Nevertheless, a open interfaces and connectors of the SpiroSphere Main Unit to avoid any contact with electrical voltage. - Page 73 Portable RF communications equipment (transmitters) (including appropriate accessories such as aerial wires and external antennas) should be operated with a minimum distance of 30 cm (21 inch) to the SpiroSphere's components reduction of the device's performance. Page 73/84...
- Page 74 Installation and assembly of the device must be done only in compliance with this Instructions for Use. SpiroSphere Sensor), a function test (e.g. calibration check) has to be performed. The Main Unit must be placed outside the patient environment during measurement.
- Page 75 Always be sure to disconnect the devices/systems from the mains power before cleaning or disinfecting. The Main Unit corresponds to protection class IP21, the SpiroSphere Sensor to class IP20. The device may not be soaked in liquid of any kind. Liquid inside the device/ system may lead to harm of the user and can destroy the device.
- Page 76 ERT Customer Care. The device must not be opened. If it is opened without authorization the guarantee entitlement expires. ERT Customer Care is always at your disposal with help and assistance in case of problems.
-
Page 77: Graphical Symbols
Alternating current at the rear side of the Main Unit. Attention! The typeplate on the SpiroSphere sensor is positioned at the left side. ON/OFF (device connected to/disconnected from the power supply system) Follow the instructions for Use! Year of Production... - Page 78 - To charge the SpiroSphere Sensor, use only the Main Unit Cradle and observe the instructions in the manual! - To charge the Main Unit, use only the provided power supply.
- Page 79 1710 to 1785 MHz 1 Watt GSM, GPRS and EDGE -1.1dBi PCS 1900 1850 to 1910 MHz 1 Watt GSM, GPRS and EDGE ERT complies with EMC guidelines according to EN60601-1-2. ERT can provide further information on EMC properties on request. Page 79/84...
-
Page 80: Notes On Emc According To En60601-1-2
The use of accessories not recommended by ERT may result in an increased electromagentic radiation or a reduced interference immunity of the SpiroSphere. The SpiroSphere uses RF energy for internal function. Therefore, its RF emissions are very low and are not likely to cause any interference to nearby electronic equipment. The SpiroSphere is suitable for use in all establishments including domestic and those directly connected to the public low-voltage power supply network that supplies buildings used for domestic purposes. -
Page 81: Technical Data
3 h. Full charging: 2 h Cycle life: 70% of rated capacity after 350 cycles SpiroSphere Sensor Built-in rechargeable lithium-ion battery 3.7 V, 640 mAh. Battery will last under standard operating conditions for about 3 days in standby and 2.5 h operation. - Page 82 FEV1 and FVC: 0.1 to 8 L: ± 3% of reading or ± 0.050 L Resistance Spirometer max. 135 Pa/L/s at 14 L/s Instantaneous Flow 0.1 – 14 L/s: +/- 5% or 0.2 L/s The expected operational lifetime of the SpiroSphere is 7 years. Page 82/84...
-
Page 83: Item Numbers Of Disposables And Accessories
SpiroSphere ® Instructions for Use Item Numbers of Disposables and Accessories Use ERT accessories and spare parts only! 720254 Manual calibration syringe, 3 L 852740 Syringe Adapter D 28 mm, L 60 mm 892120 Plastic nose clip 892121 Nose clip pad "foam material", disposable,... - Page 84 All rights reserved eResearchTechnology GmbH Sieboldstrasse 3 97230 Estenfeld, Germany +49 9305 720-9891 tel +49 9305 720-7891 fax...
Need help?
Do you have a question about the SpiroSphere and is the answer not in the manual?
Questions and answers