Table of Contents
Advertisement
Quick Links
Advertisement
Table of Contents

Related Manuals for Winland EAPro

Summary of Contents for Winland EAPro
- Page 2 Winland Electronics, Inc. Limitations of the Alarm System or Device. While your alarm system or device is reliable and sophisticated, it does not offer guaranteed protection against burglary, fire or other emergency. Any security product, whether commer- cial or residential, is subject to compromise or failure-to-warn for a variety of reasons. These include: •...
- Page 3 NOTE: As of Firmware 22.11.11, the EAPro-Gateway sends notifications to INSIGHT, however INSIGHT does not send out notifications to text/emails as this time. Page iii...
- Page 4 Winland Electronics, Inc. Page Left Blank Page iv...
-
Page 5: Table Of Contents
TABLE OF CONTENTS Foreword Safety Information General Information Overview How to Use This Manual Symbols On the Product or Manual Labeling Relay Block Diagram EAPro ‑Gateway ® Home Screen Access Control Connections Configuration Parameters Sensors Sensor Programming and Parameter Descriptions... - Page 6 Winland Electronics, Inc. Clear Notification Logs Clear Sensor Logs Export Logs Data Logs Maintenance Edit Sensor Replace Wireless Transmitter Delete Sensor Pause Sensor Test Sensor Edit User Delete User Configure User Mode Sync Users Save System Configuration Edit Network Wi‑Fi...
- Page 7 LIST OF FIGURES Figure 1: EAPro ‑Gateway ® Figure 2: EAPro ‑Gateway Block Diagram ® Figure 3: EAPro ‑Gateway Front ® Figure 4: Home Screen Sensor Tile Figure 5: Home Screen Tile Examples Figure 6: Connections Figure 7: Wiring Diagram for 4–20mA Sensor –...
- Page 8 Winland Electronics, Inc. Page Left Blank Page viii...
- Page 9 Table 17: Wireless MultiFunction Transmitter Table 18: Voltage Selection Matrix for 4–20mA Sensors Table 19: Sensor Programming Parameter Descriptions Table 20: Relay Operation Conditions Table 21: Troubleshooting Table 22: Specifications: EAPro ‑Gateway ® Table 23: Specifications: Sensors Table 24: Specifications: Accessories...
- Page 10 Winland Electronics, Inc. Page Left Blank Page x...
-
Page 11: Foreword
Form C relay outputs used with the EAPro ‑Gateway. Connecting ® AC‑mains type circuits to the EAPro ‑Gateway ® may result in an electric shock and/or fire hazard. Connect only sensors specified in this manual to the wired and wireless input connections. - Page 12 Caution on page 28. CAUTION Do not connect or disconnect power, sensor, or alarm wiring while power is applied. Connecting and disconnecting sensors or alarm wiring when power is applied to the EAPro ‑Gateway ® may damage the EAPro ‑Gateway or result ®...
- Page 13 Foreword To satisfy RF exposure requirements, this device and its antenna must operate with a separation distance of at least 20 cm from all persons. ‑‑‑‑‑‑‑‑‑‑‑‑‑‑‑‑ Conformément au CNR‑Gen, section 8.4 Cet appareil est conforme aux normes RSS d’Industrie Canada exemptes de licence. Le fonctionnement est soumis aux deux conditions suivantes : (1) ce dispositif ne peut pas causer de brouillage, et (2) ce dispositif doit accepter toute interférence,...
-
Page 14: General Information
The alarm signals are provided via relay outputs that can operate with process controls, security systems, or other similar automated equipment. The EAPro -Gateway system ®... -
Page 15: How To Use This Manual
Click highlighted material to navigate within the document. This manual is organized into sections that guide Installation, Program, Operation, and Maintenance of the EAPro -Gateway system. Troubleshooting guidelines are also provided as ® well as Specifications and Warranty and Service Information. -
Page 16: Symbols On The Product Or Manual Labeling
Winland Electronics, Inc. SYMBOLS ON THE PRODUCT OR MANUAL LABELING Symbols appearing on the product labeling, packaging, and/or in this manual are shown and described in Table 1. Table 1: Symbols on Product or Manual Labeling SYMBOL DEFINITION Attention, consult accompanying documents or statements. - Page 17 General Information Model: EAPro ‑Gateway This device complies with part 15 of the FCC Rules. Operation is subject to the ® • FCC ID: following two conditions: V5SEAPGTWY‑0822 (1) This device may not cause harmful interference, and • IC: (2) this device must accept any interference received, including interference that 7635A‑EAPROGTWY...
-
Page 18: Eapro ® -Gateway
The relay provides an output signal for an optional audible alarm or strobe that is activated whenever any alarm condition exists. The EAPro -Gateway may also be ®... -
Page 19: Table 2: Eapro ® -Gateway Parts: Description
Note: Pressing the Cancel/Silence key does NOT reset the relay. USB Port See Connections. Rear Mounting Plate The rear mounting plate is connected with a hinge. The EAPro ‑Gateway may be ® attached to a standard 3gang electrical enclosure or mounted directly to a wall. -
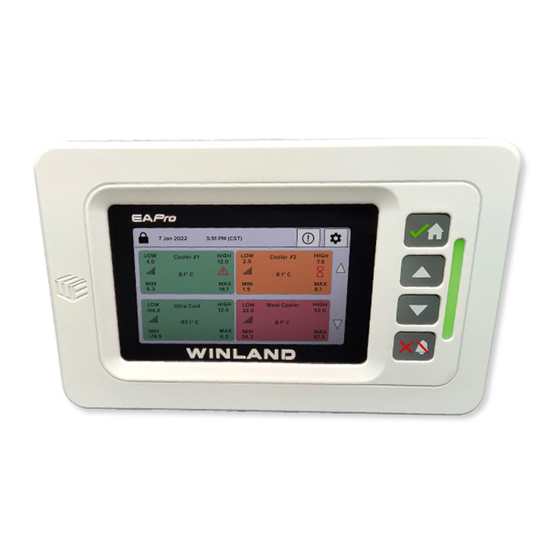
Page 20: Home Screen
Winland Electronics, Inc. Table 3: Icons on Touchscreen SYMBOL NAME DEFINITION Lock The touchscreen is locked when this displays in the upper left corner of the touchscreen. Tap icon to go to Login Screen. Unlock The touchscreen is unlocked when this displays in the upper left corner of the touchscreen. -
Page 21: Figure 4: Home Screen Sensor Tile
General Information Table 4: Home Screen Display NUMBER NAME DESCRIPTION Lock/Unlock Icon Tap and enter code to lock and unlock. Date and Time Current date and time. See Section 4‑3 to change format. Quick Access Buttons Info Exclamation quick acccess button for data menu. Gear quick access button for main menu. -
Page 22: Figure 5: Home Screen Tile Examples
Winland Electronics, Inc. Signal Strength Bars Signal strength bars indicates connection to wireless sensor. (NG Review) “Err” (NG Review) will display in sensor reading if signal strength is zero bars. Sensor Reading Current sensor reading. (NG Review) “Err” (NG Review) will display in sensor reading if signal strength is zero bars. -
Page 23: Access Control
General Information LOW and HIGH sensor settings for alarm limits: when the temperature is below ‑114 °C or above 12 °C the sensor would be in a pending alarm status based on a timedelay, if there is no timedelay sensor would be in alarm status. -
Page 24: Table 7: User Access Levels
Users are identified in the Event Log and User Log by their Username. Username is an email address. A PIN is a 4–6 digit numeric code that offers an additional layer of security to perform activities. User information may be entered at the EAPro -Gateway or via INSIGHT (sold separately). - Page 25 -Gateway is locked. Tap the Closed Lock icon and enter a PIN to access restricted options. ® Full Lock In the Full Lock level, the console is locked on boot up and the EAPro -Gateway locks after ® 5 minutes of inactivity (no touchscreen or key activity). Access to most menus and screens is restricted to view only and must be unlocked.
-
Page 26: Connections
FUNCTION USB Type A connection used to program firmware, export logs, and export and import configuration files. Power In 11–26 VDC input power connection for EAPro ‑Gateway (from ® accessory power supply or alarm panel). CAUTION: Observe (+) and (‑) polarity markings on circuit board. -
Page 27: Configuration Parameters
SENSORS The EAPro -Gateway accepts a variety of sensors to provide environmental status and ® information. These include wired and EAPro wireless sensors for conditions that include ® temperature, humidity, and the presence of water. Additional options include dry contact closure sensors and the use of industry standard 0–5V, and 4-20mA sensors. -
Page 28: Table 11: Wired Temperature Probes
Wired temperature probe options include probes for high, low, and ultralow temperature ranges (see Table 11). Probe options are stainless steel and waterproof. Select a waterproof sensor for cooler monitoring applications. Note: The Wireless Multi-Function Transmitter (EAPro -WFMT) accepts the wired temperature ®... -
Page 29: Table 14: Dry Contact Sensors
Wireless sensors can be standalone temperature (EAPro -WTS) or humidity (EAPro -WHS). ® ® Hardwired sensors can be wired to a wireless multifunction transmitter (EAPro -WMFT). ® Wireless Temperature Sensor EAPro -WTS (wireless temperature sensor) is a standalone wireless sensor for temperature ®... -
Page 30: Figure 7: Wiring Diagram For 4-20Ma Sensor
Operation Diagrams Figure 7 shows an example of the loop circuit for a 4–20mA sensor whose minimum operating voltage is 8V or less when connected to an EAPro -Gateway that is powered with 12VDC. ®... -
Page 31: Figure 8: Wiring Diagram For 4-20Ma Sensor - External Power Supply
4–20mA sensor, first identify all of the voltage drops within the current loop. Figure 7 and Figure 8 each show a drop of 4.0 VDC which is the voltage drop generated by connecting the 4–20mA sensor to the EAPro -Gateway using 1000′ of 22 AWG wire. -
Page 32: Sensor Programming And Parameter Descriptions
Winland Electronics, Inc. 22 VDC 18 VDC 23 VDC 19 VDC 24 VDC 20 VDC 25 VDC 21 VDC 26 VDC 22 VDC SENSOR PROGRAMMING AND PARAMETER DESCRIPTIONS This section provides a description of each sensor parameter (see Table 19) for sensor programming. - Page 33 General Information Collection Frequency All Sensors Sets the interval for collecting and recording data from the sensors. The data collection frequency is set per sensor. The system provides a minimum of approximately (TFS 470) 10,000 collected data points (TFS 470) regardless of the frequency selected.
-
Page 34: Relay Operation
DISABLE is selected. Relay Warning RELAY OPERATION This section describes the operation of the relays in the EAPro -Gateway. Relays are ® programmed to provide the desired signal to the alarm panel. Relays are not programmed to a specific sensor, instead they provide an alarm for a specific condition such as an exceeded high alarm limit or an exceeded low alarm limit. -
Page 35: Data Logs
Power is applied to the relay coil. Alarm Power is removed from the relay coil. DATA LOGS The EAPro -Gateway collects data which can be viewed or exported for reporting purposes. ® Logged data includes notifications, events, sensors, and users. View the logged data points on... -
Page 36: Installation
Winland Electronics, Inc. INSTALLATION This section provides instructions for installing the EAPro -Gateway. ® Note: Read the Installation and Program sections in entirety prior to starting any installation or programming work. Note: All product images shown are for illustration purposes only and may not be an exact representation of the product. -
Page 37: Mount The Rear Plate
Dropdown the rear mounting plate of the EAPro -Gateway: ® Pull the rear mounting plate down and hinge away from the EAPro -Gateway main chassis. The ® top retainer tabs on the main chassis disengage from the holes in the rear plate. -
Page 38: Initial Start-Up Procedure
-Gateway, the touchscreen will flash the splash screens ® as the system verifies memory and conducts internal checks. Since no sensors are installed, the initial boot up process will end at the null sensor screen. This indicates the EAPro -Gateway is ®... -
Page 39: Install Wired Sensors
Install wired sensors according to the instructions provided with the wired sensor. Mount the wired sensor in its designated location. Label the sensor wires for easy identification. Route the wires from the sensor to the EAPro -Gateway and dress the wires as required by local ®... -
Page 40: Install Wireless Sensor
Winland Electronics, Inc. Figure 10: Wired Sensor Connection: HA-III+ Figure 11: Wired Sensor Connection: 4–20mA INSTALL WIRELESS SENSOR Install wireless sensors after connecting power and then unlocking the EAPro -Gateway. Install ® wireless sensors one at a time. CAUTION Do not connect or disconnect power, sensor, or... -
Page 41: Figure 12: Wireless Sensor Mac Address And Id Location
Connecting the remote alarm panel before configuring the EAPro -Gateway sensors may result in false alarms at the remote ® panel. Note: Verify the wireless sensor can communicate with the EAPro -Gateway before permanent ® mounting. Record Serial Number Wireless sensors have a model ID code (e.g. - Page 42 Local Lock Setting. If the detection and programming process for a sensor is not completed before the keypad lockout, entered values are lost and the programming procedure must be restarted for the sensor from the beginning. It is recommended that the EAPro -Gateway ®...
-
Page 43: Program
Program PROGRAM This section provides instructions for programming the EAPro -Gateway. ® The EAPro -Gateway may be programmed locally (by default) or remotely via INSIGHT (sold ® separately). When the EAPro -Gateway is installed and powered-up, it is ready to program. -
Page 44: Add Sensor
Winland Electronics, Inc. Note: System configuration changes are recorded in the Event Log. > > > SYSTEM MENU CONFIGURATION MENU 5:51 PM 5:51 PM LOAD CONFIG SAVE CONFIG UPDATE FIRMARE SET DATE & TIME CONFIGURATION LIGHT TIME FORMAT RF CHANNEL... - Page 45 > > Wireless. Sensors Add Sensor 2. The EAPro -Gateway will begin searching for wireless sensors that have been powered ® on. The sensor and wireless connection frequency strength are displayed when a sensor connection is made. Tap on the sensor name to begin programming the sensor.
-
Page 46: Add User
Winland Electronics, Inc. 10. Toggle and set high limit, high limit delay, high limit warning, and high limit warning delay and tap to advance. Confirm The sensor has been added. Tap screen to navigate as desired. Note: Adding a sensor is recorded in the Event Log. -
Page 47: Set System Time And Date Format
Program SET SYSTEM TIME AND DATE FORMAT To set the system time and date format, perform the following procedure starting at the Main Menu: 1. At Main Menu tap > > System Configuration Time Format. 2. Tap on dropdown to select new date format. 3. -
Page 48: Select Rf Channel
CONFIRM CONFIGURE RELAYS When all sensors have been added and programmed, configure the sensors to relays to warn or alarm for specific conditions. The EAPro -Gateway contains four relays. ® To configure relays, perform the following procedure starting at the Main Menu: 1. -
Page 49: Configure Relay State
Program CONFIGURE RELAY STATE Relays must be programmed correctly to provide the desired signal to the alarm panel. Relay states by default are set to de-energized (normally closed relay). To configure relay states, perform the following procedure starting at the Main Menu: 1. - Page 50 Winland Electronics, Inc. > > SYSTEM MENU 5:51 PM SET DATE & TIME CONFIGURATION LIGHT LOCK SETTINGS CANCEL BUZZER Page 40...
-
Page 51: Operation
Operation OPERATION This chapter provides instructions for general system operations. ACKNOWLEDGE ALARM To acknowledge an alarm, perform the following procedure starting from the Home Screen: 1. At Home Screen, tap on sensor tile that is in alarm. 2. At popup, enter PIN (if using), and press: a. -
Page 52: View Notification Log
Winland Electronics, Inc. > > > SENSOR CONFIG SENSOR CONFIG SENSOR CONFIG 5:51 PM 5:51 PM 5:51 PM 32.0 NAME Upper Cooler #1 LOW LIMIT HIGH LIMIT 55.0 TYPE BLUE LOW LIMIT DELAY HIGH LIMIT DELAY 12.0 DEGREE FAHRENHEIT LOW WARNING HIGH WARNING 45.0... -
Page 53: View User Logs
To view the about information, perform the following procedure starting at the Main Menu: 1. At Main Menu tap About. 2. Tap Confirm to advance. > > ETHERNET MAC ETHERNET MAC WINLAND ELECTRONICS INC. SN: 000-0AB8C DATA MENU 5:51 PM XX:XX:XX:XX:XX:XX XX:XX:XX:XX:XX:XX KEY: 41FA-9A11 192.168.0.2... -
Page 54: Clear Sensor Logs
Winland Electronics, Inc. CLEAR SENSOR LOGS To clear the sensor log, perform the following procedure starting at the Main Menu: 1. At Main Menu tap > > Notification Logs Clear Logs Clear Sensor Logs. Note: Clearing sensors logs is recorded in the Event Log. -
Page 55: Maintenance
Maintenance MAINTENANCE This chapter provides instructions for maintaining the system. EDIT SENSOR Occasionally the parameters of a sensor may need to be edited. Use the Edit Sensor meu to quickly edit the desired parameters. Note: Editing sensor parameters is recorded in the Event Log. Edit Sensor Name To edit the parameters of a sensor, perform the following procedure starting at the Main Menu: 1. - Page 56 Winland Electronics, Inc. > EDIT SENOR MENU SENSOR TYPE & NAME 5:51 PM 5:51 PM DEFAULT SETTING NAME NAME & RESOLUTION DROP DOWN GENERAL SETTINGS COLLECTION FREQ UNIT OF MEASURE DROP DOWN LOW WARNING HIGH WARNINGS DETAILS MIN VALUE LOW LIMIT...
- Page 57 Maintenance > Edit Sensor Light (Visual Warning) To edit the parameters of a sensor, perform the following procedure starting at the Main Menu: 1. At Main Menu tap > and tap on desired sensor. Sensors Edit Sensor 2. At Edit Sensor Menu tap General Settings.
- Page 58 Winland Electronics, Inc. Edit Sensor Relay Assignment To edit the parameters of a sensor, perform the following procedure starting at the Main Menu: 1. At Main Menu tap > and tap on desired sensor. Sensors Edit Sensor 2. At Edit Sensor Menu tap General Settings.
- Page 59 Maintenance Edit Sensor High Warnings or High Limits To edit sensor high warnings or high limits, perform the following procedure starting at the Main Menu: 1. At Main Menu tap > and tap on desired sensor. Sensors Edit Sensor 2. At Edit Sensor Menu tap High Warning High Limits.
- Page 60 Winland Electronics, Inc. Edit Sensor Hysteresis To edit sensor schedule, perform the following procedure starting at the Main Menu: 1. At Main Menu tap > and tap on desired sensor. Sensors Edit Sensor 2. At Edit Sensor Menu tap Details.
-
Page 61: Replace Wireless Transmitter
Maintenance > > > SENSOR MENU EDIT SENSORS 5:51 PM 5:51 PM REPLACE Sensor 2 Upper Cooler #1 ADD SENSOR VIEW SENSOR TRANSMITTER West Cooler #16 154 N. Vaccine SIGNAL EDIT SENSOR DELETE SENSOR PERFORMANCE ULTRA COLD -70° Main Phrama PAUSE SENSOR TEST SENSOR CANCEL... -
Page 62: Delete Sensor
Winland Electronics, Inc. > > REPLACE TRANSMITTER - SCAN 5:51 PM SELECT WIRELESS CONFIG UPDATE CONFIRM 5:51 PM 5:51 PM SIGNAL SERIAL NUMBER SELECT WARNING! SYSTEM CHANGE SEARCHING 18AB 254F SN: 01AB SNL 01FD B1AA CANCEL CANCEL CONFIRM BACK CONFIRM... -
Page 63: Test Sensor
Maintenance TEST SENSOR The system will test a sensor’s functionality. To test a sensor, perform the following procedure starting at the Main Menu: 1. At Main Menu tap > and tap on desired sensor. Sensors Test Sensor 2. Tap on desired function to test: a. -
Page 64: Delete User
Winland Electronics, Inc. DELETE USER To delete users, perform the following procedure starting at the Main Menu: 1. At Main Menu tap > and tap on desired user to select for deletion. Users Delete User 2. Enter PIN number. 3. Tap to activate. -
Page 65: Save System Configuration
Maintenance SAVE SYSTEM CONFIGURATION Save System Configuration to USB To save system configuration to USB, perform the following procedure starting at the Main Menu: 1. Insert USB. 2. At Main Menu tap > > > System Configuration Save Config Save to USB. -
Page 66: Edit Network Wi-Fi
Winland Electronics, Inc. EDIT NETWORK WI-FI Edit Network Wi-Fi Manually To edit network Wi-Fi settings manually, perform the following procedure starting at the Main Menu: 1. At Main Menu tap > > Manual. Network Edit Wi‑Fi 2. Enter Network Name. -
Page 67: Edit Ethernet Settings
Maintenance EDIT ETHERNET SETTINGS To edit network Ethernet settings, perform the following procedure starting at the Main Menu: 1. At Main Menu tap > Network Edit Ethernet. 2. Modify settings as needed. 3. Tap to return to Network menu. Confirm Note: Editing Ethernet settings is recorded in the Event Log. -
Page 68: Reset To Factory Defaults
Winland Electronics, Inc. 1. At Main Menu tap > > > System Configuration Update Firmware Load from USB. 2. Scroll to and tap on desired firmware file and tap to activate. Confirm 3. Review warning and tap to load from USB. -
Page 69: Reboot System
Maintenance (REVIEW) Occasionally, an EAPro -Gateway may need to be reset to factory defaults.(REVIEW) ® Resetting to factory defaults does not delete the Event Log. To reset all parameters to factory defaults, perform the following procedure starting at the Main Menu: 1. -
Page 70: Troubleshooting
Verify the received signal strength. communicating with the EAPro ‑Gateway. ® Verify the wireless sensor has a charged battery. WINLAND TECHNICAL SUPPORT Winland Technical Support is available Monday through Friday from 8:00am to 5:00pm Central at 1-800-635-4269, techsupport@winland.com and eapro.winland.com. Page 60... -
Page 71: Specifications
Troubleshooting SPECIFICATIONS This section lists the specifications for the EAPro -Gateway, sensors, and accessories ® EAPro -Gateway Specifications ® Specifications for the EAPro -Gateway are listed in Table 22. ® Table 22: Specifications: EAPro -Gateway ® ITEM SPECIFICATION Dimension 8.13" H x 5.52" W x 1.93" D (20.6cm x 14.0cm x 4.9cm) -
Page 72: Table 23: Specifications: Sensors
Note 2: All terminals must be connected to a Class 2 Power Limited Circuit complying with the National Electric Code NFPA 70, Article 725. Sensor Specifications Specifications for Winland sensors used with the EAPro -Gateway are listed in Table 23. ® Table 23: Specifications: Sensors... - Page 73 Troubleshooting TEMP‑B‑T Buffer Tube TEMP‑S‑K Flat Cable Splice Kit SECTION LEFT BLANK Page 63...
-
Page 74: Warranty And Service Information
Winland Electronics, Inc. (“Winland”) warrants to the original purchaser from Winland that each product of Winland’s that it manufactures shall be free from defects in material and factory workmanship for a period of one (1) year from the date of purchase, when properly installed and operated under normal conditions according to Winland’s instruction. - Page 75 Troubleshooting The sale of product by Winland and the terms in this document shall be governed by, construed and enforced in accordance with the laws of the State of Minnesota, U.S.A., and applicable U.S.A. federal laws, without giving effect to any choice of law rule that would cause the application of the laws of any other jurisdiction.
Need help?
Do you have a question about the EAPro and is the answer not in the manual?
Questions and answers