Table of Contents
Advertisement
Quick Links
Advertisement
Table of Contents

Related Manuals for Fac C3

Summary of Contents for Fac C3
- Page 1 C UTTE R C3 | C5 | C8 f or hous ehol d an d profess ional use USE AND MAINTENANCE MANUAL FAC SRL macchine affettatrici industriali e familiari Via Morazzone, 137 - 21044 CAVARIA (VA) Tel. +39 0331 212252 - Fax. +39 0331 216443 www.slicers.it...
- Page 3 C UTTE R C3 | C5 | C8 f or hous ehol d an d profess ional use USE AND MAINTENANCE MANUAL...
-
Page 5: Table Of Contents
INDEX • USER NOTE ........................ Pag. 3 • GENERAL WARNINGS ....................Pag. 4 • USE WARNINGS ......................Pag. 10 • MANUFACTURER’S WARRANTY AND RESPONSIBILITIES ........Pag. 11 • PACKING ........................Pag. 12 • NAMEPLATES - CONFORMITY MARKINGS ............. Pag. 13 • SUPPLIED ACCESSORIES ..................Pag. 14 • ELECTRICAL AND MECHANICAL SAFETY DEVICES ..........Pag. 16 • TECHNICAL DATA ...................... Pag. 17 • MAIN COMPONENTS ....................Pag. 18 • INSTALLATION ADN PRELIMINARY CHECKS ............Pag. 20 • USING THE MACHINE ....................Pag. 20 • CLEANING ........................Pag. 24 • MAINTENANCE ......................Pag. 27... -
Page 6: General Warnings
- - - - - - - - - - - - - - - - - - - - - - - - - - - - - - - - - - - - - - - - - - - - - - - - - - Safety warnings indispensable before use Carefully read the warnings contained herein since they provide important information regarding safe installation, use and maintenance of the CUTTER C3-C5-C8 machines. The purpose of this pubblication, simply defined ‘manual’ below, is to allow the user, especially to the direct operator to take every measure and to prepare all the necessary human and material resources for a safe and durable use of the. This booklet MUST be kept for all the slicer lifetime and in case of need (example: damage tamperising even partially its consultation, etc.) the user must ask for a new copy... - Page 7 GENERAL WARNINGS If the cutter is transferred, this manual must also be given to the new owner. ☞ The installation must be performed following the instructions of the manufacturer. A wrong installation can cause damages to people, animals or things, in respect of which the manufacturer cannot be considered responsable.
- Page 8 GENERAL WARNINGS • Before plugging the appliance make sure that the data on the label correspond to those of the electrical distribution network. • The plate is on the bottom of the appliance. • For your safety, it is recommended to power the device through a circuit breaker (DRC) with trip current not exceeding 30 mA. • In case of incompatibility between the socket and the plug of the appliance have the die-cast wire and plug with another one suitable by an authorized retailer. In case of tampering the manufacturer doesn’t answer neither for safety, nor for warranty. Alternatively have the socket replaced with a suitable type by a qualified professional. The latter, in particular, will also have to ensure that the section of the socket cables is suitable for the power absorbed by the appliance. In general it is not advisable to use adapters, multiple sockets and/or extensions. • Do not connect the appliance to the electrical power through external timers or remote operating systems.
- Page 9 GENERAL WARNINGS • If you decide not to use a device of this type any more, it must be made inoperative by cutting the power cord after removing the plug from the socket. It is also recommended to make harmless those parts of the equipment which may constitute a danger, especially for children who might use an abandoned appliance for their games. • To avoid dangerous overheating, it is recommended to extend the power cord to its full length and use the appliance as recommended in “USING THE MACHINE”. ☞ During the functioning, the socket must be easily accesible in the event that becomes necessary to unplug the appliance. Do not place the appliance under a socket so that the wire doesn’t interfere with the correct use of the machine.
- Page 10 GENERAL WARNINGS ☞ Place the appliance on a horizontal and firm supporting plane, whose surface is not sensitive (eg. Lacquered furniture, tablecloths etc.). Make sure that the appliance is safely supported. ☞ Do not place the appliance on or near heat sources. Place the appliance far from sinks and faucets.
- Page 11 GENERAL WARNINGS Do not remove safety devices and do not alter or remove mechanical and electrical guards. ☞ Always use protective scratchproof gloves for cleaning and maintenance. ☞ Do not operate the empty appliance. ☞ In case of problems with the appliance, contact an authorized service center.
-
Page 12: Use Warnings
USE WARNINGS • Do not remove, cover or alter the rating plates fitted to the machine body and ensure their prompt replacement in case of damage. • Always keep the zone around the cutter and the operator floor surface clean and dry. • Do not use the cutter as a support surface and do not rest any object foreign to normal cutting operations on it. ☞ DO NOT use accessories for the cutter that have not been supplied by the manufacturer of the cutter. • Do not damage the blade by cutting hard objects (bones, etc.). • Do not fill the pot to over half its capacity; the upper part of the blade must be free in order to remove it. -
Page 13: Manufacturer's Warranty And Responsibilities
MANUFACTURER’S WARRANTY AND RESPONSIBILITIES • This device is guaranteed for 24 - incorrect installation. months. - failure to comply with the specific The purchase date must be proven with power techniques the relevant document. - insufficient or incomplete periodic In the absence of valid fiscal document, maintenance. the warranty claim can not be exercised. - use by people under the age of 18. - use by people whose physical, • In case of non-compliance the claim sensory or mental skills are reduced. -
Page 14: Packing
PACKING Check that all components spec- .1 - UNPACKING ified in the delivery note and this instruction booklet are present On delivery of the cutter, check that the and fully intact. packaging is integral. If this is not the case, inform the carrier or area agent • Should any faults be noted, such as: immediately. - dents to the frame or guards; Operate as follows to remove the pack- - controls that are either not working aging from the cutter:... -
Page 15: Nameplates - Conformity Markings
WASTE RESPONSIBLY! Fig. 1 Fabbrica Affettatrici Cavaria STAR CUTTER C3 - C5 - C8 PER USO DOMESTICO E PROFESSIONALE Istruzioni per l’uso e la manutenzione FAC S.r.l. MACCHINE AFFETTATRICI INDUSTRIALI E FAMILIARI Via Morazzone, 137 - 21044 CAVARIA (VA) Tel. -
Page 16: Supplied Accessories
Unless otherwise defined at the • EU conformity declaration; moment of order, the machines are • instructions manual for installation, supplied together with the following: use and maintenance; Fig. 2 “C3” “C5” “C8” ATTENZIONE OSSERVARE ATTENTAMENTE LE ISTRUZIONI PER L’INSTALLAZIONE, USO, PULIZIA E MANUTENZIONE FORNITE DAL COSTRUTTORE. WARNING... - Page 17 .2 - Environmental conditions of .3 - Correct use of the cutter the machine use The slicer is only designed to slice food of • Temperature . . from -5 °C to + 40 °C the type and within the dimensional limits • Relative humidity ..max 95% indicated in this instruction manuals. 2.3.a - Intended use (Products that can be processed) Products that can be reduced to small pieces are: • All types of foodstuffs such as meat, fish, pulses, cheeses, shelled walnuts, etc.
-
Page 18: Electrical And Mechanical Safety Devices
ELECTRICAL AND MECHANICAL SAFETY DEVICES The following mechanical safety devices are used: • transparent plastic protective cover (6) suitable for contact with foodstuffs. • start-up with start/stop button (X), which requires intentional re-starting of the appliance in the event of power failure; • magnetic micro-switch (12) on the transparent cover (6), which does not allow the appliance to be started when the cover is open; • micro-switch (10) located underneath the pot, which does not allow the appliance to be started before the pot has been positioned; • micro-switch (11), which does not allow the appliance to be started if the pot is not properly positioned on the appliance body (the pin (P) on the pot must be positioned in its seat); • appliance power on luminous indicator light (15). Fig. 3 “C5” “C8” “C3”... -
Page 19: Technical Data
.1 - Residual risks In spite of the effort made during design and manufacturer of the cutter, risks still exist (cut hazard) to which the operator can be exposed during use and cleaning and maintenance operations, if he does not operate VERY CAREFULLY. -
Page 20: Main Components
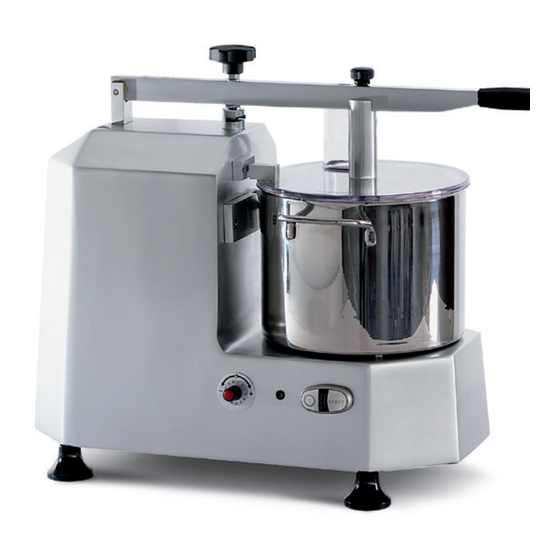
8a. Multi-purpose blade. 8b. Thin meat mincing blade (optional). 8c. Blade with holes for mixing (optional). 9. Metal cylinder. 10. Pot presence micro-switch. 11. Correct pot positioning micro-switch. 12. Cover in position magnetic micro-switch. 13. Start button “I” (model “C3”). 14. “Stop” button“0” (model “C3”). 15. Machine power on indicator light 16. “START” button in continuous mode (models “C5” and “C8”). 17. Pulsed start button “T” (models “C5” and “C8”). 18. “STOP” button (models “C5” and “C8”). 19. Blades speed changer (optional) (models “C5” and “C8”). For any “Spare Part” orders, DO NOT consider the numbering in this manual, but refer only to the “Spare Parts”... - Page 21 MAIN COMPONENTS Fig. 5 “C3” “C5” “C8”...
-
Page 22: Installation Adn Preliminary Checks
Install the slicer in the immediate vicinity those indicated on the nameplate of the of an outlet to CE standards derived from slicer. a system that complies with applicable regulations. USING THE MACHINE .1 - Start and stop button “C3” • Start the appliance by pressing the relevant button: - model “C3”: “I” button (13); - models “C5” - “C8”: “START” button (16). The indicator light (15) switches on. • For “C5” and “C8” with speed changer only: 14 15 the indicator light (15) switches on after the plug has been connected to the socket. - Page 23 .2 - Using • Position the appliance on a well levelled, smooth, dry and stable surface, suitable to support the its weight. • Install the appliance in the immediate vicinity of a CE-marked power outlet derived from a system compliant with the regulations in force. ☞ Before connecting the appliance, check that the mains features correspond to those indicated on the appliance data plate. • Position the pot (5) correctly on the metal cylinder (9). • Fit the desired blade onto the metal cylinder (9), making sure that the plug (X) attaches to the pin (Y). The blades are very sharp, handle with care! Cut hazard! Fig.
- Page 24 • Introduce the foods to be processed into the pot. ☞ Do not fill the pot to over half its capacity. • It is recommended to start with a moderate amount of foodstuff and then gradually add more through the inlet duct (7) during processing. • Close the cover (6) and lock the lever (3) by turning the knob (4) clockwise. Fig. 8 The appliance does not work if the pot is not correctly positioned and the cover is not closed.
- Page 25 • For “C5” and “C8” models only: press the “T” button (17) to start the blade with pulses; the blade stops on releasing the button. • If necessary, add other foodstuffs through the inlet duct (7) ☞ If the motor struggles to operate, reduce the amount of foodstuff being processed. “C5” “C3” “C8” Fig. 9 • For “C5” and “C8” models only as an “Option”: adjust the blade rotation speed using the speed changer (19). • Prolonged appliance operation will reduce the foodstuffs being processed into pulp. • When processing is completed, when the foodstuff being processed has reached the desired consistency, stop the blade by pressing the relevant button (“0” for “C3” model; “STOP” for “C5” and “C8”) models. The power on indicator light (15) switches off.
-
Page 26: Cleaning
• Turn the knob (4) anti-clockwise. • Open the cover (6) by lifting the lever (3). • Remove the blade. The blades are very sharp, handle with care! Cut hazard! Fig. 10 • Remove the pot from the body of the appliance. CLEANING .1 - Cleaning the appliance Before carrying out any cleaning operations, always disconnect the plug from the mains power supply; • The appliance must be cleaned thoroughly at least once a day and more frequently if necessary. - Page 27 ☞ Clean the appliance exclusively using food-grade detergents. Never use corrosive and flammable cleaning products or products that may contain and/or release toxic substances. Never immerse the appliance in water or other liquids. Do not clean the appliance with jets of water so as not to damage the components;...
- Page 28 CLEANING .2 - Machine reassembling Proceed in the opposite direction to what indicated in the previous operations. Before putting the appliance away: - clean it as described previously; - position the pot (5) correctly on the body of the appliance (1). - insert the blade (8) into the pot (5); - close the cover (6) and lock the lever (3) using the relevant knob (4). Fig. 11 .3 - Put the cutter away • When you finish using it, after carefully • It is recommended to cover the cutter have cleaned all the components (as with a sheet to protect it from dust. described in the previous sections). If the cutter is not to be used for several days, put it in a sheltered and dry place.
-
Page 29: Maintenance
MAINTENANCE .1 - Generalities In addition to the above-mentioned cleaning operations, you should also perform routine maintenance in order to guarantee the slicer’s operating efficiency over time. The operator may perform the following maintenance operations: • Control blade sharpness: In order to obtain good performance, the blades must be well-sharpened. If the blades no longer cut, contact the manufacturer of the machine or a knife-grinder for sharpening. • The appliance does not require lubrication. • Whenever the cutter makes an unusual noise after a certain period of time, which is due to settling of the belt, tighten the belt tensioner positioned at the side of the motor, under the base. The maintenance operations must be performed always after disconnecting the machine from the power network. The maintenance operations to be entrusted to personnel authorized by the manufacturer are the following:... - Page 30 MAINTENANCE .2 - Blades replacement • In order to obtain good performance, the blades must be well-sharpened. If necessary, the manufacturer recommends replacement of the entire unit in order to prevent coupling problems of the blades and consequent malfunctioning of the same. • To replace or sharpen the blades: a. Wear cut-proof gloves b. Open the cover (6) (Fig. 10). c. Remove the blades unit (8) from the pot (5) (Fig. 12). d. Use a vice (x1) with protective jaws (x2) so as not to damage the Teflon parts of the blades unit (Fig. 13). Fig. 12 Fig. 13 e. Fix the blades unit, 180°...
- Page 31 e. Using a flat tip screwdriver, loosen the screws (y1) and remove the blades. Fig. 15 f. Re-mount the new blades (or sharpened) positioning the components in the order illustrated in “Fig 5” on page 42. g. Tighten the screws (y1). The blades are very sharp, handle with care! Cut hazard!
-
Page 32: Motor Belt Tension Adjustment
• Disconnect the plug from the socket. • Remove the pot (5) from the body of the appliance (1) as described previously; • Lift the cutter. ☞ Make sure that the cutter is stable and can not inadvertently fall. • For “C3” model only (Fig. 16): - Unscrew all 4 feet (2) and the screw (v) under the base; remove the cover (2b). - Loosen the nut (13) and the screw (10), adjust the belt tensioner (12). - When the operation has been completed, tighten the nut (13) and the screw (10). • For “C5” and “C8” models only (Fig. 17): - Unscrew all 4 feet (2) and the screw (v) under the base; remove the cover... - Page 33 “C3” Fig. 16 “C5” “C8” Fig. 17...
-
Page 34: Decommissioning The Cutter
DECOMMISSIONING THE CUTTER .1 - Correct procedure A machine compromises: • Aluminium-alloy frame. • Stainless-steel inserts and components. • Electrical parts and electrical cables. • Electrical motor • Plastics, etc. - When commissioning third parties to perform dismantling and demolition, only businesses authorised to dispose of these materials should be employed. - When demolishing without outside assistance, sort the various types of material and hand over to authorised businesses for disposal.. ALWAYS comply with the current legislation of the country in which the slicer is utilised. -
Page 35: Troubleshooting
TROUBLESHOOTING • The following information is intended to aid in identifying and correcting defects and faults that may occur during use of the machine. ☞ Some failures can be resolved by the user; others require precise technical skills or special skills, and must be carried out by qualified personnel with recognized expertise and experience in the specific area of intervention. Do not disassemble the inner parts of the cutter. -
Page 36: Electrical Schemes
WIRING DIAGRAM T 98 ER CUTTER C1 POT PIN MICRO-SWITCH PENTOLA MOTOR MOTOR Only for personnel authorized by the manufacturer... - Page 37 WIRING DIAGRAM CUTTER C5 / 8 Litre with speed changer POT PIN MICRO-SWITCH PENTOLA Luminous indicator light START STOP Potentiometer Blue Black Yellow CONNECTOR Condensatore MOTOR Three-phase 230V Only for personnel authorized by the manufacturer...
- Page 38 WIRING DIAGRAM CUTTER C5 / 8 Litre POT PIN MICRO-SWITCH PENTOLA POT BOTTOM MICRO-SWITCH PENTOLA MOTOR Single-phase 230V Time brake Braking force Line 8 7 6 5 4 3 2 1 220V-50Hz Black Blue Luminous indicator light Only for personnel authorized by the manufacturer...
-
Page 39: Spare Parts
Fig. 1 CUTTER C3 Ed. 09/2013 Fig.5 Spare parts... - Page 40 Fig. 1 CUTTER C3 Ed. 09/2013 Fig.5...
- Page 41 Fig. 2 CUTTER Ed. 09/2013 Fig.5...
- Page 42 Fig. 3 CUTTER Ed. 09/2013 Fig.5...
- Page 43 Fig. 4 CUTTER - Optional Ed. 09/2013...
- Page 44 Fig. 5 CUTTER - lame CUTTER - blade Ed. 09/2013 MULTI-PURPOSE BLADES Versione C8 Versione C3 Versione C5 Version C3 Version C5 Version C8 OPTIONAL BLADES For mixing Per impastare Per tritare For chopping...
-
Page 45: Moca Declaration
2019...
Need help?
Do you have a question about the C3 and is the answer not in the manual?
Questions and answers