
Subscribe to Our Youtube Channel
Related Manuals for claber Hydro 4


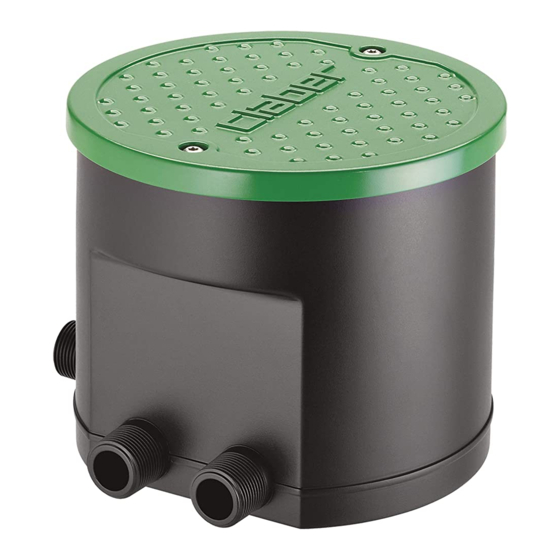
Summary of Contents for claber Hydro 4
- Page 1 Hydro 4 In-built prefitted water timer valve box USE AND INSTALLATION MANUAL 90829...
-
Page 3: Table Of Contents
Index Introduction ..................56 Reminders ..................57 General specifications...............58 Fitting the battery................60 Installation ..................63 Use ....................71 - guidelines on programming ............74 - setting current day and time ............84 - programming watering ..............86 - test/manual watering ..............92 - Reset ..................94 - enabling programmes A and B and setting to off ......95 - Rain Sensor RF ................97 Cleaning and maintenance ...............98 Diagnostics ..................100... -
Page 4: Introduction
Introduction Our thanks for the confidence shown in purchasing this product. Please read this instruction manual carefully before programming the device, and keep it handy for future reference: each section will provide all the neces- sary information on how to perform the single steps correctly. This device has been designed and manufactured exclusively for the pro- gramming of watering time by adults with experience and knowledge. -
Page 5: Reminders
Reminders 1. Use only two AAA (LR03)1.5V Alkaline new batteries, with an expiry date exceeding one year. Follow the instructions of the battery manufacturer. Do not power the water timer with sources other than those specified. 2. Replace the batteries at the beginning of each season. 3. -
Page 6: General Specifications
General specifications The water timer allows you to easily set the time, watering run time and date of four watering lines. The programming of the water timer allows you to satisfy the requirements of different plants according to their species and environment. The water timer is powered by two AAA (LR03) 1.5V Alkaline batteries that must be replaced at the start of each season and are sufficient, for at least, the entire watering season. - Page 7 General specifications Legend ( fig.1 3 4 5 8* 9 1. 3/4” threaded male tap water intake connector 2. Hydro 4 Valve Box 3. Liquid Crystal Display 4. Back key 5. Enter key 6. Forward key 7. Cover fastening screw 8.
-
Page 8: Fitting The Battery
Fitting the battery In order to operate the water timer requires two AAA (LR03)1.5V Alkaline batteries that must be replaced with two new charged batteries at the start of each season and are sufficient for, at least the entire irrigation. fig.2 To install or replace the battery, proceed as follows ( •... - Page 9 Fitting the battery 1.5V AAA Alkaline LR03 fig.2...
- Page 10 Fitting the battery When the batteries are first fitted the display shows the first page with the current TIME/DAY, indicating as default 12:00 and Sunday. Check the time and the day and set the current time and day if incorrect, please refer to section “...
-
Page 11: Installation
Installation The valve box is to be installed outside, buried at ground level or resting on the surface, ensuring that the cover opening is free so that the valve inside the box can be programmed easily. If installed below ground, do not place it in areas which are frequently wal- ked over or passed over by mechanical means (eg. - Page 12 Installation If installing below ground, use a spade to make a hole of a sufficient size to hold the valve box and tracks where the 4 watering line pipes will pass. Place an even layer of shingle on the base of the hole and position the fig.4 valve box ensuring that it is stable and level ( fig.4...
- Page 13 Installation click click...
- Page 14 Installation Open the transparent cover of the water timer and carry out a functional test by activating ma- nual watering (please refer to section test/manu- al watering on page ): if the test has a posi- tive outcome, close the cover. The control module is fully watertight and will function even when under water at a depth of up to one metre...
- Page 15 Installation fig.6 Also close the valve box cover and, if installed below ground, fill the hole with soil making sure that the valve box cover is left free for inspec- tion and programming activities. fig.5 fig.6 • Do not use the water timer with chemicals or liquids other than water.
- Page 16 Installation 8804* 8609* 9073* 8609* 8609* 8804* 91013* Installation drawing. parts not supplied, to be purchased se- parately.
- Page 17 Installation Installation drawing. parts not supplied, to be purchased separately.
- Page 18 Installation Installation drawing. parts not supplied, to be purchased se- parately.
-
Page 19: Use
Line Line Line Line It is possible to set up two watering programmes, A and B, which op- erate independently from each other on one or more of the 4 lines Each watering Programme, A or B, can be set to start watering on any day 1 2 3 4 of the week (WEEKLY SchEDULE), up to 4 times a day ( START TIME) and for a maximum run time of 60 minutes for each line (... - Page 20 PROGRAMMING EXAMPLE In the example, programme A starts watering at 5:00 (START TIME) and at 21:00 (START TIME2): at these times the valves open in order (RUN TIME: valve 1 for 5 minutes, valve 2 for 10 minutes, valve 3 for 5 minutes, valve 4 not used).
- Page 21 If a programme does not include the use of a line (in the exam- ple, line 4 of programme A) simply set the watering run time (RUN TIME) of that line to OFF. If you do not want to use all 4 available daily start times (START TIME) simply set the start time (START TIME) which is not used to OFF (in the example, START TIME 3 and 4 of programme A and START TIME 2-3-4 of programme B) .
-
Page 22: Guidelines On Programming
GUIdELINES ON PROGRAMMING Clock fant Run Time prog. A LINE PROG LINE PROG LINE PROG LINE PROG Start Time prog. A PROG PROG PROG PROG Run Time prog. B LINE PROG LINE PROG LINE PROG LINE PROG Start Time prog. B PROG PROG PROG... - Page 23 PROGRAMMING PAGES Page provides information on all the programming pages in the order they allow the user to ScROLL through the different pages. appear: key lets you AccESS ThE EDITINg of the parameter displayed. guidelines: see page 77 - programming: see page 86 RUN TIME START TIME guidelines: see page 78 - programming: see page 88...
- Page 24 HOW TO USE THE KEYPAd Only three keys let you set all the parameters. let you ScROLL ThROUgh ThE VARIOUS pAgES The keys in order to select the one desired. key lets you AccESS ThE EDITINg of the parameter displayed. When is pressed, appears in the bottom left display.
- Page 25 - PROGRAMMING GUIdELINES RUN TIME: how long to water Each LINE can be set with its own watering run time (RUN TIME) ex- pressed in minutes. The total of the Run Times of the enabled lines deter- mines a WATERINg cYcLE. The lines are opened in a watering cycle in sequence from Line 1 to Line 4.
- Page 26 - PROGRAMMING GUIdELINES START TIME: watering time A WATERING CYCLE can be started at the required time (START TIME), up to 4 times a day for Programme A and 4 times for Programme B. If you do not want to use all 4 available daily start times (START TIME) simply set the start time (START TIME) which is not used to OFF (in the example, START TIME 3 and 4 of programme A and START TIME 2-3-4 of programme B) .
- Page 27 - PROGRAMMING GUIdELINES WEEKLY SCHEdULE: watering days With weekly programming (WEEKLY SchEDULE) the user can select the days of the week on which the set WATERING CYCLES are independently activated, both for Programme A and Programme B: only A (only Programme A waters) only B (only Programme B waters) both A and B (both Programme A and programme B water) neither A nor B (no watering).
- Page 28 - PROGRAMMING GUIdELINES Programming limits The setting limits are as follows: • RUN TIME: from 1 minute to 1 hour, then OFF • START TIME: from 00:01 to 23:59, then OFF The water timer automatically resets the 4 daily start times (START TIME) of both Programme A or B optimising them in order to: 1) prevent the watering cycle from starting before the previous cyc- le has finished;...
- Page 29 - PROGRAMMING GUIdELINES • on the display indicates an operation is not permitted. Before programming, make sure you have read section “ USE - PROGRAMMING GUIDELINES ” on page 74 PROGRAMMING EXAMPLE I have to set the two programmes A and B so that: programme “A”...
- Page 30 - PROGRAMMING GUIdELINES Diagram to summarise the example on page Watering programme A Start time 3 Start time 4 Start time 1 Start time 2 time 21:00 time 05:00 5 OFF run time (min) run time (min) Start time 2 Start time 3 Start time 4 Start time 1...
- Page 31 - PROGRAMMING GUIdELINES To obtain the two programmes A and B required, set the water timer as follows (the screens refer to the example of page Watering programme A LINE PROG LINE PROG LINE PROG LINE PROG PROG PROG PROG PROG LINE PROG...
-
Page 32: Setting Current Day And Time
SETTING CURRENT dAY ANd TIME When the batteries are first fitted the display shows the first page current TIME/DAY, indicating as default 12:00 and Sunday. OK OK By pressing , the message appears and the days of the week disappear. OK OK OK OK Press... - Page 33 Press to scroll through and select the current day. PROG OK OK To confirm the modified parameter press and move to the screen PROG to set the type of programme to use. OK OK PROG OK OK to enable the required programme A or B or both Press programmes or set them to OFF.
-
Page 34: Programming Watering
PROGRAMMING WATERING PROGRAMMING WATERING RUN TIME The RUN TIME page allows the user to set a watering run time for programme A and programme B for each LINE. Selected watering LINE Signals that the main number indicator represents the watering run time Indicates Programme (RUN TIME) of the LINE and selected A or B for which the... - Page 35 Set/modify the RUN TIME • From the RUN TIME page, press to enable modification -> the symbol flashes indicating that the parameters displayed can be modified and require a setting confirmation. • Using changes the value displayed (by pressing and holding the keys, the value will change more quickly).
- Page 36 - WATERING PROGRAMMING START TIME The START TIME page allows the user to set up to start times per day for the WATERING CYCLE for programme A and 4 times for programme B. This indicates programme A or B in the selection and displayed parameter setting stage Signals that the main number indicator represents the start...
- Page 37 - WATERING PROGRAMMING Set/modify the START TIMES • From the START TIME page, press to enable modification of the START TIME -> the symbol flashes indicating that the pa- rameters displayed can be modified and require a setting confirmation. • Using changes the value displayed (by pressing and holding the keys, the value will change more quickly).
- Page 38 - WATERING PROGRAMMING WEEKLY SCHEdULE With the weekly programming (WEEKLY SchEDULE) the user selects the days of the week on which the set WATERING CYCLES are activated. Indicates which programme (only A, only B, both A and B, neither A nor B) is assigned to each day of the week Indicates the weekly programming...
- Page 39 - WATERING PROGRAMMING Assigning days of the week to the programmes • From the WEEKLY SCHEDULE page, press -> the symbol flashes =Sunday. • Each time is pressed, the screen displays which programme is to start on that day (only A, only B, both A and B, neither A nor B). •...
-
Page 40: Test/Manual Watering
TEST/MANUAL WATERING PROGRAMMING WATERING While manual watering is in progress, it indicates the minutes remaining until watering finishes Watering LINE selected for manual opening/check test PROG If this activates Indicates that the page intermittently, it indicates that displayed refers to manual/ watering is in progress TEST operation. - Page 41 • The solenoid valve automatically closes and stops watering operations when the set watering minutes have been reached. If you wish to stop watering operations in advance, press and the message OFF appears on the display. Exiting the test/manual watering page •...
-
Page 42: Reset
RESET The factory settings can be restored by pressing and holding down at the same time until 12:00 appears on the display (approx. 10 seconds). Then, completely reprogramme the water timer as described in the programming sections. -
Page 43: Enabling Programmes A And B And Setting To Off
ENABLING PROGRAMMES A ANd B ANd SETTING TO OFF Activating/deactivating programmes A and B of the water timer is useful in managing: - watering requirements based on the season: for example, pro- gramme A can be set for the summer - maximum watering requirements, and programme B for the spring - low watering requirements;... - Page 44 - WATERING PROGRAMMING only programme B (symbol B activated) PROG PROG PROG The selected unit operates on the basis of the settings of just programme B both programme A and programme B (symbols A and B both activated) PROG PROG PROG The selected unit operates on the basis of the settings of Programmes A and B...
-
Page 45: Rain Sensor Rf
RAIN SENSOR RF • From the RAIN SENSOR page (see page press -> activates when the Rain Sensor RF activates/deactivates. • Press to move the sta- tus from “ ” (sensor activated) to “ ” (sensor deactivated) and vice versa. •... -
Page 46: Cleaning And Maintenance
Cleaning and maintenance Clean the outside of the valve box and the control module when necessary using a soft cloth dampened slightly with water or specific detergent: fol- low the detergent cleaning instructions. Do not use abrasive pads, scourers or acid detergents. In winter or long periods of inactivity: close the tap or the gate valve upstream;... - Page 47 Cleaning and maintenance < 3°C...
-
Page 48: Diagnostics
The water timer (for further information please refer to section “Fitting does not work batteries” on page 60). The water timer is defective; contact CLABER technical (display turned off) assistance for repair, through the dealer. No water supply: inspect and restore. - Page 49 diagnostics After the batter- ies have been changed, water- When replacing the batteries, the clock time and the ing programmes current date are stored for a maximum of 30 seconds. take place at Once this time period has passed, they must be reset times and/or (please refer to section Use - SETTING CURRENT TIME/...
-
Page 50: Technical Specifications
Technical specifications Power supply: Two AAA 1.5V IEC (LR03) Alkaline batteries Average life of the battery: 1 year Ingress Protection: IP 68 Operating temperature: 3-60 °C Operating pressure: MAX: 10/12 bar (145/174 psi) MIN: 0.2 bar (2.9 psi) Plastic materials: >ABS<... -
Page 51: Guarantee Conditions
Claber guarantees that the product is free of material or manufacturing defects. Within two years from the date of delivery to the consumer, Claber shall repair or replace any parts of this product found to be defective. The guarantee is void in the event of:... -
Page 52: Declaration Of Conformity
Via Pontebbana 22 – 33080 – Fiume Veneto – Pordenone Italy Assuming full responsibility, we declare that the product: 90829 - hYDRO 4 - In-built prefitted timer valve box complies with European directives 2004/108 with reference to technical standards: IEC EN 61000-6-1 :2007;...
Need help?
Do you have a question about the Hydro 4 and is the answer not in the manual?
Questions and answers