Table of Contents
Advertisement
Quick Links
Advertisement
Table of Contents

Related Manuals for MATSUYAN Vesta G

Summary of Contents for MATSUYAN Vesta G
-
Page 3: Table Of Contents
— SAFETY INSTRUCTIONS — WARNING — BATTERY AND RECHARGING INSTRUCTIONS SPECIAL FEATURES ------------------------------------------------------------ 5 MAJOR COMPONENTS AND ATTACHMENTS -------------------------- 5 Vesta G OVERVIEW ------------------------------------------------------------ 6 INSTALLATION GUIDE ------------------------------------------------------ 7 — Installing and Removing Side Brush — Recharging Battery — Proof Test —... -
Page 4: Safety Instructions
Please read the Operation Manual before operating Vesta G. Do not operate Vesta G outdoors. Before starting Vesta G, be sure to install Vesta G dust bin filter properly in case of any damage of Vesta G. Do not operate on wet floor or moist conditions, e.g. bathroom. -
Page 5: Warning
Children being supervised not to play with the appliance. Only to be used with the unit provided. WARNING: The plug must be removed from the socket or outlet before cleaning or performing maintenance on the unit at all times. Make sure that the appliance can be worked freely in the room (shall not be blocked or overturned etc…) and make sure that there is nothing that the appliance can overturn and create a hazard (clear all Candle, Vase with or without water and fragile... -
Page 6: Battery And Recharging Instructions
If you are not sure of the voltage and current of your house, please contact your local power company or a licensed electrician. Use only the battery supplied with your Vesta G. Charging adaptor is for indoors only. WARNING: For the purposes of recharging the battery, only use the detachable supply unit provided with this appliance. - Page 7 Recharge Vesta G as soon as possible following use; waiting several days can damage the battery. If you plan not to use Vesta G over 6 months, please fully charge the battery, then turn off the power and remove the battery from the vacuum cleaner and store it separately.
-
Page 8: Special Features
Cleaner With Docking Station is equipped with functions suitable for cleaning up floor surfaces of home and office such as wood, tile, and linoleum. Vesta G Robotic Vacuum Cleaner With Docking Station is a house- hold helper. Working Patterns: "Z" Type... -
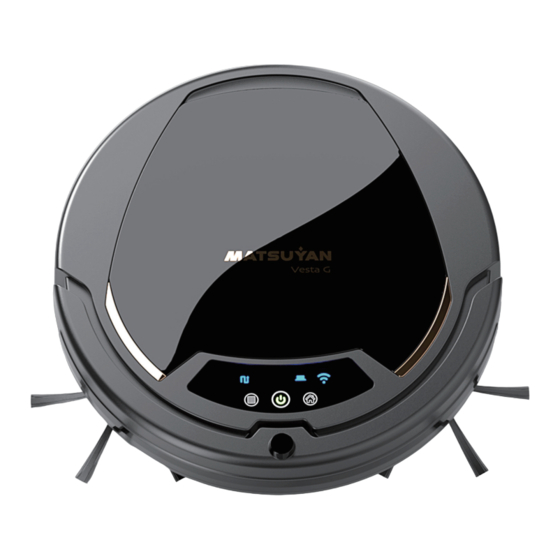
Page 9: Vesta G Overview
Vesta G Overview IR Receiver (for Docking Station) Control Panel and LED Display Top Cover (Dust Bin in Side) Bumper Power Switch D.C. jack Contact Plates for Automatic Charging Side Brush Front Small Wheel Anti-Cliff Sensor Intake Valve Side Brush... -
Page 10: Installation Guide
To install: Push the brush directly onto the holder.(Fig. 1) To remove: Hold two opposite sides of the brush as shown in Fig. 2, and evenly pull upward to remove the brush. PULL UP! PRESS Side brush holder CLICK! Fig. 1 Fig. 2 Matsuyan... -
Page 11: Recharging Battery
9 proof test) When charging, the LED indicator below the “ ” (Power) on Vesta G (asabove diagram) will flash green, and it will stay green when the cleaner has been uninterruptedly charged for 4~6 hours. To make sure the battery always at full charged status, the unit will be charged 15 min every hour after full. -
Page 12: Proof Test
Test by the unit, turn on the power switch of the unit, Use ( ) on APP or press robotic control panel icon to control the robot go back to the docking station for recharging. Please refer to below picture. Open Space Power Switch On Matsuyan... -
Page 13: Preparation Of Room Containment
Preparation of Room Containment: Turn the power switch off. Press two points mark A and slide the cover in the direction of arrow B as shown in the diagram below. Insert four size AA batteries and match "+" and "-" to the battery compartment, then close the cover of the containment. -
Page 14: General Operation
— Dust bin is full. — Intake Valve is stuck with dirt. — Wipe out the inner and outside of Intake Valve area. Room containment of Vesta G may contain the cleaning area by putting it in a proper place. For example:... -
Page 15: Control Panel
Operation without connecting to the docking station: Place the cleaner on the floor and turn on the power switch then press the operation button to operate, press again to stop. When battery low, the unit is programmed to find the docking station automatically for recharge. -
Page 16: Download App And Scheduling Setting
How to Download APP: To download " SmartCleanerQ " APP from Playstore or APP store. Scan the QR code and download APP. Android Scheduling setting from APP: ※The vacuum cleaner can function normally no matter Wi-Fi is connected or not. Matsuyan... -
Page 17: Basic Operation
Basic Operation: Manual work LED Indicator lights on. ※When Check: — Dust bin is full. — Intake Valve is stuck with dirt. — Wipe out the inner and outside of Intake Valve area. Turn ON the power switch, wait for power LED light on(green). - Page 18 The unit will detect the error and fix The bumper stuck. automatically . The unit lifted up from the floor. Put Vesta G back on the floor. Remove the cleaner from dark floor The unit stuck on the cliff or stair. surface.
-
Page 19: Cleaning And Maintenance
CLEANING AND MAINTENANCE Maintenance Method: The operation and maintenance of the Vesta G is very simple. After each use, clean any dirt left behind on the dust bin and filter. It is not necessary to clean the intake after every use. - Page 20 Open the upper cover of the dust bin. Side buckle Lift up and take out the filter. Throw away the dust and dirt from the dust bin. Matsuyan...
- Page 21 Rinse the dust bin with tap water and drain completely. It is not necessary to wash every time. Please do not put it into the wash- ing machine to do the cleaning. Periodically clean the filter with a soft bristle brush. Once dry, reinstall the filter and close the dust bin lid.
-
Page 22: Cleaning Side Brushes
PULL UP! Cleaning Intake: After repeated use, dirt and dust can accumulate around the intake of the Vesta G and the working efficiency can be reduced. To ensure the best efficiency and constant airflow, the intake should be cleaned periodically. -
Page 23: Cleaning Brush Roll
Cleaning Brush Roll: After repeated use, dirt and dust can accumulate around the intake and Brush Roll of the Vesta G and the working efficiency can be reduced. To ensure the best efficiency and constant airflow, the intake should be cleaned periodically. -
Page 24: Maintenance Of Main Wheels
Maintenance of Main Wheels: Follow below Instruction if Cable is twined or strangled or Clean needed. Removable Wheel Cover Press Wheel Pull up Wheel Press Grappling Hook Closed Wheel Cover Press Wheel PRESS CLICK! Matsuyan... -
Page 25: Battery Installation And Removal
Battery Installation and Removal: Turn off the power switch before installing the battery. The details on how to remove the battery: To open the battery cover first by pressing the two points “A” (marked in the below diagram) and slide the battery cover in the direction of arrow “B” (marked in the below diagram). -
Page 26: Trouble Shooting
Install the dust bin filter effectively when it is properly installed. properly. turned on. Please refer to table A on E1, E2, E3, E4, E5, E6, E7 The LED display shows page 15 for solving the and Beep 3 times. error. problems. Matsuyan... -
Page 27: Specifications
SPECIFICATIONS Rating Voltage 14.6VDC Power Battery Type Li-ion rechargeable battery Battery Capacity 2500mAh Charging Time 4~6 hours Working Time (normal mode) 85 ± 10 mins Operating Temperature 0°C~40°C Operating Humidity ≤80% RH Noise ≤65dB 3.5kg Weight and Dimensions Ø: 330*88m Accessories Adaptor 20VDC/1.2A... -
Page 28: Wireless Advisories
4.6 dBiz Single - ≤20dBm Transmitting Matsuyan declares that this robotic vacuum cleaner is in compliance with the essential requirements and other relevant provisions of RE Directive 2014/53/EU. The declaration of conformity may be con- sulted in this link: http://www.matsutek.com/shop/declaration_of_conformity...
Need help?
Do you have a question about the Vesta G and is the answer not in the manual?
Questions and answers