Table of Contents
Advertisement
Quick Links
Advertisement
Table of Contents

Related Manuals for Revolution Micro TouchMi

Summary of Contents for Revolution Micro TouchMi
- Page 1 Owner’s Manual TOUCHMI DIGITAL LIGHTING CONTROLLER...
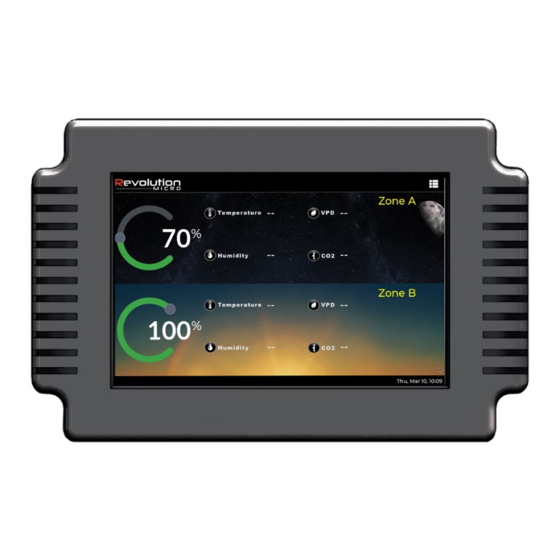
- Page 2 TouchMi All Digital Lighting Controller 120/240/277v or 347v Owner's Manual Updated Jan 24, 2022 This manual will tell you how to hang, connect and operate your TouchMi. The TouchMi can control up to The Box Contains 512 lights in two zones with up to 256 lights in each zone.
- Page 3 Data Cables and Connections These are the data cables we supply. If you get longer or different ones, make sure they are wired like this. TouchMi uses RJ14 splitters and RJ14 cables up like this. If you get RJ-type cables from a local...
- Page 4 Next, Plug it In Plug the included AC adapter into a power outlet and connect the other end to the TouchMi’s AC input jack on the bottom panel. Next plug the VPD sensor into the corresponding jack on the bottom panel and run your probe cable its full length up to and across the ceiling if possible, toward the center of the grow space.
- Page 5 Internal Clock For HPS lights that need cooling time, the TouchMi has an internal clock and starts counting when the power goes out, so a 30 minute on-delay will only have 10 minutes to run if the power comes back on in 20 min-...
- Page 6 Just tap the Zone name and type! Helpful Hints If you change your mind on something, simply go to another page without saving. If you get called away in the middle of changing something, TouchMi goes back to the Main screen without saving after 30 seconds.
- Page 7 Settings page and use the sliding bars to change the color spectrum if you are using an LED. LED Default Settings If you’ve made changes and want to go back to our defaults, here’s how the TouchMi is set up from the factory: Preset: Blue White...
- Page 8 External Connections The bottom of the TouchMi has eleven (11) connectors: 1. Power (6v DC) 2. Zone A temperature sensor 3. Zone A Communications port to lights 4. Zone A Low-voltage external equipment trigger for Lights On 5. Zone A Low-voltage external equipment trigger for Lights Off 6.
Need help?
Do you have a question about the TouchMi and is the answer not in the manual?
Questions and answers