
Related Manuals for Brunswick Edinburgh

Summary of Contents for Brunswick Edinburgh
- Page 1 Edinburgh Edinburgh - Steel POCKET BILLIARD TABLE INSTALLATION MANUAL www.brunswickbilliards.com SERVICE DEPARTMENT P.O. BOX 68 BRISTOL, WI 53104 E-MAIL:BRUNSWICKSERVICE@BRUNSWICKBILLIARDS.COM 51-906398-000 APRIL 2019...
- Page 2 WARNING: This product can expose you to chemicals including Di-2-ethyl- hexyl-phthalate, which is known to the State of California to cause cancer and birth defects or other reproductive harm. For more information go to www.P65Warnings.ca.gov” PAGE 2 BRUNSWICK INSTALLATION MANUAL...
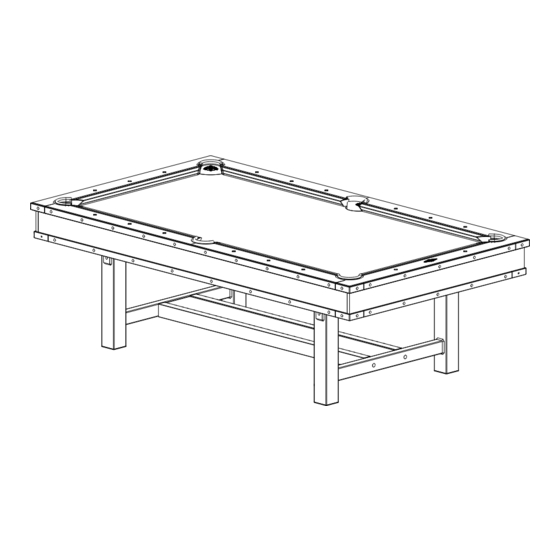
- Page 3 Secure in position with 1/4 x 6” domed head pin. Step #6: Repeat at opposite end. FIGURE ONE FIGURE ONE (EDINBURGH - STEEL) NOTE: Requires two people to assemble. Step #1: Position the pedestals and stretcher assembly as shown.
- Page 4 3/8-16 x 3-3/4” hex head cap screws and 3/8 flat washers adn 3/8-16 weld nuts. FIGURE TWO FIGURE TWO (EDINBURGH - STEEL) Step #7: Loosely attach the baseframe side assemblies to the leg assemblies and cross supports using 3/8-16 x 4-1/2” hex head cap screws and 3/8 flat washers adn 3/8-16 weld nuts.
- Page 5 Step #9: Attach slate attach cleats to the baseframe end as- semblies using 5/16-18 x 5” hex head screws with 5/16 washer and 5/16-18 hex nuts. Step #10: Install the two dovetail cross supports into the dove- tail cleats. FIGURE FOUR PAGE 5 BRUNSWICK INSTALLATION MANUAL...
- Page 6 The diagonal measurements should not vary over 1/8”. With the table square, securely tighten all remaining hardware. Step #12: Attach pedestal attach brackets to inside corners of pedestal/baseframe #10 x 1-3/4” thread cutting screws. FIGURE FIVE PAGE 6 BRUNSWICK INSTALLATION MANUAL...
- Page 7 Step #5: Securely fasten the end slate sections at both ends of the table with 1/4 x 1-3/4” flat head screws for UNFRAMED slate or #14 x 3” flat head screws for FRAMED slate. FIGURE THREE PAGE 7 BRUNSWICK INSTALLATION MANUAL...
- Page 8 1-1/2” wide by 8” long and glue the strips to the pocket cutouts. This is important as this will provide cushioning from ball impact and the bed cloth will last much longer. FIGURE FIVE PAGE 8 BRUNSWICK INSTALLATION MANUAL...
- Page 9 #5 and toward the side pocket from #2 and tack or staple at #7. Step #10: Repeat Step 7, stretching from #6 and toward the side pocket from #4 and tack or staple at #8. FIGURE THREE PAGE 9 BRUNSWICK INSTALLATION MANUAL...
- Page 10 NOTE: Occasionally cloth will stretch, leaving wrinkles at the pockets. To retighten, remove apron, one end rail and one side rail. Pull cloth taut, and retack or restaple along the open end and side to restore original tightness. FIGURE SEVEN PAGE 10 BRUNSWICK INSTALLATION MANUAL...
- Page 11 Step #6: Turn rail over and at corner pockets fold the cloth over the mitered edge as shown, stretching tightly and working out any wrinkles as you staple three places in area shown. FIGURE FIVE PAGE 11 BRUNSWICK INSTALLATION MANUAL...
- Page 12 Step #12: Hold the small fold in place with thumb and forefinger Of Small Strip and firmly hold it down over facing. Then staple at rear of facing and at bottom of rail as shown. Step #13: Trim excess cloth as required. FIGURE TEN PAGE 12 BRUNSWICK INSTALLATION MANUAL...
- Page 13 Threaded Rod out 1/4 turn. Step #4: Thread a 3/8-16 x 2-3/4” threaded stud into each of the eighteen locations. Thread stud in until contact with wood is made; then turn back 1/4 turn. FIGURE TWO PAGE 13 BRUNSWICK INSTALLATION MANUAL...
- Page 14 Step #12: Making sure the side rails are in a straight line (cushion side) fasten each side rail securely using the remaining Domed Washers and Hex Nuts. FIGURE FOUR PAGE 14 BRUNSWICK INSTALLATION MANUAL...
- Page 15 Position the bed spot and firmly roll a ball over the spot to achieve a good bond. NOTE: Bed spots are self-adhesive. Bed spots can be applied at both head and foot end of the table, or just the foot end, whichever is preferred. FIGURE SIX PAGE 15 BRUNSWICK INSTALLATION MANUAL...
Need help?
Do you have a question about the Edinburgh and is the answer not in the manual?
Questions and answers