Table of Contents
Advertisement
Available languages
Available languages
Quick Links
USA office: Fontana
AUS office: Truganina
GBR office: Ipswich
If you're having difficulty, our friendly
customer team is always here to help.
FRA office: Saint Vigor d'Ymonville
USA:cs.us@costway.com
AUS:cs.au@costway.com
GBR:cs.uk@costway.com
FRA:cs.f r @costway.com
Dome Climber
Structure d'Escalade
TM10025
THIS INSTRUCTION BOOKLET CONTAINS IMPORTANT SAFETY INFORMATION. PLEASE READ AND KEEP FOR FUTURE REFERENCE.
Advertisement
Table of Contents

Subscribe to Our Youtube Channel
Related Manuals for Costway TM10025


Summary of Contents for Costway TM10025
- Page 1 GBR office: Ipswich FRA office: Saint Vigor d'Ymonville USA:cs.us@costway.com If you're having difficulty, our friendly AUS:cs.au@costway.com customer team is always here to help. GBR:cs.uk@costway.com THIS INSTRUCTION BOOKLET CONTAINS IMPORTANT SAFETY INFORMATION. PLEASE READ AND KEEP FOR FUTURE REFERENCE. FRA:cs.f r @costway.com...
-
Page 2: Before You Start
Before You Start Avant de Commencer Please read all instructions carefully and keep it for future reference. Veuillez lire attentivement toutes les instructions et les conserver pour la référence ultérieure. Warnings Avertissements Attention: For home use only. Attention : Pour l’usage domestique seulement. Attention: Children should use this product under the parental supervision. -
Page 3: Safety Instructions
Operation instructions •On-site adult supervision is required at all times! •Do not install the product over concrete, asphalt, packed earth or any other hard surface. A fall onto a hard surface can result in serious injury to the user. •Place the equipment on level ground at least 6.6 ft (2 m) from any structure or obstruction such as a fence, garage, house, overhanging branches, laundry lines or electrical wires. -
Page 4: Consumer Information Sheet For Playground Surfacing Materials
NOTE: An initial fill level of 12 inches (30 cm) will compress to about a 9 inch Disposal instructions (23 cm) depth of surfacing over time. The surfacing will also compact, •Disassemble and dispose of The equipment in such a way that no displace, and settle, and should be periodically refilled to maintain at least a 9 unreasonable hazards will exist at the time the equipment is discarded. -
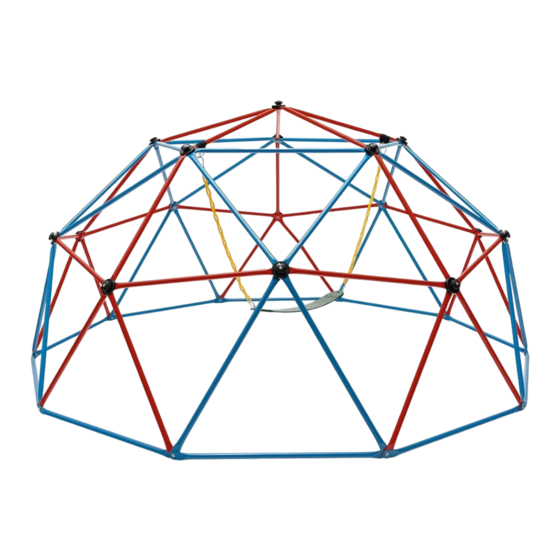
Page 5: Part List
NOTE: Tips: The order of the poles needs to be the same as the order marked in the •The assembly requires two adults. following picture. For ease of assembly, leave all fasteners finger tight until all tubes are in The outermost pole is pole ①,the second is pole ②,the third is pole ③, place, then tighten firmly and the final one (also the innermost) is pole ④. - Page 6 Step 2: Second Circle Assembly Step 3: Second Circle Assembly First, pick up three poles (B), one long , one normal washer (H) and one thin nut First, pick up two poles(A), one pole(B), one long bolt (E), one normal washer (G).
- Page 7 Step 4: Third Circle Assembly ( Important: choose 1 tube(B) and 1 tube(L) Step 5: Roof Assembly for assemble ) Pick up one long bolt (E), one normal washer (H) and one thin nut (G), then fix the poles at the roof together with tools Part I and Part J. First, pick up one pole(B), two strengthed poles(L), one long bolt (E), one normal washer (H) and one thin nut (G).
- Page 8 Step 6: Black Grip Assembly Step 7: Swing Seat Assembly First, fasten the black grip (C) on the nodes with a long nut (D) using the tool First, tie the first strap (M) around the top tube tightly, and put one end D ring Part I.
-
Page 9: Consignes De Sécurité
Instructions d'utilisation • La surveillance d'un adulte sur place est requise en tout temps! • N'installez pas le produit sur du béton, de l'asphalte, de la terre battue ou toute autre surface dure. Une chute sur une surface dure peut entraîner des blessures graves pour l'utilisateur. -
Page 10: Avant De Commencer L'assemblage
REMARQUE : Un niveau de remplissage initial de 30 cm se comprime à une Instructions d'élimination profondeur de surface d'environ 23 cm au fil du temps. La surface se compacte, bouge et se tasse également et doit être remplie périodiquement •... -
Page 11: Instructions De Montage
REMARQUE : Conseils : L'ordre des pôles doit être le même que celui indiqué dans l'image • L'assemblage nécessite deux adultes. suivante. Le pôle le plus à l'extérieur est le pôle ①,le deuxième est le pôle • Pour faciliter l'assemblage, laissez toutes les fixations serrées à la main ②,le troisième est le pôle ③,et le dernier (également le plus à... - Page 12 Étape 2 : Assemblage du Deuxième Cercle Étape 3 : Assemblage du Deuxième Cercle Tout d'abord, prenez trois pôles (B), un boulon long (E), une rondelle normale Tout d'abord, prenez deux poteaux (A), un poteau (B), un boulon long (E), une (H) et un écrou fin (G).
- Page 13 Étape 4 : Assemblage du Troisième Cercle (important : choisissez 1 tube Étape 5 : Assemblage du Toit (B) et 1 tube (L) pour l'assemblage). Prenez un boulon long (E), une rondelle normale (H) et un écrou fin (G), puis fixez les poteaux au toit avec les outils Partie I et Partie J.
- Page 14 Étape 6 : Assemblage de la Poignée Noire Étape 7 : Assemblage du Siège de la Balançoire Tout d'abord, fixez la poignée noire (C) sur les nœuds avec un écrou long (D) à Tout d'abord, attachez fermement la première sangle (M) autour du tube l'aide de l'outil Partie I.
- Page 15 Return / Damage Claim Instructions DO NOT discard the box / original packaging. In case a return is required, the item must be returned in original box. Without this your return will not be accepted. Take a photo of the box markings. A photo of the markings (text) on the side of the box is required in case a part is needed for replacement.
Need help?
Do you have a question about the TM10025 and is the answer not in the manual?
Questions and answers