Table of Contents
Advertisement
Quick Links
Advertisement
Table of Contents

Related Manuals for Electrolux EOF6P77X


Summary of Contents for Electrolux EOF6P77X
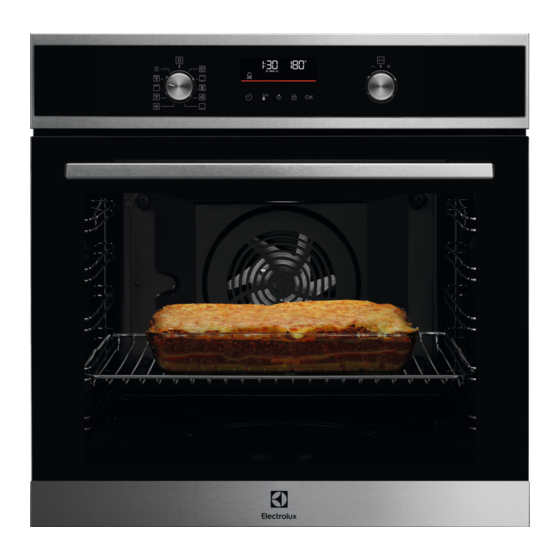
- Page 1 EOF6P77X Oven User Manual...
-
Page 2: Table Of Contents
WE’RE THINKING OF YOU Thank you for purchasing an Electrolux appliance. You’ve chosen a product that brings with it decades of professional experience and innovation. Ingenious and stylish, it has been designed with you in mind. So whenever you use it, you can be safe in the knowledge that you’ll get great results every time. -
Page 3: Safety Information
SAFETY INFORMATION 9. HOW TO USE: ACCESSORIES....23 12.3 How to use: Pyrolytic Cleaning..29 12.4 Cleaning Reminder...... 31 9.1 Inserting accessories..... 23 12.5 How to remove and install: Door..31 10. ADDITIONAL FUNCTIONS..... 24 12.6 How to replace: Lamp....33 10.1 Lock..........24 13. -
Page 4: General Safety
SAFETY INFORMATION Keep all packaging away from children and dispose of it • appropriately. WARNING: The appliance and its accessible parts become • hot during use. Keep children and pets away from the appliance when in use and when cooling down. If the appliance has a child safety device, it should be •... -
Page 5: Safety Instructions
SAFETY INSTRUCTIONS To remove the shelf supports first pull the front of the shelf • support and then the rear end away from the side walls. Install the shelf supports in the opposite sequence. Do not use a steam cleaner to clean the appliance. •... -
Page 6: Electrical Connection
SAFETY INSTRUCTIONS Depth of the appliance 569 mm Built in depth of the appliance 548 mm Depth with open door 1022 mm Ventilation opening minimum size. Opening placed 560x20 mm on the bottom rear side Mains supply cable length. Cable is placed in the 1500 mm right corner of the back side Mounting screws... -
Page 7: Use
SAFETY INSTRUCTIONS For the section of the cable refer to the total power on the rating plate. You can also refer to the table: Total power (W) Section of the cable (mm²) maximum 1380 3 x 0.75 maximum 2300 3 x 1 maximum 3680 3 x 1.5 The earth cord (green / yellow cable) must be 2 cm longer than phase and neutral cables (blue... -
Page 8: Care And Cleaning
SAFETY INSTRUCTIONS furniture panel and cause subsequent damage to the appliance, the housing unit or the floor. Do not close the furniture panel until the appliance has cooled down completely after use. 2.4 Care and cleaning WARNING! Risk of injury, fire, or damage to the appliance. •... -
Page 9: Internal Lighting
• Cut off the mains electrical cable close to the appliance and dispose of it. • Remove the door catch to prevent children or pets from becoming trapped in the appliance. 3. INSTALLATION WARNING! Refer to Safety chapters. 3.1 Building in www.youtube.com/electrolux www.youtube.com/aeg How to install your AEG/Electrolux Oven - Column installation 9/40... -
Page 10: Securing The Oven To The Cabinet
INSTALLATION (*mm) min. 550 min. 560 (*mm) min. 550 min. 560 3.2 Securing the oven to the cabinet 10/40... -
Page 11: Product Description
PRODUCT DESCRIPTION 4. PRODUCT DESCRIPTION 4.1 General overview Control panel Knob for the heating functions Display Control knob Heating element Lamp Shelf support, removable Shelf positions 4.2 Accessories • Wire shelf For cookware, cake tins, roasts. • Baking tray For cakes and biscuits. •... -
Page 12: Control Panel
HOW TO TURN OVEN ON AND OFF 5.2 Control panel Control panel sensor fields Press Turn the knob Fast Heat Timer Light Lock Select a heating function to turn on the oven. Turn the knob for the heating functions to the off position to turn the oven off. When the knob for the heating functions is in the off position, the display goes to standby. -
Page 13: Before First Use
BEFORE FIRST USE 6. BEFORE FIRST USE WARNING! Refer to Safety chapters. 6.1 Initial cleaning Before the first use clean the empty oven and set the time: 00:00 Set the time. Press 6.2 Initial preheating Preheat the empty oven before the first use. Step 1 Remove all accessories and removable shelf supports from the oven. -
Page 14: Heating Functions
DAILY USE Start cooking Set a heating function. Set the temperature. 7.2 Heating functions Standard heating functions Heating function Application To bake on up to three shelf positions at the same time and to dry food. Set the temperature 20 - 40 °C lower than for Conventional Cooking. True Fan Cooking To bake and roast food on one shelf position. -
Page 15: Notes On: Moist Fan Baking
DAILY USE Heating function Application This function is designed to save energy during cooking. When you use this function, the temperature in the cavity may differ from the set temper‐ ature. The residual heat is used. The heating power may be reduced. For Moist Fan Baking more information refer to "Daily Use"... -
Page 16: Assisted Cooking
DAILY USE Assisted Cooking - use it to prepare a dish quickly with default settings: Enter the menu. Select Assisted Select the dish. Press Insert the dish to the oven. Confirm setting. Cooking. Press 7.5 Assisted Cooking Legend Weight Automatic available. Preheat the oven before you start cooking. - Page 17 DAILY USE Dish Weight Shelf level / Accessory Duration time Roast Beef, rare (slow 75 min cooking) 2; baking tray Roast Beef, 1 - 1,5 kg; 4 Use your favourite spices or simply salt medium (slow - 5 cm thick 85 min and fresh grounded pepper.
- Page 18 DAILY USE Dish Weight Shelf level / Accessory Duration time Spare Ribs 2 - 3 kg; use 90 min 3; deep pan raw, 2 - 3 Add liquid to cover the bottom of a dish. cm thin Turn the meat after half of the cooking spare ribs time.
- Page 19 DAILY USE Dish Weight Shelf level / Accessory Duration time Meat loaf 1 kg 60 min 2; wire shelf Use your favourite spices. Fish Whole fish, 0,5 - 1 kg 30 min 2; baking tray grilled per fish Fill the fish with butter and use your fa‐ vourite spices and herbs.
- Page 20 DAILY USE Dish Weight Shelf level / Accessory Duration time Wegdes 1 kg 35 min 3; baking tray lined with baking pa‐ Use your favourite spices. Cut potatoes into pieces. Grilled mixed 1 - 1,5 kg 30 min 3; baking tray lined with baking pa‐ vegetables Use your favourite spices.
-
Page 21: Clock Functions
CLOCK FUNCTIONS Dish Weight Shelf level / Accessory Duration time All grain / 1 kg 60 min 2; baking tray lined with baking rye / dark paper / wire shelf bread all grain in loaf 8. CLOCK FUNCTIONS 8.1 Clock functions Clock Function Application Minute minder. - Page 22 CLOCK FUNCTIONS How to set: Minute minder Step 1 Step 2 Step 3 The display shows: 0:00 Set the Minute minder Press: Press: Timer starts counting down immediately. How to set: Cooking time Step 1 Step 2 Step 3 Step 4 The display shows: 0:00...
-
Page 23: How To Use: Accessories
HOW TO USE: ACCESSORIES 9. HOW TO USE: ACCESSORIES 9.1 Inserting accessories A small indentation at the top increases safety. The indentations are also anti-tip devices. The high rim around the shelf prevents cookware from slipping of the shelf. Wire shelf: Push the shelf between the guide bars of the shelf support and make sure that the feet point down. -
Page 24: Additional Functions
ADDITIONAL FUNCTIONS 10. ADDITIONAL FUNCTIONS 10.1 Lock This function prevents an accidental change of the oven function. Turn it on when the oven works - the set cooking continues, the control panel is locked. Turn it on when the oven is off - the oven cannot be turned on, the control panel is locked. - press and hold to turn on - press and hold to turn it off. - Page 25 HINTS AND TIPS (°C) (min) Sweet rolls, 16 baking tray or dripping 20 - 30 pieces Rolls, 9 pieces baking tray or dripping 30 - 40 Pizza, frozen, wire shelf 10 - 15 0.35 kg Swiss Roll baking tray or dripping 25 - 35 Brownie baking tray or dripping...
-
Page 26: Moist Fan Baking - Recommended Accessories
HINTS AND TIPS (°C) (min) Muffins, 12 baking tray or dripping 30 - 40 pieces Savory pastry, 20 baking tray or dripping 25 - 30 pieces Short crust bis‐ baking tray or dripping 25 - 35 cuits, 20 pieces Tartlets, 8 pieces baking tray or dripping 20 - 30 Vegetables,... - Page 27 HINTS AND TIPS (°C) (min) Small Conven‐ Baking 20 - 30 cakes, tional tray 20 per Cooking tray Small True Fan Baking 150 - 20 - 35 cakes, Cooking tray 20 per tray Small True Fan Baking 2 and 4 150 - 20 - 35 cakes,...
-
Page 28: Care And Cleaning
CARE AND CLEANING (°C) (min) Short True Fan Baking 140 - 20 - 40 bread Cooking tray Short True Fan Baking 2 and 4 140 - 25 - 45 bread Cooking tray Short Conven‐ Baking 140 - 25 - 45 bread tional tray... -
Page 29: How To Remove: Shelf Supports
CARE AND CLEANING Clean the cavity after each use. Fat accumulation or other residue may cause fire. Moisture can condense in the oven or on the door glass panels. To decrease the condensation, let the oven work for 10 minutes before cooking. Do not store the food in the oven for longer than 20 minutes. - Page 30 CARE AND CLEANING Before the Pyrolytic Cleaning: Turn off the oven and wait Remove all accessories. Clean the oven floor and the in‐ until it is cold. ner door glass with warm water, a soft cloth and a mild detergent. Pyrolytic Cleaning Step 1 Enter menu: Cleaning...
-
Page 31: Cleaning Reminder
CARE AND CLEANING 12.4 Cleaning Reminder The oven reminds you when to clean it with pyrolytic cleaning. To turn off the reminder enter the Menu and flashes in the display for 5 sec after each select Settings, Cleaning Reminder. cooking session. 12.5 How to remove and install: Door The oven door has three glass panels. - Page 32 CARE AND CLEANING Step 7 Hold the door trim (B) on the top edge of the door at the two sides and push inwards to release the clip seal. Step 8 Pull the door trim to the front to re‐ move it.
-
Page 33: How To Replace: Lamp
CARE AND CLEANING Make sure that you put the glass panels (A and B) back in the correct sequence. Check for the symbol / printing on the side of the glass panel, each of the glass panels looks different to make the disassembly and as‐ sembly easier. -
Page 34: Troubleshooting
TROUBLESHOOTING 13. TROUBLESHOOTING WARNING! Refer to Safety chapters. 13.1 What to do if... In any cases not included in this table please contact with an Authorised Service Centre. The oven does not turn on or does not heat up Problem Check if... -
Page 35: Service Data
Serial number (S.N.) ......... 14. ENERGY EFFICIENCY 14.1 Product Information and Product Information Sheet* Supplier's name Electrolux Model identification EOF6P77X 949498248 Energy Efficiency Index 81.2 Energy efficiency class Energy consumption with a standard load, conventional 0.93 kWh/cycle mode Energy consumption with a standard load, fan-forced 0.69 kWh/cycle... -
Page 36: Energy Saving
ENERGY EFFICIENCY Type of oven Built-In Oven Mass 32.2 kg * For European Union according to EU Regulations 65/2014 and 66/2014. For Republic of Belarus according to STB 2478-2017, Appendix G; STB 2477-2017, Annexes A and B. For Ukraine according to 568/32020. Energy efficiency class is not applicable for Russia. -
Page 37: Menu Structure
MENU STRUCTURE 15. MENU STRUCTURE 15.1 Menu - select to enter the Menu. Menu structure Assisted Cooking Cleaning Settings Step 1 Step 2 Step 3 Step 4 Step 5 O1 - O11 Adjust the value Select the Menu, Select the set‐ Confirm setting. - Page 38 ENVIRONMENTAL CONCERNS appliances. Do not dispose of appliances marked with the symbol with the household waste. Return the product to your local recycling facility or contact your municipal office. 38/40...
- Page 39 39/40...
- Page 40 www.electrolux.com/shop...
Need help?
Do you have a question about the EOF6P77X and is the answer not in the manual?
Questions and answers