
Related Manuals for ADCA RP45 Series


Summary of Contents for ADCA RP45 Series
- Page 1 ADCA RP45 PRESSURE REDUCING VALVES INSTALLATION AND MAINTENANCE INSTRUCTIONS VALSTEAM ADCA We reserve the right to change the design and material of this product without notice. IMI RP45.015 E 00.23...
- Page 2 GENERAL INFORMATION • These instructions must be carefully read before performing any work involving VALSTEAM ADCA products. Failure to observe these instructions may result in hazardous situations. • These instructions describe the entire life cycle of the product. Keep them in a location that is accessible to every user and make these instructions available to every new owner of the product.
-
Page 3: Table Of Contents
9. MAINTENANCE 9.1. Maintenance procedure 9.2. Replacing the actuator 9.3. Replacing the actuator diaphragm 9.4. Replacing the adjustment spring 9.5. Replacing seat and plug 9.6. Tightening torques 10. TROUBLESHOOTING 11. DISPOSAL 12. RETURNING PRODUCTS VALSTEAM ADCA IMI RP45.015 E 00.23... -
Page 4: Safety Information
This includes checking application, material suitability, process medium, pressure and temperature as well as their respective limiting values. VALSTEAM ADCA does not assume any responsibility for damage resulting from inappropriate use of the product, damage caused by external stresses or any other external factors. -
Page 5: Qualification Of Personnel
Unauthorized modifications to the product. If the product is to be used for an application or with a fluid other than the one it was designed for, contact VALSTEAM ADCA. 1.3. Qualification of personnel Handling, installation, operation and maintenance work must be carried out by fully trained and qualified personnel, capable of judging the work which they are assigned to perform and recognizing potentially hazardous situations. -
Page 6: Atex
Thermally insulate tubes and products as a preventive measure. RISK OF HEARING LOSS Depending on the operating conditions, the product may generate loud noises. • Wear hearing protection when in the vicinity of the product. VALSTEAM ADCA IMI RP45.015 E 00.23... - Page 7 Manual handling (e.g. lifting, carrying, pushing, pulling) of large and/or heavy products may result in personal injury. • Assess the risk associated with the handling task. • Use adequate handling methods and appropriate auxiliary handling equipment. VALSTEAM ADCA IMI RP45.015 E 00.23...
-
Page 8: Product Information
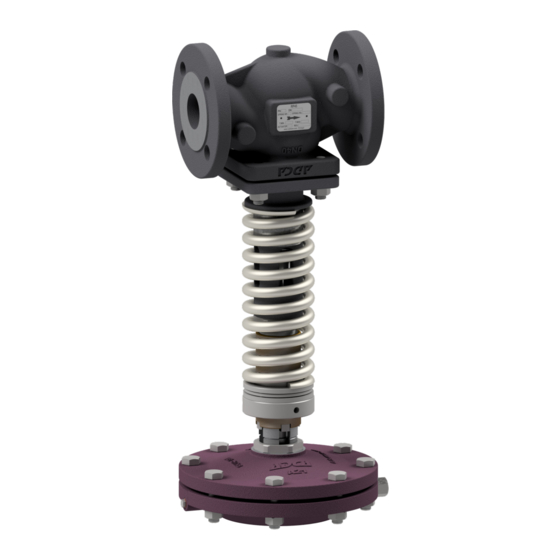
ADCA. 2. PRODUCT INFORMATION The ADCA RP45 series pressure reducing valves are single seated, bellows sealed proportional controllers that operate without auxiliary energy. These are used in industrial applications to maintain the pressure downstream of the valve within acceptable limits of the adjusted set point. - Page 9 To avoid this, the valve can be installed with the fluid direction against the plug under certain conditions. However, it is suggested to consult VALSTEAM ADCA before installing the valve with liquids. Alternative models are also available for reducing service in liquid applications.
-
Page 10: Certification
Max. operating temperature (e.g. Tmax = 250 ºC) • Flow direction (indicated by an arrow) • Serial number and year of manufacturing (e.g. Reg.:17483/19) • CE Marking (when applicable – see section 2.2 – Certification) VALSTEAM ADCA IMI RP45.015 E 00.23... -
Page 11: Technical Data
Some product components may deteriorate with time (e.g. valve packings, seals). • Do not store the product for more than 12 months. • If for any reason the product must be stored for longer periods of time contact VALSTEAM ADCA. VALSTEAM ADCA IMI RP45.015 E 00.23... -
Page 12: Installation
ADCA Products are individually wrapped in plastic film, thermo shrinkable plastic and/or stored in a cardboard box as they leave VALSTEAM ADCA. Avoid removing packaging and any protective cover until immediately before installing the product at the site. NOTE If the transport packaging has any shipping damage contact VALSTEAM ADCA or its representative. -
Page 13: Preparation For Installation
Check that there are no foreign bodies inside the pipelines and ancillaries, flushing may be necessary. These should be thoroughly cleaned. • An ADCA pipeline strainer or filter should be installed upstream of the pressure regulator, preventing solid particles from the process medium from damaging the product. -
Page 14: Mounting The Actuator Onto The Valve
In case of steam or gases service the sensing pipe may also be welded on the top of the pipeline. An ADCA seal pot must be installed in the sensing pipe when operating with steam or liquids at temperatures above 90 ºC. -
Page 15: Start-Up
(dirt, scale, weld splatters, etc.) may damage the product or cause malfunction. • Flush pipelines before start-up. • Clean protection varnishes from pipes and flanges, leftover paint, graphite, grease, etc. • Use a pipeline strainer or a filter. VALSTEAM ADCA IMI RP45.015 E 00.23... -
Page 16: Preparation For Start-Up
Close the actuator vent with the washer (62) and vent screw (61) and proceed to fill the pot until the process medium starts to overflow. d. Screw the plug on the seal pot tightly. VALSTEAM ADCA IMI RP45.015 E 00.23... -
Page 17: Start-Up Procedure
3. Check the pressure regulator to ensure it is operating correctly. NOTE 24 hours after system start-up, it is recommended to check the pipe connection for leaks and retighten when necessary. Clean strainers/filters to avoid blocking. VALSTEAM ADCA IMI RP45.015 E 00.23... -
Page 18: Operation
6. If the pressure regulator won’t be back in operation for a long period of time relax the adjustment spring (18). 7. If the pressure regulator is to be removed from the pipeline – see section 3 – Transport, storage and packaging. VALSTEAM ADCA IMI RP45.015 E 00.23... -
Page 19: Parts List
Fig. 8 - Detail A Fig. 9 - Detail A 1/2" to 2" – DN 15 to DN 40 2" and 21/2" – DN 50 and DN 65 3" and 4" – DN 80 and DN 100 VALSTEAM ADCA IMI RP45.015 E 00.23... - Page 20 3" and 4" – DN 80 and DN 100 5" and 6" – DN 125 and DN 150 Fig. 12 - A series 65 63 59 58 60 Fig. 13 - B series Fig. 14 - C series VALSTEAM ADCA IMI RP45.015 E 00.23...
- Page 21 Lower spring plate (RP45G and RP45S) Compression fitting Lower spring plate (RP45i) Vent screw Upper spring plate Washer Threaded tube Bolts Spring adjusting nut (RP45G and RP45S) Nuts Spring adjusting nut (RP45i) Washer Ball bearing VALSTEAM ADCA IMI RP45.015 E 00.23...
-
Page 22: Maintenance
Unscrew the lock nut (31) and remove the actuator from the valve. If the valve is fitted onto the pipeline with the actuator facing down, support it so it does not fall. d. Insert the guide (54A) of the new actuator through the central hole of the flange VALSTEAM ADCA IMI RP45.015 E 00.23... -
Page 23: Replacing The Actuator Diaphragm
3. Unscrew nuts and bolts (63, 64) and remove washers (65), if any, from the actuator. Separate the lower (51) and upper (52) diaphragm chambers. 4. Remove the diaphragm assembly. 5. Untighten the nut (57), remove the washer (56) (except C series actuators) and replace the diaphragm (55). VALSTEAM ADCA IMI RP45.015 E 00.23... -
Page 24: Replacing The Adjustment Spring
9.4. Replacing the adjustment spring 15 15A Adjustment rod Adjustment rod Actuator Actuator 1/2" to 4" – DN 15 to DN 100 5" and 6" – DN 125 and DN 150 Fig. 16 - Replacing the adjustment spring. VALSTEAM ADCA IMI RP45.015 E 00.23... -
Page 25: Replacing Seat And Plug
5. Follow the relevant instructions in section 9.2 – Replacing the actuator – to reassemble the actuator onto the valve. 9.5. Replacing seat and plug For instructions on how to replace seat and plug contact VALSTEAM ADCA. 9.6. Tightening torques TORQUE (Nm) POS. -
Page 26: Troubleshooting
ADCA 10. TROUBLESHOOTING Before applying any corrective measure, refer to section 1 – Safety information. If the malfunction cannot be solved with the help of the following table, contact VALSTEAM ADCA or its representative. Malfunction Possible cause Corrective measure Foreign matter is stuck between the •... -
Page 27: Disposal
VALSTEAM ADCA personnel. • Information regarding any hazards or precautionary measures to be considered must be provided in writing when returning products to VALSTEAM ADCA. • Health and Safety information sheets relating to any substances identified as hazardous or potentially hazardous must be provided outside the packaging.
Need help?
Do you have a question about the RP45 Series and is the answer not in the manual?
Questions and answers