Advertisement
Quick Links
Advertisement

Related Manuals for vita Keyhole Garden VT17101


Summary of Contents for vita Keyhole Garden VT17101
- Page 1 4’ x 4’ 122 cm x 122 cm VT17101 Instruction Manual V 3.0 | Feb 21-2018 The world needs vegetables.
- Page 2 Congratulations! We’re thrilled that you chose to purchase your Vita Keyhole Garden. We’re sure that you’ll not only grow healthy foods but you’ll have fun too. Keyhole Gardening is a native gardening technique to many communities in Africa. It’s used particulary in Rwanda, Uganda, Tanzania and Kenya. It's design is such that it requires considerably less water than traditional gardens making it a perfect garden in water-consumption sensitive areas.
-
Page 3: Box Contents
Before you begin, please check the box for these contents. In the event of missing or de-fective parts please call our customer service department at 1.844.880.VITA (8482) Mon. to Fri. 8:00 AM to 4:00 PM EST. In the UK, feel free to contact us between 1PM and 10 PM GMT at (44) 2038 687160. - Page 4 Dimensions 4’ x 4’ x 22” (122 cm x 122 cm x 56 cm) – Keyhole Garden 44 1/8 in (112 cm) 12 in 44 1/8 in (30.5 cm) (112 cm) 12 in (30.5 cm) 22 5/8 in (57.5 cm) 22 in (56 cm) 48 in...
-
Page 5: Warranty
If you have any questions about your warranty or with your product, please call our customer service department at 1.844.880.VITA (8482), Mon. to Fri. 8:00 AM to 4:00 PM EST. In the UK, feel free to contact us between 1PM and 10 PM GMT at (44) 2038 687160. - Page 6 Step 1A Insert one side panel between the posts as shown. Notice that there is a groove in the board that cooresponds to the tab on the post. This locks the boards in. Step 1B Insert another side between the posts.
- Page 7 Step 2A Repeat step 1A with the other boards and posts. Step 2B Insert the post caps as shown. 4’ x 4’ x 22” (122 cm x 122 cm x 56 cm) – Keyhole Garden...
- Page 8 Step 3A Insert a basket corner joiner bracket into each end of the basket panel as shown. Make sure they are all facing the same way. Repeat for 2 basket panels. Step 3B Connect the four basket panels as shown. 4’...
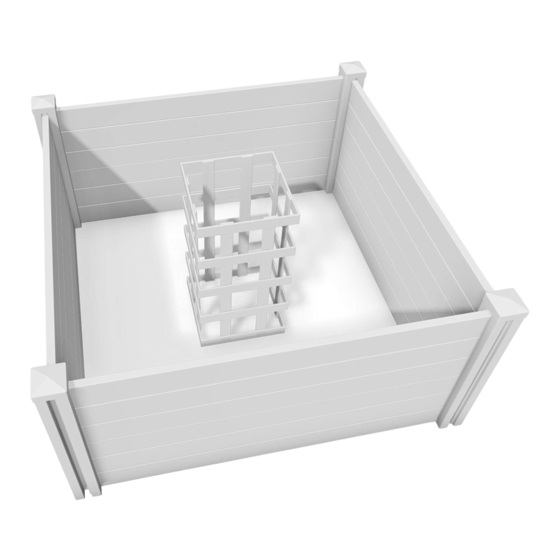
- Page 9 Step 4A Position your assembled basket inside the garden bed. 4’ x 4’ x 22” (122 cm x 122 cm x 56 cm) – Keyhole Garden...
- Page 10 Startup Option Fill with organic layers The magic of the Keyhole Garden is in it’s composting abilities. The Keyhole literally uses piles of common organic household waste and converts it into a rich growing enviroment for your vegetables to grow. The diagram below shows the different layers you should plan out to start your Keyhole Garden.
- Page 11 Startup Option Fill with soil mixture - or about 1 cubic yard), we recommend following this method: 1. Use the box your Keyhole Garden came in. Lay it on the very bottom of the eventually compost. We have used organic inks in the use of this box. 2.
- Page 12 Daily composting The Composting Basket is key to adding nutrients to your garden bed. It’s here where you can continually use up your regular kitchen scraps to nourish your Keyhole Garden. For best composting success use the same Brown-Green alternating technique as this helps your compost work the best.
- Page 13 Things you can compost - vegetable clippings cardboard - grass clippings - shredded paper - green leaves - brown leaves - fruit peels and rinds - twigs (minimal citrus) - egg shells - wine corks - tea bags / tea leaves - wood ashes - plant trimmings - oatmeal...
- Page 14 The world needs vegetables. www.vitagardens.com...
Need help?
Do you have a question about the Keyhole Garden VT17101 and is the answer not in the manual?
Questions and answers