Table of Contents
Advertisement
Quick Links
SenseCAP Indicator
User Manual
Brief Introduction
SenseCAP Indicator is a 4-inch touch screen driven by ESP32 and RP2040
dual-MCU and supports Wi-Fi/BLE/LoRa communication. It is a fully open
source powerful IoT development platform for developers. One-stop ODM
Fusion service is also available for customization and quick scale-up.
Product
Video:https://youtu.be/IOdI5_MGbCw
SenseCAP Indicator User Manual v2023.4.20.01
Advertisement
Table of Contents

Subscribe to Our Youtube Channel
Related Manuals for SeeedStudio SenseCAP Indicator


Summary of Contents for SeeedStudio SenseCAP Indicator
- Page 1 SenseCAP Indicator User Manual Brief Introduction SenseCAP Indicator is a 4-inch touch screen driven by ESP32 and RP2040 dual-MCU and supports Wi-Fi/BLE/LoRa communication. It is a fully open source powerful IoT development platform for developers. One-stop ODM Fusion service is also available for customization and quick scale-up.
-
Page 2: Table Of Contents
Introduction ................................. 4 Features ................................4 Hardware Version ............................. 7 Specification ............................... 8 ODM Service ..............................9 Get Started with SenseCAP Indicator ........................ 10 Hardware Overview ............................10 Button Function ............................. 10 Grove Interfaces ............................. 10 SX1262 LoRa Chip ..........................11 System Diagram ............................. -
Page 5: Introduction
SenseCAP Indicator native firmware enables you to use it as a desktop air quality detector or you could customize one of your own styles. There are built-in tVOCs and CO2 sensors, and a Grove TH sensor is provided to connect externally to reduce heat interference to get more accurate temperature and humidity results. - Page 6 In this way, the LoRa devices could be connected to the Matter ecosystem via Wi-Fi, without the need to buy a new Matter-compatible device. The software of SenseCAP Indicator is open source. Developers could create various IoT applications such as:...
- Page 7 ⚫ Air Quality Monitor ⚫ Weather Station Display ⚫ Sensor Data Dashboard ⚫ Smart Home Assistant ⚫ Mini Sensor Hub ⚫ Stock Price Indicator ⚫ Digital Album ⚫ SOP Reminder It can also be used to develop various exciting applications integrating with third-party platforms, such as: AWS / ChatGPT / Matter / NodeRED / IoTex ...
-
Page 8: Hardware Version
SenseCAP Indicator is an interactive display and control terminal for various IoT applications. It provides developers with a powerful and interface-rich development platform powered by ESP32-S3 and RP2040 dual-MCU. Don't wait anymore, start your wonderful development journey with SenseCAP Indicator now! Hardware Version The SenseCAP Indicator series offers four different versions: D1, D1S, D1L, and D1Pro. -
Page 9: Specification
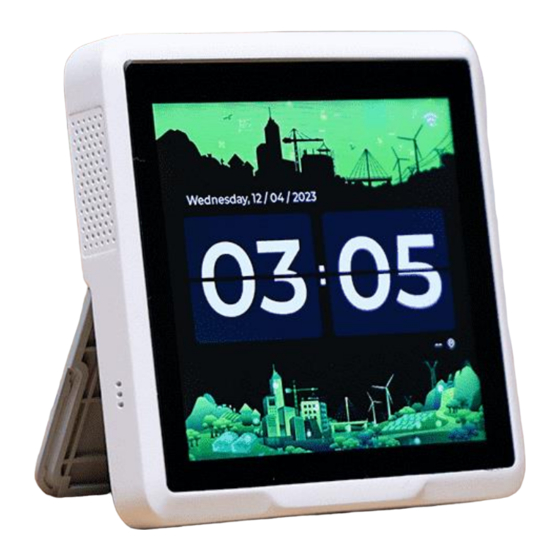
Specification Screen 3.95 Inch, RGB Touch Screen Capacitive Screen Resolution 480 x 480 pixels Power Supply 5V DC, 1A Battery ESP32-S3: Xtensa® dual-core 32-bit LX7 microprocessor, up to 240 Processor RP2040: Dual ARM Cortex-M0+ up to 133MHz ESP32S3: 8MB Flash RP2040: 2MB External Storage Support up to 32GB Micro SD Card (not included) -
Page 10: Odm Service
ODM Service Note: If you want to customize your own SenseCAP Indicator, Seeed Studio provides one-stop service for quick customization and scalp-up. Please contact iot@seeed.cc if you have large quantity customization need. With over 10 years of ODM & OEM experience, our engineers and product experts are proficient in delivering customization service for popular open-source hardware platforms, such as: Raspberry Pi, NVIDIA Jetson, Beagleboard, ESP32, and more. -
Page 11: Get Started With Sensecap Indicator
Get Started with SenseCAP Indicator Hardware Overview Button Function Short press: Turn off /wake up the screen Long press for 3s: Switch on/switch off the device Long press for 10s: Factory reset Grove Interfaces There are two Grove interfaces for connecting Grove modules, providing more possibilities for developers. -
Page 12: Sx1262 Lora Chip
hardware ecosystem. (Click Grove - Seeed Studio to learn more)Grove - Seeed Studio SX1262 LoRa Chip The embedded SX1262 LoRa module enables you to build the LoRa application and connect your local LoRa sensors to the Cloud via Wi-Fi. For example, you could build a LoRa hub device to connect your LoRa sensors to your smart home ecosystem to implement Matter over Wi-Fi. -
Page 13: System Diagram
System Diagram Native Firmware SenseCAP Indicator native firmware enables you to use it as a desktop air quality detector,just... -
Page 14: Wi-Fi Setting
a few simple steps to enjoy. Wi-Fi Configuration Plug the 5V power adaptor into the USB type-C power connector, the device will power on automatically, then the display will show the WiFi setting page. -
Page 15: Data Viewing
Select the WiFi you need, input the password and connect. Data Viewing ⚫ Home page Including the time, date, location info. ⚫ Sensor data Built-in tVOC and CO2 sensors, and an external Grove AHT20 TH sensor for more precise temperature and humidity readings. - Page 16 Click the specified sensor to enter the detailed information page, and you can choose to display the value of 24h or a week.
-
Page 17: Setting
Setting Display Setting Brightness: Adjust screen brightness Sleep Mode: Turn off the screen according to the interval you set Date & Time Setting Time Format: You can set 24H or 12H format. - Page 18 Time Auto Update/Zone Auto Update: When the device is connected to WiFi, it will automatically obtain the corresponding time zone and date. Manual setting: If the time obtained through the time zone cannot automatically identify the winter time or device is offline, then you can manually set the time zone...
-
Page 19: Development Tutorial
Development Tutorial ESP32 Firmware Flashing Flash by Flash Download Tools (For Windows only) ⚫ Step 1: Connect the device to your PC with the provided USB type-C cable. ⚫ Step 2:Install the Flash Download Tools Flash Download Tools for Windows ⚫... - Page 20 There should be 3 .bin files in the firmware , they correspond to 3 different downloading addresses: bootloader.bin - 0x0 partition-table.bin - 0x8000 terminal.bin - 0x10000 ⚫ Step 5: SPI Flash Configure SPI SPEED: 40MHz SPI MODE: DIO...
- Page 21 ⚫ Step 6: Download Panel Configure COM: Check the ports on your Device Manage, the USB-SERIAL is the correct one. Baud: 921600(recommended value) ⚫ Step 6: Start Downloading Then click "START" to start the downloading.
- Page 22 When it shows "FINISH", the flash has been completed. There is "indicator_terminal_demo.bin" firmware (allinone ) in the . you can flash it to esp32.
- Page 23 Flash by IDF For Linux and MacOS: Standard Toolchain Setup for Linux and macOS For Windows: Standard Setup of Toolchain for Windows There is "indicator_terminal_demo.bin" firmware (allinone ) in the . you can flash...
-
Page 24: Rp2040 Firmware Flashing
it by idf. examples/factory/ cd <sdk>/ esptool.py write_flash 0x0 indicator_terminal_demo.bin also you can build, flash and monitor the project. cd <sdk>/examples/ terminal_demo idf.py -p PORT flash monitor build RP2040 Firmware Flashing Flash by .uf2 file ⚫ Step 1: Connect the device to your PC Long press this internal button, then connect the device to your PC by the provided USB type-C cable, release the button once connected. - Page 25 Copy the .uf2 file in the firmware package to the disk, then the disk will log out. The upgrade will run automatically. Flash by Arduino IDE ⚫ Step 1: Install Arduino IDE Arduino IDE...
- Page 26 Raspberry Pi Pico Add the Board ⚫ Step 2: Open your Arduino IDE, click on Arduino > Settings, and copy the below URL to Additional Boards Manager URLs: https://github.com/earlephilhower/arduino- pico/releases/download/global/package_rp2040_index.json Click on Tools > Board > Board Manager. Search and install "Raspberry Pi Pico/RP2040" in the Boards Manager...
- Page 27 Add Libraries ⚫ Step 3: Download these libraries we need: Serial communication protocol SGP40 TVOC sensor library Transfer index library: Sensirion Gas Index Algorithm SCD41 CO2 sensor library AHT20 temperature and humidity sensor libray Sensirion Arduino Core library Navigate to Sketch -> Include Library -> Add .ZIP Library, then select the libraries you download.
- Page 28 ⚫ Step 4: Connect the device to your PC with the provided USB Typc-C cable. ⚫ Step 5: Select the board Tools > Board > Raspberry Pi PR2040 Boards > Raspberry Pi Pico Port: Select the "usbmodem" one ⚫ Step 6: Open the example code file File >...
- Page 29 ⚫ Step 7: Verify and Upload the file.
-
Page 30: Resource
Resource IDF Downloard: Standard Toolchain Setup for Linux and macOS Standard Setup of Toolchain for Windows SenseCAP Indicator ESP32 SDK:SenseCAP Indicator SDK for esp32 SenseCAP Indicator RP2040 Examples: SenseCAP Indicator examples for rp2040...
Need help?
Do you have a question about the SenseCAP Indicator and is the answer not in the manual?
Questions and answers