
Related Manuals for Outback MATE


Summary of Contents for Outback MATE
- Page 1 MATE System Controller and Display Installation and User Manual for the OutBack MATE and MATE 2...
-
Page 2: Warranty
OutBack Power Systems is a leader in advanced energy conversion technology. Our products include true sine wave inverter/chargers, maximum power point charge controllers, system communication components, as well as breaker panels, breakers, accessories, and assembled systems. Notice of Copyright MATE System Controller and Display Installation and User Manual REV A © 2007 All rights reserved. -
Page 3: Contact Information
Disclaimer UNLESS SPECIFICALLY AGREED TO IN WRITING, OUTBACK POWER SYSTEMS: (a) MAKES NO WARRANTY AS TO THE ACCURACY, SUFFICIENCY OR SUITABILITY OF ANY TECHNICAL OR OTHER INFORMATION PROVIDED IN ITS MANUALS OR OTHER DOCUMENTATION. (b) ASSUMES NO RESPONSIBILITY OR LIABILITY FOR LOSS OR DAMAGE, WHETHER DIRECT, INDIRECT, CONSEQUENTIAL OR INCIDENTAL, WHICH MIGHT ARISE OUT OF THE USE OF SUCH INFORMATION. -
Page 4: Table Of Contents
Contents INTRODUCTION MATE Specifications and Features Manual Setup Installation Basic Operation Power Up MAIN Screen How to Read a MATE Screen Screen Types MATE Setup Setup the MATE Setting the Clock Contrast Adjustment Backlight Adjustment MATE Communications Options Communications Options Communications Errors Errors and Debugging... - Page 5 Grid-Use Mode Weekday Grid-Use Start Weekday Grid-Use Stop Weekend Grid-Use Start Weekend Grid-Use Stop MATE DEFAULTS MATE Menu Map Menu Structure MATE Menu Guide MATE Menus MATE Menu Map Overview APPENDIX Troubleshooting User Information and Settings Warranty Product Registration...
-
Page 6: Introduction
OutBack Power System products • Issue a global Bulk or EQ recharging command which includes the Charge Controller’s charging function. This manual will show step-by-step use of the OutBack MATE to best run a power system. MATE At a Glance Yellow Status Indicator, AC Input LED “Hot Key”... -
Page 7: Mate Specifications And Features
(425) 844-1291 Info@RightHandEng.com OutBack MATE Functions Why use a MATE with your OutBack Power System FX Series Inverter/Chargers and Charge Controllers? What exactly does it do? A typical power system providing utility-supplied electricity requires very little from a user. Other than flipping an occasional tripped circuit breaker back on due to an overload and paying a monthly bill, there is little to monitor or adjust. - Page 8 With the MATE, a user can know the system’s activity and conditions at any given time. Sometimes, after careful observations, a user might want to change the conditions or set points which cause an action to occur. What is a set point? A set point is a condition, measurement, or baseline a user establishes in order for something else to happen.
-
Page 9: Manual Setup
• Chapters 1-5: setting basic items and display options (when, how, and what you want to view) with the “soft keys, ” enabling the user to get around the MATE and change its settings. - Page 10 Connect the CAT5 cable to the source but not to the MATE just yet. • If connecting a computer to the MATE or MATE2, run a serial cable from the computer to the MATE’s location, but do not connect the cable at this time.
-
Page 12: Basic Operation
Basic Operation... -
Page 13: Power Up
NOTE: For a viewing of all MATE screens, please see pages 105-118 at the end of this manual. Power Up A soon as the MATE cable is plugged into a powered OutBack product, the MATE itself will power-up and display several information screens. -
Page 14: Port Assignment
10> 2M> No Devices Found The MATE found an FX Series Inverter/Charger The MATE has found a Charge Controller The MATE has found the HUB Port Assignment screen follows the HUB Found screen Each Port used will show its connected component. -
Page 15: Main Screen
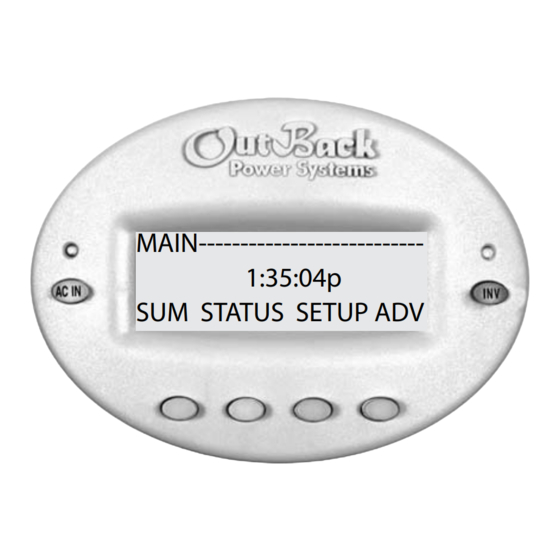
Would you like to Retry? NOTE: If the MATE does not find the connected device, refer to page 124, Troubleshooting MAIN Screen MAIN--------------------------------- No Device Found The MAIN screen appears after the MATE detects the HUB (and any devices connected to it) or detects a single device if a HUB is not in use. - Page 16 Navigation This section of the manual will cover how to use the buttons on the MATE to navigate the menus. MATE Buttons Yellow Status Indicator, AC Input LED AC In Hot Key Soft Keys Six buttons or keys navigate the MATE and change its settings: HOT KEYS Two FX dedicated “hot”...
-
Page 17: How To Read A Mate Screen
How To Read a MATE Screen MATE screens will either show values that can be changed or navigate to value screens. The information on the MATE’s screen is segregated by type or task and distinguished by location on the screen and the choice of lowercase or uppercase letters. Occasionally it can be misread by a user. - Page 18 <TOP> soft keys or a change of HUB ports using the <PORT> soft key. In other cases, a MATE navigation screen leads to a screen that can require a user’s action. The screen below, for instance, asks you to choose a category—HBX, GRIDUSE, AGS, or ADV.
-
Page 19: Screen Types
Although the OutBack MATE menu display screens vary depending on the unit’s software version, the menu structures and navigation are the same for all versions. The MATE uses a branching menu structure to display various OutBack products’ operation modes and statuses. -
Page 20: Mate Setup
MATE Setup... -
Page 21: Setup The Mate
CLOCK SETUP/MATE/PAGE2-------------- choose category: SETUP/MATE/PAGE3-------------- choose category: Note: To return the MATE to its factory default settings, please see page 96 Start with the <MAIN> screen, which appears 9:57:32A after the power-up screens, and press the <SETUP> soft key. STATUS SETUP Press the <MATE>... -
Page 22: Setting The Clock
Otherwise, the system will never work optimally. SETUP/MATE/PAGE1-------------- mate code rev: choose category: CLOCK SETUP/MATE/CLOCK-------------- BACK DATE NOTE: The MATE clock does not automatically adjust for daylight savings time or leap year. Current Day Current Month MONTH GLOW 1/01/03 12:00:00P... - Page 23 The next screen adjusts the year <INC YEAR> or <DEC YEAR> changes the year setting. Press the <DONE> soft key after the date change is final. This returns the MATE to the SETUP/MATE/CLOCK screen. <TIME> sets the MATE’s time. Pressing the <TIME> soft key leads to the Current Hour screen.
-
Page 24: Contrast Adjustment
Contrast Adjustment Why you want to do it: Everyone has different eyesight and ambient lighting varies with every location of a MATE. Like any other monitor, you may want to adjust the lighting and contrast for easier reading. PATH MAIN------------------------------------... -
Page 25: Backlight Adjustment
<TIME> sets the auto-off time limit from 1 to 60 minutes using <INC> and <DEC> soft keys. This is how long the MATE waits after the last button press to turn off the backlight. Once the backlight has turned off, any button press on the MATE will turn it back on. -
Page 26: Mate Communications Options
MATE Communications Options... -
Page 27: Communications Options
An error reading doesn’t mean the system is failing, but that the MATE is looking for a component that has been moved from one HUB Port to another or has been disconnected completely. The MATE is trying to account for the system components. - Page 28 10:001 2M:001 or 001 values after pushing the <RSET> soft key. Press any soft key to return to the SETUP/MATE/ COMM screen. To correct errors, please see “Er- rors and Debugging” in the section that follows. If no errors are present, pressing any soft key returns to the previous SETUP/MATE/COMM screen.
- Page 29 BACK SETUP/MATE/PAGE2-------------- choose category: BACK NOTE: Disconnecting the MATE’s CAT5 cable and then reconnecting it also performs the re-poll task, but the cable can be inconvenient to remove from a mounted MATE. Searching for Devices Port Assignment 1> FX 5>...
-
Page 30: Communications Errors
Generator Start) Mode is used and the wrong port is designated for the generator or if the system is damaged by a lightning strike. When a communication error occurs, the COMM ERR message will appear on any MATE screen in view. A sample DEBUG screen looks like this:... - Page 31 Port and the device. If the error remains on the same Port, then the problem is with the HUB. 4. Try connecting the MATE directly to the device. If the MATE recognizes the device, the problem could lie with the cable connecting the device to the HUB or with the HUB port itself.
-
Page 32: Mate Summary Screens
MATE Summary Screens... -
Page 33: Battery Discharging
(See Summary Screen Options on the next page for more setup information). Any MATE soft key pressed while the Summary screen is being displayed returns you to the screen that was active before the Summary screen was displayed. Pressing the two lower left soft keys at the same time opens the MAIN Menu screen. -
Page 34: Fx Summary Screen
Why you might want them: Summary screens show the current status of one or more FXs or Charge Controllers. Given that each user and system is different, the MATE offers the choice of viewing the status of either component as well as the timing of those displays. - Page 35 Roll change the summary screen Roll—switches between FX and CC (Charge Con- troller) summary screens automatically if both are connected to the MATE through an OutBack Power Systems HUB. None—disables the SUMMARY screen from None automatically opening; the SUMMARY screen can still be accessed via the <SUM>...
- Page 36 CC and FX SUMMARY screens every 20 seconds when in “Roll” mode. 4. If you choose “None, ” the MATE continues to display the last active screen viewed; if you press the <SUM> soft key on the MAIN menu when “None” is chosen, the FX SUMMARY screen appears.
- Page 37 <INC> and <DEC> soft keys. After the SUMMARY screen delay time is chosen, press the <BACK> soft key to return you to the SETUP/MATE- SUMMARY screen. Pressing the <SUM> soft key in the MAIN menu brings up your chosen SUMMARY screen or, if...
-
Page 38: Mate Status Screens
MATE Status Screens... - Page 39 MODE Typical CC Status Screen NOTE: Other than offering manual on/off control of its AUX relay, the MATE has no control over the workings of the CC Charge Controller except when the system is undergoing a global EQ charger mode. At this time, the system uses both the FX and the Charge Controller(s) to charge the batteries.
- Page 40 Reading a STATUS Screen STATUS/FX/PAGE1--------------- choose catagory MODES METER BATT • MODE: a functioning condition or state of operation • METER: displays inverter and charger activity, including output and input AC voltage, and AC inverter, charger, and input current • BATT: displays the battery temperature, voltage and the various set points for the different recharging cycles as well as the time remaining to complete any of those cycles •...
-
Page 41: Fx Status Screens
FX STATUS MODE Screens STATUS/FX/PAGE1------------------ choose category: MODES METER BATT STATUS/FX/MODE------------P00 chr control: CHANGE DOWN MODE STATUS/FX/MODE------------P00 inv control: CHANGE DOWN STAT MODE Push <STAT> to return to the choose category STATUS page. STATUS/FX/PAGE1-------- choose category: MODES METER BATT Pressing the <METER> soft key brings up the first METER screen. - Page 42 FX STATUS METER Screens Charge inv 0.0kw zer 0.0kw chg 0.0kw buy 0.0 kw DOWN STATUS PORT STATUS/FX/METER------------P00 inverter current DOWN STATUS/FX/METER----------P00 sell 0.0 aac current DOWN STATUS/FX/METER----------P00 sell 0.0 aac current DOWN TOP PORT Pressing the <BATT> soft key brings up the first FX BATT screen.
- Page 43 FX STATUS Batt(ery) Screens STATUS/FX/MODE-------------P00 battery 13.6 vdc actual DOWN STATUS PORT STATUS/FX/BATT---------------P00 absorb 00.0 hrs time remaining DOWN STATUS/FX/BATT---------------P00 refloat 12.5 vdc set point DOWN STATUS/FX/BATT---------------P00 batt temp. (not in degree C/F) DOWN BATT(ERY) Screens • battery actual: battery voltage as measured by the FX •...
- Page 44 FX STATUS ERROR Screens STATUS/FX/PAGE1------------------- choose category: MODES METER BATT STATUS/FX/ERROR----------P00 stacking error detected DOWN STATUS/FX/ERROR----------P00 phase loss error DOWN STATUS/FX/ERROR---P00 ac output backfeed DOWN ERROR Screens • low ac output voltage: inverter could not supply enough AC voltage to meet demand •...
- Page 45 • temperature sensor fault: an internal FX temperature sensor is malfunctioning • internal comm. error detected: there is a communication problem between the MATE and the FX • internal fan failure detected: the FX’s internal cooling fan is not operating properly •...
- Page 46 DISCON(NECT) Screens STATUS/FX/DISCON-----------P00 acin freq too high DOWN STATUS PORT STATUS/FX/DISCON-----------P00 acin voltage < min DOWN DISCON(NECT) Screens • acin freq too high: screen displays “Yes” if the AC source exceeds 69 Hz and the FX disconnects from the source •...
-
Page 47: Charge Controller Screens
To view the CC STATUS screens, return to the MAIN Menu, press the <STATUS> soft key and then choose the CC on the STATUS choose product screen. The STATUS screens include MODE, METER, and SET (SET POINT). In STATUS Mode, these Charge Controller functions can be viewed by the MATE, but not changed. MAIN--------------------------------... - Page 48 To view the CC STATUS screens, return to the MAIN Menu, press the <STATUS> soft key and then choose the CC on the STATUS choose product screen. The STATUS screens include MODE, METER, and SET (SET POINT). In STATUS Mode, these Charge Controller functions can be viewed by the MATE, but not changed. mode: Silent 33.2 vdc...
- Page 49 Absorb 28.8 VDC DOWN STATUS NOTE: All OutBack Charge Controller screens are displayed as CC screens on the MATE. CHARGE CONTROLLER SETP(OINT) Screens • Absorb: displays the voltage that initiates and maintains the Absorb cycle • Float: displays the voltage that begins the Float cycle and is maintained during this cycle...
-
Page 50: Mate Hot Keys
MATE Hot Keys... -
Page 51: Inv Hot Key
1:35:04p SUM STATUS SETUP ADV PRESS ONCE: <OFF> —turns off all the FX inverters connected to the MATE <SRCH> —the inverter begins search mode if the AC load connected is smaller than allowed by the programming of the search function. -
Page 52: Ac In Hot Key
AC IN Hot Key The AC IN “hot” key allows direct control of the AC input from anywhere in the menu system. The yellow LED indicator above the AC IN “hot” key has three settings: Flashing - an AC source is available, but not connected Continuously On - the AC source is connected and in use Off - no AC source is present The number of AC IN key presses determines which menu is called up. - Page 53 <OFF> manually overrides AGS mode. Pressing <OFF> brings up MAN-OFF indicating the user manually shut off the generator. <AUTO> allows the MATE to automatically start and stop the generator according to the settings programmed in the AGS menu. Pressing <AUTO> brings up either AUTO-OFF or AUTO-ON depending on the FX programming.
- Page 54 EQ and BULK charger commands. PRESS FOUR TIMES: • The CHARGER MODE CONTROL screen appears allowing the MATE to issue system (global) recharging commands. • Pressing <BULK> brings up the BULK CONTROL screen and starts a new recharging cycle.
- Page 55 Pressing <EQ> on the CHARGER MODE CONTROL screen brings up the EQUALIZE CONTROL screen When <STOP> has been selected, the EQ charge has stopped. When <START> has been selected, two informational screens are displayed. The user must push the <MORE> soft key before an equalizing cycle can begin.
- Page 56 To stop an equalizing process, return to the EQUALIZE CONTROL screen and press the <STOP> soft key. To return to the EQUALIZE CONTROL screen: • Press the <AC IN> hot key four times. • Press the <EQ> soft key. • Press the <STOP> soft key on the EQUALIZE CONTROL screen. AC INPUT CONTROL Hot Key NOTE: For a global charger command to work, all of the OutBack products must be connected...
-
Page 57: Advanced Mate Menus
Advanced MATE Menus... -
Page 58: Mate Control Codes
MATE Control Modes The MATE, when connected to at least one FX Series Inverter/Charger, offers more sophisti- cated controls than basic debugging and system displays. With the MATE, you can: • Program when an FX connects to an AC source based on time, battery voltage, or time-of- day grid usage •... -
Page 59: The Advanced Menus
The ADVANCED Menus The MATE must be connected to an OutBack system for the Advanced features to function. To access the MATE’s Advanced Mode settings, go to the MAIN menu and push the <ADV> soft key. The next screen is a warning screen intended to keep those unfamiliar with an OutBack system from altering the settings. -
Page 60: Hbx Mode
• Press the <AC IN> hot key three times until the CHARGER CONTROL screen appears. • Press the <OFF> soft key. In the ADV menu, push the <MATE> soft key to view the Advanced MATE functions. From the ADV/MATE screen, a Control Mode is chosen. - Page 61 At these times, the MATE directs the FX to use AC power until the battery is fully charged again. The user programs in the amount of time a battery can be below the low voltage and the amount of time after it’s fully charged before the MATE starts issuing its commands.
- Page 62 HUB-10. The Master will then instruct any stacked Slaves to USE or DROP the AC input source (please see appropriate the FX programming manual for stacking instructions). Before starting HBX Mode, set or reset the established values on the four MATE set point modes shown on the following screens: •...
- Page 63 CHANGE DONE NOTE: Before enabling HBX Mode, make sure the FX is in DROP mode by pressing the <DROP> soft key. The screen will indicate DROP mode, allowing the MATE to reset the HBX values.
- Page 64 ADV/MATE/HBX--------------------- ac input control DOWN Enable HBX by pressing the <HBX> soft key. The DROP screen now indicates the MATE is running in HBX mode by displaying the current state, USE or DONE DROP followed by HBX. DROP-HBX DONE To disable HBX Mode, press the <HBX> soft key DROP-HBX again.
- Page 65 AC INPUT CONTROL Currently:USE DROP NOTE: Even with HBX enabled, the user can issue manual DROP or USE commands using the AC INPUT CONTROL found under the ACIN hot key. Once a manual command is issued, the system will remain in that chosen command until the next HBX scheduled cycle normally occurs.
-
Page 66: Advanced Generator Mode
GenAlert is another way to automatically start a generator, but it does not offer the range of programming options as AGS. AGS is a function of the MATE while GenAlert is a function of the FX, which is programmed using the MATE. Information on the GenAlert function can be found in the FX programming and operations manual. -
Page 67: Ags Setup
AGS Setup To enter the AGS setup, go to the <ADV/MATE> screen: MAIN----------------------------------- 9:57:32 A SUM STATUS SETUP ADV ADV---------------------------------- choose device: ADV/MATE/PG1----------------------- choose category: HBX GRIDUSE AGS ADV/MATE/AGS------------------------ choose category: QUIET VOLT SETUP TIME START ADV/SETTINGS/WARNING changes made could... - Page 68 • Use the <INC> and <DEC> soft keys to set the AGS Port value to the HUB FX or FLEXnet DC Port controlling the generator If no HUB is used and the MATE is directly plugged into an FX, then the AGS Port needs to be set to 0 (zero).
- Page 69 AGS Enabled ADV/MATE/AGS/SETUP------------ AGS enabled: DOWN ADV/MATE/AGS/SETUP------------- AGS enabled: DOWN AGS Control ADV/MATE/AGS/SETUP------------- AGS control: DOWN GEN START CONTROL currently: This is the overall control for the AGS Mode. If AGS is not enabled, none of the AGS settings or controls will work. Enable the AGS first by pressing the YES soft key and then establish your settings.
- Page 70 FX system after the AUX output has been activated. If the generator fails to connect and provide AC current, the MATE displays an AGS error. The user can set this time anywhere from 5-30 minutes by pressing the <INC>...
- Page 71 ADV/MATE/AGS/SETUP----- cool down time DOWN ADV/MATE/AGS/SETUP----- warm up time DOWN End of AGS SETUP After the FX charging has been disabled, the cool down time screen allows the user to adjust the minutes number of minutes the generator will cool down before being shut off.
-
Page 72: Quiet Time
Quiet Time Why do you might want it: If Quiet Time Mode is set, the MATE will not allow most AGS settings to start the generator during the Quiet Time window. This is usually set up during night time when a running generator would be an annoyance. Quiet Times can be set individually for weekday and weekend, and consist of a Quiet Time Start and a Quiet Time Stop. -
Page 73: Weekday Start
DOWN PRESS <INC> UNTIL 141 AND THEN PRESS ENTER ADV/SETTINGS/WARNING changes made could adversely affect system performance MATE Go to the ADV/MATE screen and press the <AGS> soft key. GRIDUSE AGS QUIET VOLT TIME START weekday quiet time start is the beginning of the Monday-Friday quiet time period. -
Page 74: Weekday Stop
<INC> and <DEC> adjust the weekday start min- 12:00A utes. When finished, press the <DONE> soft key. This will return you to the ADV/MATE/AGS/QT weekday quiet time start menu. Press the <DOWN> soft key to go to the weekday 12:00A quiet time stop screen. -
Page 75: Weekend Start
Weekend Start ADV/MATE/AGS/QT------------------ weekend: quiet time start DOWN WEEKEND QT START--------------- adj hour DOWN WEEKEND QT START---------------- adj min ADV/MATE/AGS/QT------------------ weekend: quiet time start DOWN weekend quiet time start is the beginning of the quiet time period for Saturday and Sunday. Most... -
Page 76: Weekend Stop
WEEKEND QT STOP---------------- adj min ADV/MATE/AGS/QT--------------- weekend quiet time stop DOWN ADV/MATE/QUIET TIME----------- end of QUIET TIME menu weekend quiet time stop is the end of the quiet 12:00A time period for Saturday & Sunday. <CHANGE> adjusts the hour and minutes settings. -
Page 77: Voltage Start
2-Hour Voltage Set Point ADV/MATE/AGS/VSTART------------ volt start 2 hr setting DOWN To get to the Voltage Start screen, press the <VOLT START> soft key on the ADV/MATE/ QUIET VOLT AGS screen. TIME START If the battery voltage falls below this set point, a 24 hour timer starts counting down. -
Page 78: Load Start
2-Minute Voltage Set Point ADV/MATE/AGS/VSTART----------- volt start 2 min setting DOWN ADV/MATE/AGS/VSTART----------- end of VOLTAGE START menu Load Start Why you might want it: Instead of the generator starting only at preset times or according to battery voltage conditions, Load Start allows it to start because the demand for electricity is high. - Page 79 In the load start kw screen, an AGS start command will be issued when the total AC load 0 kw of all the FXs connected to the MATE exceeds this setting for the load start delay (next screen) time. A zero value disables any load start function.
- Page 80 AC load of all the FXs connected to the 0 kw MATE falls below this setting for the amount of time set with load stop delay (next screen) as long as the generator was started due to Load Start.
-
Page 81: Must Run
Must Run Time is a daily time period when the MATE commands the generator to run. Must Run Times can be set individually for weekdays and weekends and consist of a must run start time and a must Run stop time. -
Page 82: Weekday Stop
When finished, press the <DOWN> soft 12:00A key to adjust the minutes. Adjust the minutes using the <INC> and <DEC> soft keys. When finished, press the <DONE> soft 12:00A key to return to the ADV/MATE/AGS/MR week- DONE day must run stop time screen. -
Page 83: Weekend Start
DOWN WEEKEND MR START adj hour DOWN WEEKEND MR START adj min Press the <DOWN> soft key in the ADV/MATE/ 12:00A AGS/MR screen to adjust the weekend must run start time. CHANGE weekend must run start time is the beginning... -
Page 84: Weekend Stop
Adjust the minutes settings using the <INC> and <DEC> soft keys. When finished, press the 12:00A <DONE> soft key to return to the ADV/MATE/ AGS/MR weekend: must run stop time screen. DONE To proceed to the end of MUST RUN menu, press 12:00A the <DOWN>... - Page 85 DOWN ADV/MATE/AGS/%SOC-------------- %SOC DOWN ADV/MATE/AGS/%SOC-------------- To proceed to the ADV/MATE/AGS/PG2 screen, press the <AGS> soft key Press the <P3> soft key to access the ADV/MATE/ AGS/PG3 screen which includes the EXERCISE LOAD MUST option. START Press the <%SOC> soft key.
- Page 86 ADV/MATE/AGS/PG3--------------- choose category ADV/MATE/AGS/TIMERS------------ agsstate DOWN ADV/MATE/AGS/TIMERS ---------- agsgenfault DOWN ADV/MATE/AGS/TIMERS--------- 24 hr vs time DOWN ADV/MATE/AGS/TIMERS--------- DOWN ADV/MATE/AGS/TIMERS --------- 2 min vs time DOWN Press the <TIMERS> soft key to view the various AGS timer-related screens. %SOC START TIMERS PG4...
- Page 87 ADV/MATE/AGS/TIMERS --------- lsstart timer DOWN ADV/MATE/AGS/TIMERS--------- lsstop timer DOWN ADV/MATE/AGS/TIMERS--------- vdcstop timer DOWN ADV/MATE/AGS/TIMERS--------- exstop timer DOWN ADV/MATE/AGS/TIMERS ---------- end of TIMERS menu This screen displays the load start delay timer which is adjustable up to 240 minutes, counting 0 min down.
-
Page 88: Generator Exercise
ADV/MATE/AGS/PG5-------------- choose category PG2 EXERCISE This takes you to the ADV/MATE/AGS/EX (exercise) screen for running a lightly used generator at least one day a month to assure it’s in good working order (see next section). Generator Exercise Why you might want it: Exercising a generator prolongs its life and dependability. - Page 89 After adjusting the exercise start time hour, press 12:00A the <DOWN> soft key and go to the adj min screen. Ajust the minutes and then press the <DONE> 12:00A soft key to return to the ADV/MATE/AGS/EX ex start time screen DONE...
- Page 90 The exercise period screen allows you to set the length of the exercise period using the <INC> and <DEC> soft keys. The MATE offers a range of 1-240 minutes for this period, but check your generator manufacturer’s recommendations before setting this period.
-
Page 91: Grid-Use Mode
Stop time, no action will be taken and the time period is ignored. The above settings will have the following results: • Monday—Friday evenings at 6 p.m., the MATE issues a USE command to the FX allowing the AC input source to be used. - Page 92 Weekday Start-6:00 p.m. Weekend Start-4:00 p.m. • Monday—Thursday evenings at 6:00 p.m., the MATE will issue a USE command to the FX allowing the AC input source to be used. • Monday—Friday at 6:00 a.m., a <DROP> will be issued. On Friday evening at 6:00 p.m., a USE will be issued.
-
Page 93: Weekday Grid-Use Start
Weekday Grid-Use Start ADV/MATE/GRIDUSE--------------- weekday griduse start time DOWN On the ADV menu, push the <MATE> soft key. MATE Press the <GRIDUSE> soft key on the <ADV/ MATE> screen. The first GRID-USE screen to appear is the griduse enable screen. This screen turns GRID- USE mode ON or OFF. -
Page 94: Weekday Grid-Use Stop
12:00A weekday griduse start screen. DONE Press the <DOWN> soft key to access the ADV/ 12:00A MATE/GRIDUSE weekday grid-use stop screen. CHANGE The WEEKDAY GRID-USE STOP setting is the time during the week (Monday-Friday) that a 12:00A DROP will be issued to the FX system, forcing a disconnect from the AC input source. -
Page 95: Weekend Grid-Use Start
Weekend Grid-Use Start ADV/MATE/GRIDUSE---------------- weekend gridusestart DOWN Weekend Grid-Use Stop ADV/MATE/GRIDUSE---------------- weekend griduse stop DOWN This setting is the time during the weekend (Sat- urday and Sunday) that a <USE> will be issued to 12:00A an FX system, allowing the FX to connect to the AC input source. -
Page 96: Mate Defaults
MATE DEFAULTS The MATE comes with factory default settings for its various functions. Many of these can be changed depending on a user’s preferences. To return the MATE to its default settings, go to the ADV/MATE/DEFAULT screen and press the <RESET> soft key. Press the <YES> soft key in the ADV/MATE/RESET ARE YOU SURE? screen to reset the default values. - Page 97 01.0 hrs grid delay DOWN NOTE: The MATE’s hbx-use grid setpoint screen vdc value will equal the battery voltage of the system it’s connected to. In this case, it reflects 12 VDC batteries. NOTE: For a 24 VDC battery, the hbx-drop grid setpoint is 26.0 vdc;...
- Page 98 • AGS QUIET TIME Menu ADV/MATE/AGS/QT---------------- weekday 12:00A quiet time start DOWN ADV/MATE/AGS/QT------------------ weekend quiet time stop DOWN • AGS VOLT START Menu ADV/MATE/AGS/VSTART---------- volt start 12.2 vdc 24 hr setting DOWN Volt start 24 hr setting: 24 VDC system = 24.4 vdc 32 VDC system = 32.6 vdc...
- Page 99 • AGS MUST RUN Menu ADV/MATE/AGS/MR---------------- weekday 12:00A must run start time DOWN CHANGE ADV/MATE/AGS/MR----------------- weekend must run stop time DOWN • AGS EXERCISE Menu ADV/MATE/AGS/EX----------------- exstartday ---- DOWN • AGS TIMERS Menu ADV/MATE/AGS/TIMERS agsstate DOWN ADV/MATE/AGS/TIMERS 24hr vs time 120 min...
-
Page 100: Mate Menu Map
MATE Menu Map... -
Page 101: Menu Structure
Dedicated Inverter Control “Hot Key” The menu system displayed on the MATE will vary depending on the software version the MATE was programmed with at the time of manufacturing or during its last software upgrade. The OutBack MATE uses a branching menu structure which: •... - Page 102 DOWN 9:57:32 A STATUS SETUP MATE The top line of the MATE display will show the ‘path’ to the current menu; in this example it is STATUS/FX/BATT--------P01 with “P01” referring to the first port of the HUB. 25.0 vdc...
-
Page 103: Mate Menu Guide
The MATE features over 400 screens for viewing power system status and adjusting its values. The screens are accessible in a series of categorized menus (for example, METERS, WARNING, BATTERY, etc.). By knowing the categories, it’s easier to find a specific screen. Screens display locations within the system, values and set points, some of which can be changed using <DEC>... - Page 104 Before entering the ADVANCED screens, a warning message appears. Any changes can always be undone, different values entered, or the MATE can be returned to its factory default settings. After pressing the <INC> soft key until the password number 141 appears, the ad- vanced screens for the FX.
-
Page 105: Mate Menus
MATE MENUS INV HOT KEY INVERTER CONTROL currently: OFF SRCH ON AC IN HOT KEY AC IN FIRST PRESS AC INPUT CONTROL currently: DROP DROP USE SECOND PRESS GEN START CONTROL currently: MAN-OFF OFF AUTO ON THIRD PRESS CHARGER CONTROL... - Page 106 STATUS/FX/METERS--P00 inverter 0.0 aac current DOWN UP TOP PORT STATUS/FX/METERS--P00 charger 0.0 aac current DOWN UP TOP PORT STATUS/FX/METERS--P00 input 0.0 aac current DOWN UP TOP PORT STATUS/FX/METERS--P00 sell 0.0 aac current DOWN UP TOP PORT STATUS/FX/METERS-P00 FX firmwarerevision DOWN UP TOP PORT STATUS/FX/METERS—--- end of meter menu UP TOP STATUS...
- Page 107 WARNINGS MAIN---------------- 6:54:42PM SUM STATUS SETUP ADV STATUS-------------- choose device: MAIN STATUS/FX/PAGE1----- choose category: MODES METER BATT PG2 STATUS/FX/PAGE2----- choose category: PG1 ERROR WARN PG3 STATUS/FX/WARN---P00 acin freq too high DOWN STATUS PORT STATUS/FX/WARN---P00 acin freq too low DOWN UP TOP PORT STATUS/FX/WARN---P00 acin voltage too high...
- Page 108 MODES MAIN---------------- 6:54:42PM SUM STATUS SETUP ADV STATUS-------------- choose device: MAIN STATUS/CC/PAGE 1------- MODE METER SETP PG2 STATUS/CC/MODE--P00 charger mode: Absorb DOWN STATUS PORT STATUS/CC/MODE--P00 aux relay:mode Vent Fan DOWN UP TOP PORT STATUS/CC/MODE--P00 aux relay state: DOWN UP TOP PORT STATUS/CC/MODE--—--- end of mode menu UP TOP STATUS...
- Page 109 STATISTICS MAIN---------------- 6:54:42PM SUM STATUS SETUP ADV STATUS-------------- choose device: MAIN STATUS/CC/PAGE 1------- MODE METER SETP PG2 STATUS/CC/PAGE 2------- PG1 LOGS STAT MAIN STATUS/CC/STAT------P01 maximum battery 21.1 vdc DOWN UP PORT STATUS/CC/STAT------P01 0.0 vdc DOWN UP TOP PORT STATUS/CC/STAT------P01 max voc 19.0 vdc DOWN UP TOP PORT STATUS/CC/STAT------P01...
- Page 110 MAIN DOWN INC DEC PORT SETUP/FX/INPUT---P00 ac2/gen 30 aac limit DOWN INC DEC PORT MAIN SETUP/FX/INPUT------ input setup completed TOP SETUP MAIN MATE SETUP MAIN------------------------- 2 cycles 6:54:42PM SUM STATUS SETUP ADV SETUP-------------------- 30 cycles choose device: MAIN MATE...
- Page 111 SETUP/MATE/PAGE1---- mate code rev: 350 choose category: CLOCK CNT GLOW PG2 DATE & TIME SETUP/MATE/PAGE1---- mate code rev: 402 choose category: CLOCK CNT GLOW PG2 SETUP/MATE/CLOCK---- Tu 12/10/02 4:00:22P BACK DATE TIME CONTRAST SETUP/MATE/PAGE1---- mate code rev: 402 choose category:...
- Page 112 ADV/SETTINGS/WARNING changes made could adversely effect system performance ADV/PASSWORD-------- enter the password: ENTER INC DEC EXIT ADV----------------- choose device: FX CC MATE MAIN ADV/FX/PAGE1-------- choose category: ADV INV CHGR PG2 ADV/FX/CHARGER---P00 charger 12.0 aac limit DOWN INC DEC PORT ADV/FX/CHARGER------ absorb 28.8 vdc...
- Page 113 ADV/PASSWORD-------- enter the password: ENTER INC DEC EXIT ADV----------------- ADV/FX/AUX----------P00 choose device: genalert on delay MATE DOWN INC DEC PORT ADV/FX/AUX-----------P00 ADV/FX/PAGE1-------- genalert choose category: off set point DOWN INC DEC PORT ADV INV CHGR PG2 ADV/FX/AUX-----------P00...
- Page 114 ADV/SETTINGS/WARNING changes made could adversely effect system performance ADV/PASSWORD-------- enter the password: ENTER INC DEC EXIT ADV----------------- choose device: FX CC MATE MATE ADV/FX/PAGE1-------- choose category: ADV INV CHGR PG2 ADV/FX/PAGE2-------- choose category: PG1 GRID GEN PG3 ADV/FX/PAGE3-------- choose category:...
- Page 115 DOWN INC DEC PORT ADV/CC/CHGR----------- float voltage 13.6v DOWN INC DEC PORT ADV/CC/CHGR---------- end charger menu TOP ADV MAIN ADV----------------- choose device: MATE ADV/CC/PAGE 1--------- choose category: ADV CHGR CCADV PG2 ADV/CC/ADVANCED-P01 snooze mode <0.6 amp DOWN INC DEC PORT ADV/CC/ADVANCED-P01 wakeup mode VOC change 1.5 V...
- Page 116 ADV/MATE/AGS/SETUP--- ags fault 17 min time DOWN UP INC DEC MATE/AGS/SETUP------ end of AGS SETUP menu TOP AGS ADV/MATE/AGS/SETUP--- cool down time minutes DOWN UP INC DEC ADV/MATE/AGS/SETUP--- wrm up time minutes DOWN UP INC DEC QUIET TIME MAIN---------------- 6:54:42P...
- Page 117 ADV/MATE/AGS/LS----- load sop 1 min delay DOWN UP INC DEC ADV/MATE/AGS/LS----- end of VOLTAGE START menu UP TOP AGS MUST RUN MAIN---------------- 6:54:42P SUM STATUS SETUP ADV ADV/SETTINGS/WARNING changes made could adversely effect system performance ADV/PASSWORD-------- enter the password: ENTER INC DEC EXIT...
- Page 118 ADV/MATE/AGS/TIMERS-- agsstate DOWN AGS ADV/MATE/AGS/TIMERS-- genfault DOWN UP ADV/MATE/AGS/TIMERS-- 24 hr 1440 min vs time DOWN UP ADV/MATE/AGS/TIMERS-- 2 hr vs time 120 min DOWN UP ADV/MATE/AGS/TIMERS-- 2 min 2 min vs time DOWN UP ADV/MATE/AGS/TIMERS- lsstart timer 0 min...
-
Page 119: Mate Menu Map Overview
MENU MAP OVERVIEW... - Page 120 MENU MAP OVERVIEW...
-
Page 121: Appendix
NOTE: The MATE acts almost exclusively as a display screen only for the MX60 Charge Controller. The MX60 has its own screen and soft keys for its programming. - Page 122 You can manually start a generator manually or by presetting some time, voltage, or load conditions. To manually start a generator: • Press the AC IN hot key twice (on the left side of the MATE) • Press the <ON> soft key...
- Page 123 When the battery falls below your established voltage set point for a set amount of time, the generator will start and recharge the batteries. For voltage-based start and stops, go to the AGS screens and press VOLT START: • 24 hr, 2hr, and 2 min time periods are available •...
-
Page 124: Troubleshooting
MATE will not EQ my system when I use the EQ function under the <ACIN> button Older FXs and MXs with a newer MATE will not be able to utilize this system wide command. FXs that do not respond to this command can have an EQ cycle started by using the EQ start function located in the STATUS/FX/MODE menu. -
Page 125: User Information And Settings
AUG SEPT OCT NOV DEC AUG SEPT OCT NOV DEC AUG SEPT OCT NOV DEC AUG SEPT OCT NOV DEC AUG SEPT OCT NOV DEC AUG SEPT OCT NOV DEC AUG SEPT OCT NOV DEC MATE System Controller and Display Page 122... -
Page 126: Warranty
WARRANTY OutBack Power Systems Two Year Limited Warranty OutBack Power Systems Inc. warrants that the products it manufactures will be free from defects in materials and workmanship for a period of two (2) years subject to the conditions set forth below. The limited warranty is extended to the original user and is transferable. -
Page 127: Product Registration
Extended warranty coverage must be purchased within 90 days of the original sale of the product covered. PRODUCT Any FX Series Inverter/Charger Charge Controller MATE HUB 4 HUB 10 Product Covered ________________________ _________________________________ _______________... - Page 128 19009 62nd Avenue NE European Sales Office Arlington, WA USA Barcelona, España (+1) 360-435-6030 (+34) 600-843-845 www.outbackpower.com 900-0092-01-00 REV A...
Need help?
Do you have a question about the MATE and is the answer not in the manual?
Questions and answers