
Related Manuals for Jensen JE3223S

Summary of Contents for Jensen JE3223S
- Page 1 JE3223S 32 INCH DLED TV IMPORTANT Please observe all safety precautions when using this product. Please read this manual carefu.
- Page 2 Trademarks JENSEN and JENSEN logo are trademarks or registered trademarks of ASA Electronics. HDMI,the HDMI logo,and the term High Definition Multimedia Interface are trademarks or registered trademarks of HDMI Licensing LLC. FCC WARNING This device complies with part 15 of the FCC Rules. Operation is subject to the following...
-
Page 3: Table Of Contents
Contents Safety Precautions ....................4-6 TV Buttons And Terminal Interface ................7 TV Buttons ........................7 Terminal Interface ......................7 Accessories ........................7 External device connection ..................7 TV Install........................8 Mounting on a Desktop....................8 Installation Precautions ................... -
Page 4: Safety Precautions
Safety Precautions WARNING IMPORTANT SAFETY INSTRUCTIONS To reduce the risk of fire or electric shock,do not expose Read these instructions. this product ot rain or moisture. Keep these instructions. Heed all warnings. Follow all instructions. Do not use this product near water. Apparatus should not be exposed to dripping or splashing and no objects filled with liquids, such as vases, should be placed on the product. - Page 5 Safety Precautions • Before using your TV, please read these instructions Stubborn stains may be removed with a cloth slightly completely, and keep this manual for future reference, dampened with a solution of mild soap and warm water. Carefully observe and comply with all warnings, Never use strong solvents such as thinner or benzine for cautions and instructions placed on the unit or cleaning.
- Page 6 Safety Precautions Safety checks Do not use near a bathtub, washbowl, kitchen sink, or laundry Upon completion of service or repair work, request the tub, in a wet basement, or near a swimming pool. service technician to perform safety checks to ensure Do not use immediately after moving from a low temperture that the product is in proper operating condition.
-
Page 7: Tv Buttons And Terminal Interface
TV Buttons And Terminal Interface TV Buttons POWER:Turn ON/OFF Power. CH+/-:Selecting Channel. SOURCE: External Signal lnput Selection. VOL+/-:Adjusting Volume.MENU:Display Main MENU And Confirm MENU Item Selection. Terminal Interface Note: The following are the various terminal interface, the actual position and arrangement, the number of different models may be different. -
Page 8: Tv Install
TV Install Mounting on a Desktop Your LED TV can be mounted on a desktop with the base installed. This is not a floor-standing unit. Installation Precautions Wall Mounting Please ensure enough space for safe use. (Please refer to diagrams A and B.) Installation of the LED TV in an improperly ventilated location can cause damage to the LED TV due to increased temperature. -
Page 9: Remote Control
Remote Control Funtions of remote control buttons Media content control function buttons Menu D-p a d (u p /d o wn /le ft/rig ht / / / navigation buttons) Return to the previous place in the menu or app Volume (up/down) Mute and restore sound (quick press) Press 3 times successively to call out system info (for service purpose) Enter Live TV source... -
Page 10: Initial Settings
Initial Settings Press button to turn on the TV. Select language Press button to select OSD Language. and press button to enter the next setting page. Select language • English English • Español Español Welcome • Français Français • 简体中文 简体中文... -
Page 11: Terms &Conditions, Privacy Policy
Initial Settings Time Zone Press button to select Time Zone • Hawaii Time Zone Connect to the Internet Access all your favorite Movies and TV shows • Alaska Alaska Skip Refresh • Pacific your wireless network Pacific • Arizona Arizona •... -
Page 12: Vidaa App Download Sop
VIDAA APP Download SOP Using remote control to navigate on Home Screen. "Setting" > Support > Mobile App Download ◆Select “ Support ” using remote control. Select " Mobile App Download " QR code will appear on screen. Please follow directions for VIDAA app download and enjoy controlling your smart TV through your mobile device. -
Page 13: Live Tv
Live TV Press the “Live TV” button and follow directions for Over-the-air TV. Select the way you watch Live TV. Tuner Mode Antenna Cable Set top box Antenna/Cable I don’t watch Live TV Or access by: > Settings > Channel > Auto Channel Scang Channel Scan Auto Channel... -
Page 14: Favorite
Live TV Favorite Adding channels to your 'Favorites' list Press button to call out the channel list, the channel list appears on the right side of the screen. Press > to select your favorite channel. Press and Choose Add to Favorite, a heart-shaped icon will appear next to your favorite channel. - Page 15 Live TV Deleting channels from your 'Favorite' list Press to call out the channel list, the channel list appears on the right side of the screen. Press > Favorite, on the favorite list screen, press > to select the channel that you want to delete.
-
Page 16: Connection
Connection Wired LAN Connecting to the Internet > Settings > Network > Network Configuration You set the TV network by selecting Configuration and press the button to enter the submenu. RF IN OPTICAL ANTENNA Automatically obtain an IP address 1. If you connect to the wired network, the TV will automatically obtain an IP address and connect to the network. -
Page 17: Hdmi-Cec
Connection • Advanced Settings Configure the advanced wireless network settings for the TV. • Add You can add wireless network. Note: • If no wireless router is found, select Add and enter the network name in the SSID. • If no wireless router is found, select Refresh. HDMI-CEC You can use your TV remote to control the external devices that are connected to the TV by HDMIcable. -
Page 18: Usb Device
Connection USB Device Connect the USB devices such as hard drives, USB sticks and digital cameras for browsing photos, listening to music. USB2 USB1 HDMI 2 HDMI 1(ARC) 500mA 500mA 1. Support the U disk 4G, 8G, 16G, 32G, 64G, 128G and other common market sizes, 8T hard drive is currently supported. -
Page 19: Multi-Screen
Multi-screen Screen Sharing Mirror content from your device to the TV. > Screen Sharing • Turn on the casting function of your Android/Windows10 device. • Find the TV name in the searching list of your device and select it. Wait for the connection progress to complete and the content on your device will be displayed on the TV. -
Page 20: Smart Functions
Smart Functions Media Playing Media contents > My Apps > Media By default, there are Content Sharing displayed on the Media screen. If your mobile device is connected to the TV, its name also appears on the Media screen. Note: •... -
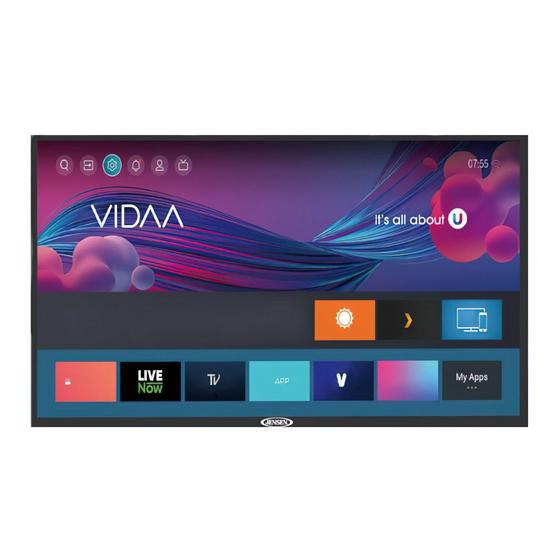
Page 21: Home
Smart Functions Home Getting familiar with the Home screen Run the TV more conveniently by selecting the corresponding sections. Press button. • You can always view the current time at the top of the Home screen. • If your TV is connected to the Internet through a wireless connection, then the icon will be at the top right corner of the screen. -
Page 22: Picture And Sound
Picture and Sound Adjusting the Picture Quality Adjust current picture mode to apply to all sources or just current source. The menu is only for reference. The following modes may differ from the actual product. Choosing a picture mode > Picture Mode or >... -
Page 23: Adjusting The Sound Quality
Picture and Sound • Contrast • Brightness • Color • Tint • Sharpness • Overscan • Color Temperature • Motion Clearness • Noise Reduction • Digital Noise Reduction • HDMI Dynamic Range • Active Contrast • Expert Settings • Reset Picture Settings Adjusting the Sound Quality Adjust current sound mode to apply to all sources or just current source. -
Page 24: System And Support
System and Support Setting Time > Settings > System > Time Settings Set the current time based on your location. • Time Zone Select your time zone. • Time Format Set the time to display in a 12 or 24-hour format. •... -
Page 25: Upgrade
System and Support Upgrade > Settings > Support > System Update Set your TV to receive the latest firmware. • Auto Firmware Upgrade Set your TV to automatically receive the latest firmware. • Check Firmware Upgrade Check if your TV needs Firmware upgrade. Note: •... -
Page 26: Troubleshooting
Troubleshooting Self Diagnosis Diagnose issues with your TV. > Settings > Support > Self Diagnosis Use the Picture Test to help diagnose picture issues and the Sound Test to diagnose sound issues. Use the Network Test to test network connection and use the Input Connection Test to show all related information with external connections. -
Page 27: Other Picture And Sound Problem
Troubleshooting The Problem Possible Solutions There is no sound or Check the volume control of the device (cable or satellite box, DVD, Blu-ray, etc.) connected to your TV. the sound is too low at maximum volume. Picture is normal, but no •... -
Page 28: My File Won't Play
Troubleshooting The Problem Possible Solutions The TV cannot connect Make sure the TV has a network connection. to your network or apps. • Run Network Test ( > Settings > Support > Self Diagnosis > Network Test). • Contact your Internet service provider. The wireless network Make sure your wireless modem/router is on and connected to the connection failed. -
Page 29: Using The E-Manual
Using the E-Manual Launching the E-Manual > Settings > Support > E-Manual or > My Apps > E-Manual View the embedded E-Manual that contains information about your TV's key features. • Words in blue (e.g., Picture Mode) indicate a menu item. •... -
Page 30: Specifications
Specifications LED Panel Panel Size 32” TFT LED Brightness Contrast Ratio 4000:1 Viewing Angle /178 Max. Resolution 1366 x 768 VIDEO INPUT HDMI OUTPUT OPTICAL EARPHONE Power Source Power Consumption Dimension 28.8” x 17.2” x 3.2” inch Weight 7.91lbs • The cabinet design and electronics specifications may be modified without prior notice for performance improvement.
Need help?
Do you have a question about the JE3223S and is the answer not in the manual?
Questions and answers