
Related Manuals for Forenex FEB600


Summary of Contents for Forenex FEB600
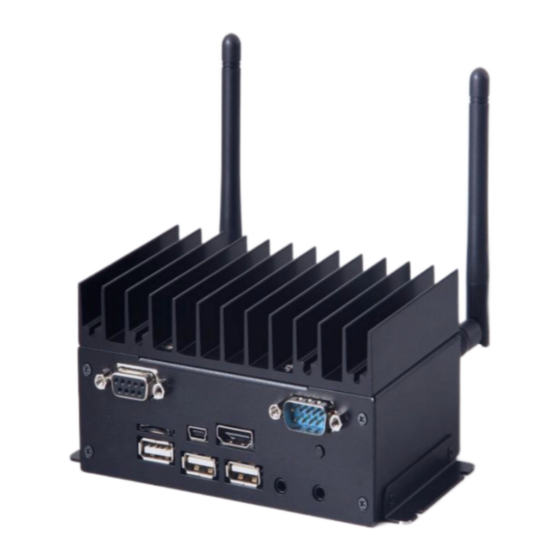
- Page 1 FEB600 User Manual FEB600-Q/D/U ARM BOX PC User Manual (Preliminary) Fanless ultra-compact quad core ARM system ruggedized for extreme environments Version: V1.0 Document No: doc-FEB600x-V10 PCB Bare Board: PB630868-V10...
- Page 2 FEB600 User Manual Packing List 1 x FEB600 device. 1 x Terminal Block to DC Jack. Ordering Information Part number : FEB600-xyz-m-n-MN • : The feature code of Processor Fanless ARM system with 1.0GHz NXP i.MX 6Quad Cortex-A9 SoC.
- Page 3 FEB600 User Manual Revision histories Rev. No. Date Substantial Changes 2018/06 First issue.
-
Page 4: Table Of Contents
FEB600 User Manual Table of Contents General Information ......................6 1-1. Features ..........................6 1-1-1. ARM based System ......................6 1-1-2. Ultra compact, Ruggedized and Fanless ................6 1-1-3. The Operating Temperature ....................6 1-1-4. Storage Expansion ......................7 1-1-5. Networking Option ......................7 1-1-6. - Page 5 FEB600 User Manual 2-8. Mini USB OTG Port ......................14 2-9. CAN/Debug Port ........................ 15 2-10. Micro SD/SDHC card Slot ....................15 2-11. DIO port..........................16 2-12. MIC with Stereo Jack ......................16 2-13. Headphone with Stereo Jack .................... 16 2-14.
-
Page 6: General Information
-20 ° C to 70 ° C, and it consumes extremely low power under typical operating conditions. In addition, an optional miniPCIe slot is provided for 5G / Wi-Fi connection. Comprehensive I / O functions on the front and rear panels make the FEB600 a flexible solution for a variety of embedded applications. -
Page 7: Storage Expansion
FEB600 User Manual 1-1-4. Storage Expansion The Micro SD/SDHC card slot enables the FEB600 to have a flexible storage up to 32GB size. **Note: More frequent and larger data access on eMMC memory makes its lifespan shorter. Therefore, it is highly recommended to use a Micro SD card for large data access. -
Page 8: Product Specifications
FEB600 User Manual 1-2. Product Specifications Processor: 1.0GHz NXP i.MX 6Quad Cortex-A9 SoC (FEB600-Q10xx). 1.0GHz NXP i.MX 6Dual Cortex-A9 SoC (FEB600-D10xx). 1.0GHz NXP i.MX 6DualLite Cortex-A9 SoC (FEB600-U10xx). System Memory: 2GB DDR3-1066 SDRAM onboard. Storage: ... - Page 9 FEB600 User Manual Front Panel I/O: 1 x 2-pole Phoenix DC jack. 1 x Power LED & WLAN/WPAN/WWAN LED (if Wi-Fi has installed). 1 x COM1 port (supports 5-wire TX/RX/RTS/CTS) RS232 DTE mode/RS485/RS422. 1 x Gigabit Ethernet port (supports optional IEEE802.3 af type 1).
-
Page 10: Outline Dimensions
FEB600 User Manual 1-3. Outline Dimensions 1-3-1. Front view 1-3-2. Top view 1-3-3. Rear view -10-... -
Page 11: Peripherals Port Layout Diagram
FEB600 User Manual 1-4. Peripherals Port layout diagram 1-4-1. Front Panel 1-4-2. Rear Panel -11-... -
Page 12: Peripherals Port Description
2-3. Micro SD/eMMC boot select switch On front panel. The FEB600 comes with a boot select switch which allows users to select boot device from Micro SD and eMMC. To boot from eMMC device To boot from SD card... -
Page 13: Com1 Port
FEB600 User Manual 2-4. COM1 Port On front panel. The integrated 9-pin of COM1 port provides optional RS232/485/422 three operating modes. Please note the following!!! Even though the COM1 can be selected as RS232, RS422 or RS485 operating modes, these absolutely cannot be used simultaneously. -
Page 14: Reset Button
2-8. Mini USB OTG Port On rear panel. The Mini USB 2.0 OTG(On-The-Go) port. The FEB600 is regarded as an USB device by default when connected to an USB host. Pin Assignment: Connector: ( Mini USB Type B ) -
Page 15: Can/Debug Port
FEB600 User Manual 2-9. CAN/Debug Port On rear panel. The integrated 9-pin of CAN/Debug port uses a male DB-9 connector. The CAN bus port supports CAN protocol specification Version 2.0 B while the Debug port supports TX/RX. The purpose of the Debug port is for debug only. -
Page 16: Dio Port
FEB600 User Manual 2-11. DIO port On rear panel. Supports eight GPIOs without isolated Pin Assignment: Connector: ( DB-9/Female ) Pin number Description 3.3V_GPO_3 3.3V_GPI_3 3.3V_GPO_2 3.3V_GPI_2 3.3V_GPO_1 3.3V_GPI_1 3.3V_GPO_0 3.3V_GPI_0 DIO-GND 2-12. MIC with Stereo Jack ... -
Page 17: Hdmi®-1.4 Port
FEB600 User Manual 2-14. HDMI®-1.4 port On rear panel. The HDMI port uses an HDMI Type A receptacle connector. It allows connecting the digital video devices which utilize a high definition video signal without a HDCP. Pin Assignment:... -
Page 18: Software And Technical Supports
FEB600 User Manual 3. Software and Technical Supports 3-1. Android Programming Guide 3-1-1. ADB installation Enable USB debugging from Android environment of MBE60 : Scroll to "Settings > About Tablet" From “Settings” select "About tablet" to enter the dialog, and then click "Build number"... - Page 19 FEB600 User Manual After completing the above action, a new item "Developer Options" will appear in the system block. Next select "Developer Options" and turn on the USB debugging function. Note: Please do not change the other settings if you do not understand what they ...
-
Page 20: Gpio Installation
FEB600 User Manual user’s APK software installation. 3-1-2. GPIO installation GPIOs definition Position PIN name Linux node/Note Direction PIN 7 3.3V PIN 8 Ground PIN 9 DOUT0 /sys/class/gpio/gpio15/value PIN 10 DIN0 /sys/class/gpio/gpio193/value In PIN 11 DOUT1 /sys/class/gpio/gpio14/value PIN 12... -
Page 21: Canbus Installation
FEB600 User Manual 3-1-3. CANbus installation The socketCAN statistics can be retrieved with this command: <root@imx6qsabresd:/#> cat /proc/net/can/stats Initial stages: Set CAN port0 link down <root@imx6qsabresd:/#> ip link set can0 down Set CAN port0 loopback mode <root@imx6qsabresd:/#> ip link set can0 type can bitrate 50000 loopback on Set CAN port0 link up <root@imx6qsabresd:/#>... -
Page 22: Com Port Installation And Sample Code
FEB600 User Manual 3-1-4. COM port installation and Sample code COM port device is “/dev/ttymxc1”. As COM port working in RS485 mode, the gpio 82 is used as data-in/out control. As COM port working in RS422 mode, the gpio 82 has to keep high status to make data-out in properly. -
Page 23: Canbus Installation
FEB600 User Manual 3-2-2. CANbus installation The socketCAN statistics can be retrieved with this command: <root@imx6qsabresd:/#> cat /proc/net/can/stats Initial stages: Set CAN port0 link down <root@imx6qsabresd:/#> ip link set can0 down Set CAN port0 loopback mode <root@imx6qsabresd:/#> ip link set can0 type can bitrate 50000 loopback on Set CAN port0 link up <root@imx6qsabresd:/#>... -
Page 24: Com Port Installation And Sample Code
FEB600 User Manual 3-2-3. COM port installation and Sample code COM port device is “/dev/ttymxc1”. As COM port working in RS485 mode, the gpio 82 is used as data-in/out control. As COM port working in RS422 mode, the gpio 82 has to keep high status to make data-out in properly.
Need help?
Do you have a question about the FEB600 and is the answer not in the manual?
Questions and answers