Table of Contents
Advertisement
Advertisement
Table of Contents

Related Manuals for StayFresh 4H11560US


Summary of Contents for StayFresh 4H11560US
- Page 1 Stay Fresh Home Freeze Dryer MODEL 4H11560US stayfreshfreezedry.com...
-
Page 2: Table Of Contents
Specifications ......................... 4 Installation Guide ........................6 Freeze-Drying Process ......................9 Freezing ............................9 Main drying ..........................9 Final drying ..........................9 Food Preparation ......................... 10 Automated Freeze-Drying ....................11 Freeze-drying unfrozen food without the temperature probe ..........12 Freeze-drying unfrozen food with temperature probe ............14 Freeze-drying frozen food without temperature probe ............ - Page 3 Vacuum Pump Oil Change ....................36 10. Touch Screen Info ......................... 37 Main-menu ..........................37 Auto-freezedry-start ........................ 38 Auto-freezedry-setting ......................39 Auto-freezedry-freezing ......................41 Auto-freezedry-maindry ......................43 Auto-freezedry-finaldry ......................43 Auto-freezedry-finaldry-pause ....................44 Auto-freezedry-complete ......................44 Preset-curve-drying ........................45 Function-test ..........................47 Defrosting-setting ........................
-
Page 4: Specifications
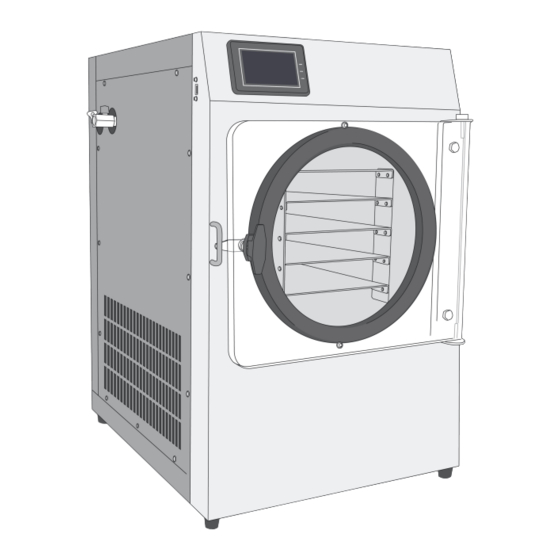
1. Specifications Touch screen controller Ventilation grille ○ ○ Acrylic door USB port ○ ○ Door gasket Drain valve ○ ○ Tray shelf Main power inlet ○ ○ Vacuum port Main power switch ○ ○ Vacuum valve Vacuum pump power outlet ○... - Page 5 Inside the chamber, there are three cables: one for power, one for shelf temperature, and one for the temperature probe. The temperature sensors are linked by a three-pin connector, while the power is connected using a two-pin connector. The cables for power and tray temperature are bundled together for convenience.
-
Page 6: Installation Guide
2. Installation Guide The freeze dryer is designed for indoor use only and performs best in a temperature-controlled room with temperatures ranging from 60F to 75F. Avoid using the freeze dryer in rooms where the temperature exceeds 80F. Proper ventilation is necessary when operating the freeze dryer. To ensure proper operation and safety, keep at least three inches of clearance between the back of the freeze dryer and the wall, and at least six inches of clearance between the freeze dryer and the walls on the left and right sides. - Page 7 Step 3. Connect the power cord to the wall outlet and the other end to the back of the freeze dryer (○ main power inlet on page 4). Plug the vacuum pump cord to the back of the freeze dryer (○ vacuum pump power outlet on page 4).
- Page 8 Step 5. Close the vacuum valve (○ vacuum valve on page 4) and the drain valve (drain valve on page 4). Refer to the following for the Open/Close statuses for the valve. Step 6. Connect the drain hose to the drain valve (○ drain valve on page 4).
-
Page 9: Freeze-Drying Process
3. Freeze-Drying Process The freeze-drying process is divided into three stages: freezing, main drying, and final drying. Freezing The freezing stage duration varies depending on the food's type, weight, and thickness, taking anywhere from 6-15 hours for unfrozen food and 2-4 hours for frozen food. During this stage, the cold trap temperature drops gradually to around -40F, and only the compressor runs. -
Page 10: Food Preparation
4. Food Preparation To prepare food for freeze-drying: 1. Wash the food thoroughly to remove any dirt or debris. Freeze drying won’t kill bacteria in the food. 2. Cut the food into small pieces if possible, for better drying results. For solid foods, cut them into pieces that are less than half an inch thick. -
Page 11: Automated Freeze-Drying
5. Automated Freeze-Drying Press the ‘FreezeDrying’ button on the main menu to enter the automated freeze-drying mode. The automated freeze-drying process may vary slightly depending on whether the food is pre- frozen or if you're using the temperature probe. For a more detailed description of the automated freeze-drying process, refer to the following sections. -
Page 12: Freeze-Drying Unfrozen Food Without The Temperature Probe
Freeze-drying unfrozen food without the temperature probe Step 1. Inspect and make sure there is no sign of ice or water in the bottom of the chamber and in the groove of the door gasket. Step 2. Load trays with unfrozen food, insert the trays onto the shelves, and close the acrylic door. Step 3. - Page 13 When the final dry stage is completed, open the vacuum valve to normalize the pressure, then open the acrylic door. Check if the food is completely dry on each tray. All pieces of food should be warm immediately after drying is complete if the default maximum shelf temperature is used.
-
Page 14: Freeze-Drying Unfrozen Food With Temperature Probe
Freeze-drying unfrozen food with temperature probe Step 1. Inspect and make sure there is no sign of ice or water in the bottom of the chamber and in the groove of the door gasket. Step 2. Load trays with unfrozen food, insert the trays onto the shelves. If the food consists of solid pieces, pick the largest piece on the second tray (from top to bottom), and insert the temperature probe into the center of the piece. - Page 15 Step 6. After the final dry stage is finished, the vacuum pump will stop and the motorized ball valve will close automatically. The screen will switch to the Auto-freezedry-complete screen and beep for 30 seconds. In case you're not around when the drying process is finished, the trays might get excessively cold since the compressor will still be running.
-
Page 16: Freeze-Drying Frozen Food Without Temperature Probe
Freeze-drying frozen food without temperature probe Step 1. Pre-freeze the food on the trays in a deep freezer for over 24 hours to make sure the food is completely frozen. Step 2. Inspect and make sure there is no sign of ice or water in the bottom of the chamber and in the groove of the door gasket. - Page 17 After the final dry stage is finished, the vacuum pump will stop and the motorized ball valve will close automatically. The screen will switch to the Auto-freezedry-complete screen and beep for 30 seconds. In case you're not around when the drying process is finished, the trays might get excessively cold since the compressor will still be running.
-
Page 18: Freeze-Drying Frozen Food With Temperature Probe
Freeze-drying frozen food with temperature probe Step 1. Disconnect the temperature probe in the chamber. If the food is of solid pieces, pick the largest piece and insert the temperature probe into the center of the piece. Place the piece back on the tray. If the food is liquid/semi-liquid, immerse the temperature probe in the food. - Page 19 The freeze dryer will start the drying process and jump to the Auto-freezedry-maindry screen when any of the default trigger conditions are met or the ‘Drying’ button is pressed. When the main drying stage is completed, the freeze dryer will enter the final dry stage and the screen jumps to Auto-freezedry-finaldry.
-
Page 20: Freeze-Drying Candies
Freeze-drying candies Step 1. Inspect and make sure there is no sign of ice or water in the chamber, shelving unit, and in the groove of the door gasket. Step 2. Load trays with candies, insert the trays onto the shelves, and close the acrylic door. Step 3. - Page 21 Step 7. Remove ice in the chamber. Read Section 6 for defrosting. Step 8. Change/filter vacuum pump oil if needed. Check section 9 for details. stayfreshfreezedry.com...
-
Page 22: Increase Or Decrease Final Dry Hours
Increase or decrease final dry hours You may need to adjust the final dry hours in various scenarios. This can be done before initiating the freeze-drying process, during the freezing stage, or during the final dry stage. 1. Adjust before the freeze drying process. Press the ‘Setting’... - Page 23 Adjust the number in the ‘Final dry hours’ box. 3. Adjust during the final dry stage. Press the ‘INC’ (‘DEC’) button to increase (decrease) final dry hours. If you input ‘1’, the final dry hours will be increased by 1 hour. stayfreshfreezedry.com...
-
Page 24: Pause And Resume The Drying Process
Pause and resume the drying process If you need to check the food inside the chamber while the drying process is ongoing, you can pause the process by pressing the orange 'Drying' button during the main drying stage (shown below). This will turn the button grey and stop the vacuum pump. Open the vacuum valve to normalize the pressure in the chamber and then check if the food is dry. -
Page 25: What To Do After Drying Is Complete
What to do after drying is complete The below screen will show up when the drying process is complete, Follow the steps, Step 1: After the drying process is complete, check the shelf temperature to ensure that the trays are still warm. If the shelf temperature is below the room temperature, indicating that the drying process was completed at least a few hours ago, press the ‘Warm Tray’... - Page 26 Follow the same steps above when the drying is complete again. stayfreshfreezedry.com...
-
Page 27: Troubleshoot Vacuum Error Messages
Troubleshoot vacuum error messages The majority of vacuum error messages occur during the first 10 minutes after the vacuum pump is turned on. The controller checks for adequate vacuum levels at various points, and the pressure reading usually drops to 1000 mTorr or lower within 10 minutes. If the vacuum pressure does not reach the required level at any of these points, the freeze dryer will stop the pump, beep, and switch to the Vacuum-not-reached-warning screen. - Page 28 However, if the vacuum level target is still not met for the third time, press the 'Exit' button again. It is advisable to terminate the current freeze-drying session by pressing the 'Exit' button located at the bottom left corner and identify the underlying cause of the vacuum error message.
-
Page 29: Defrosting
6. Defrosting Press the ‘Defrost’ button on the main menu to enter the defrosting mode after the freeze- drying process is done. Once you have removed the freeze-dried food from the chamber, proceed to open the drain valve and close the acrylic door. Ensure that the drain hose is directed towards a water bucket. Next, navigate to the Defrosting-setting screen by selecting the ‘Defrost’... - Page 30 stayfreshfreezedry.com...
-
Page 31: Advanced Freeze-Drying
7. Advanced Freeze-Drying Press the ‘Functions’ button on the main menu to enter the advanced freeze-drying screen. Manual freeze-drying Manual freeze-drying is only for advanced users. Improper use will void the warranty on the vacuum pump. The following is the typical manual freeze-drying process: Step 1. -
Page 32: Pre-Set Curve Freeze-Drying
Keep monitoring the vacuum pressure reading during the drying process. If the vacuum pressure is higher than 550 mtorr, lower the target temperature to avoid damage to the vacuum pump. Step 6. When the drying is complete, press the ‘Valve’ button to close the motorized ball valve and then press the ‘Pump’... - Page 33 Step 3. Press the ‘Compressor’ button to turn on the compressor. Monitor the shelf temperature (and food temperature if the probe is inserted into the food). Move to Step 4 until the food is completely frozen. A good indicator is that the shelf (or food) temperature is below -5F. Step 4.
-
Page 34: Freeze-Dryer Settings
8. Freeze-Dryer Settings Press the ‘Settings’ button on the main menu to enter the system and freeze-drying setting screen Settings. There are six main buttons on the Settings screen, Set parameters Press the button ’FreezeDrying Setting’ to go to the freeze-drying parameter screens. The default settings work for most the of the freeze-drying scenarios. -
Page 35: Touch Calibration
Touch calibration If the touch screen response is not accurate, press the ‘Touch Calibrate’ button to calibrate the touch screen response. Use your finger to press the centers of all crosses following the numeric order. Reset time Press the ‘Set Time’ button to adjust Year/Month/Day/Hour/Minute/Second and day of the week. -
Page 36: Vacuum Pump Oil Change
9. Vacuum Pump Oil Change For the standard oil vacuum pump, oil needs to be filtered after 2-3 cycles of freeze-drying or when it becomes murky in the sight glass. If there is no moisture present in the oil, you can reduce the frequency of oil changes. -
Page 37: Touch Screen Info
Touch Screen Info In the context that follows, screen names are indicated by an underscore, button names are enclosed in quotes, a displayed number '888' is a placeholder for actual values, and a timestamp 'YYYY/MM/DD HH:MM' is a placeholder for the actual date and time. Main-menu There are four buttons on the main-menu screen: FreezeDrying’... -
Page 38: Auto-Freezedry-Start
Auto-freezedry-start Press the ‘Settings’ button to access the auto-freezedry-setting screen and configure the drying process. You can set parameters and trigger conditions for the drying process to start. If you want to use the temperature probe, press the ‘Probe in use’ button, which will enable the system to:: 1. -
Page 39: Auto-Freezedry-Setting
Auto-freezedry-setting This screen shows two sets of settings: conditions that trigger main drying, and the drying parameters. There are three conditions that trigger main drying: 1. Hours of freezing, which is turned off by default. 2. Shelf temperature, which measures the temperature of the silicone heater under the second tray. - Page 40 If all the conditions are turned off, you will need to manually press the 'Drying' button to start the drying process in the auto-freezedry-freezing screen. You can adjust three parameters for the drying process: the initial target pressure, max shelf temperature, and final dry hours.
-
Page 41: Auto-Freezedry-Freezing
Auto-freezedry-freezing This screen indicates the freeze dryer is in the freezing stage. The ‘Auto’ sign in the top left indicates that trigger conditions set in the auto-freezedry-setting screen are active. When any of the conditions are met, the drying process will be started, and the screen will jump to the auto-freezedry-drying screen. - Page 42 Press the bottom-left ‘Exit’ button to stop the freezing process and go back to the main-menu. When you press the ‘Frozen food’ button in Auto-freezedry screen, the ‘food in chamber’ button will show up in the bottom. After the frozen food is loaded on the trays in the chamber and all valves are closed, press ‘Food in chamber’...
-
Page 43: Auto-Freezedry-Maindry
Auto-freezedry-maindry This is the main drying screen. At the center of the screen, you will see two buttons labeled 'Freezing' and 'Drying.' The 'Freezing' button, highlighted in yellow, indicates that the compressor is currently operating to cool the chamber. This button is purely an indicator. On the other hand, the 'Drying' button, also highlighted in yellow, indicates that the vacuum pump is in operation, and the control algorithm will turn the heater on and off as necessary. -
Page 44: Auto-Freezedry-Finaldry-Pause
The final dry screen is similar to the auto-freezedry-maindry screen. The main differences here are: 1) The button name becomes ‘Final Drying’ instead of ‘Drying.’ 2) There are two extra buttons, ‘INC’ and ‘DEC’ to increase and decrease the final dry hours. -
Page 45: Preset-Curve-Drying
Open the vacuum valve and wait for the pressure to be normalized in the chamber. Open the door to check if the food on each tray is completely dry. If not completely dry and the food is still frozen, put the trays back, close the door and press ‘Return to FinalDry.’ The screen will jump to Auto-finaldry-pause screen. - Page 46 control will maintain the shelf temperature at 110F until the 'Run' button is turned off. The 'Runtime' displays the number of minutes that the drying process has been in operation. Press the ‘Exit’ button to go back to the function-test screen. stayfreshfreezedry.com...
-
Page 47: Function-Test
Function-test On this screen, you can access the function to test each component of the freeze dryer, such as the compressor, vacuum pump, heater, and motorized ball-valve. Along with the buttons for these components, there are temperature readings and vacuum pressure displayed. Additionally, there is a minutes counter for each component that records the runtime. -
Page 48: Defrosting
Defrosting This screen indicates the freeze dryer is in the defrosting mode and and it displays the amount of time the freeze dryer has been in this mode, the preset defrosting time, and the current temperature of the shelf. Press the ‘Exit’ button to go back to the main-menu. Defrosting-complete This screen pops up when the defrosting is complete. -
Page 49: Settings
Settings There are six main buttons on the screen: 1) ‘FreezeDrying Settings’ - Press this button to adjust all the default parameters for freeze-drying. 2) ‘Download data’ - This button is used to download the recorded freeze dryer status and sensor readings. -
Page 50: Cable-Connection-Warning
Cable-connection-warning This warning pops up when the cable connecting the heater and shelf temperature sensor is disconnected. Press the ‘Stop and exit’ button to return to the main menu. Vacuum-leak-warning This warning pops up during drying when the sensor detects an unusual drop in the vacuum pressure. -
Page 51: Vacuum-Pressure-Abnormal
Vacuum-pressure-abnormal This warning pops up when the vacuum pressure reading is abnormal. Press the ‘Stop and exit’ button to the freezing mode or main menu screen. Vacuum-not-reached-warning If the vacuum pressure reading does not reach the benchmark values at different points, a warning will appear when the vacuum pump is started. - Page 52 If you have any questions, contact us via info@stayfreshfreezedry.com, or visit stayfreshfreezedry.com. +1 (424) 420 7534 Stay Fresh Technology LLC, 3768 Rockwell Ave, El Monte, CA, 91731 stayfreshfreezedry.com...
Need help?
Do you have a question about the 4H11560US and is the answer not in the manual?
Questions and answers
I get the msg. Unable to reach target vacuum. We have done everything suggested ie: clean , dry, changed oil etc... we have put a vacuum gauge on and there is vacuum. Is it possible there is a sensor prob? Any other ideas?