Table of Contents
Advertisement
Quick Links
Advertisement
Table of Contents

Related Manuals for StayFresh 4H11560US


Summary of Contents for StayFresh 4H11560US
- Page 1 StayFresh Home Freeze Dryer MODEL 4H11560US stayfreshfreezedry.com...
-
Page 2: Table Of Contents
1. Specifications .......................... 4 2. Installation Guide ........................ 6 3. Freeze-Drying Process ...................... 9 Freezing ............................ 9 Main drying .......................... 9 Final drying .......................... 9 4. Food Preparation ........................ 1 0 Size and shape .......................... 1 0 Type of food .......................... 1 0 5. Automated Freeze-Drying .................... 1 1 Freeze-drying unfrozen food without the temperature probe .......... 1 2 Freeze-drying unfrozen food with temperature probe . - Page 3 Auto-freezedry-start ......................... 2 9 Auto-freezedry-setting ...................... 3 0 Auto-freezedry-freezing ...................... 3 1 Auto-freezedry-maindry ...................... 3 3 Auto-freezedry-finaldry ...................... 3 4 Auto-freezedry-finaldry-pause .................... 3 4 Auto-freezedry-complete ...................... 3 5 Preset-curve-drying ........................ 3 5 Function-test .......................... 3 7 Defrosting-setting ........................ 3 7 Defrosting .
-
Page 4: Specifications
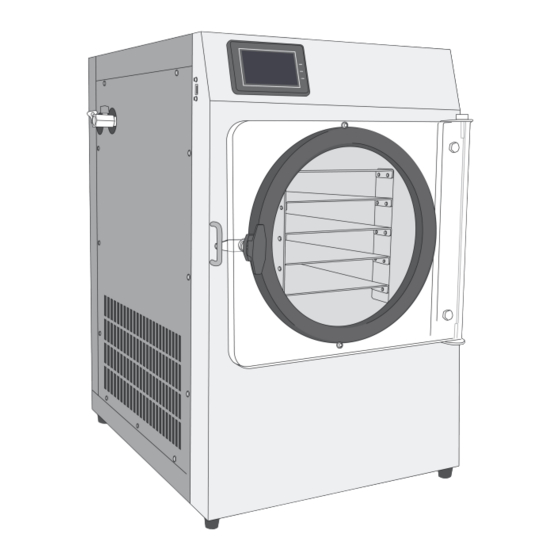
1. Specifications Touch screen controller Ventilation grille ○ ○ Acrylic door USB port ○ ○ Door gasket Drain valve ○ ○ Tray shelf Main power inlet ○ ○ Vacuum port Main power switch ○ ○ Vacuum valve Vacuum pump power outlet ○ ○ stayfreshfreezedry.com... - Page 5 There are three cables inside the chamber: one for the power, one for tray temperature, and one for the temperature probe. The temperature sensors are connected by a three-pin connector. The power is connected by a two-pin connector. The cables for the power and the tray temperature are bundled together. Table 1 Technical specifications Number of trays Tray size W 8 in. x D 20 in. x H 0.75 in. Cold trap temperature -40F Rated current 15A Power 115v/60Hz Weight 165 lbs. Dimension W 20 in. x D 26 in. x H 31 in. stayfreshfreezedry.com...
-
Page 6: Installation Guide
2. Installation Guide The freeze dryer is for indoor use only. It is best used in a temperature-controlled room, where the temperature ranges from 60F to 80F. Do not use the freeze dryer when the room temperature is over 85F. The freeze dryer requires proper ventilation in the room. The freeze dryer needs at least three inches of distance from the wall to its back, and at least six inches of distance from the walls to the left and right side. The freeze dryer needs a dedicated circuit, and a 15-amp outlet which must be within five feet of distance. Installation steps: Step 1. Unpack the delivery box and make sure items in the packing list are not missing. Place the freeze dryer in a proper location as described above. Step 2. Remove the oil cap and fill the vacuum pump with oil using the funnel until the oil level in the sight glass reaches the middle line. Note that the oil level does not change initially when you pour in the oil, but when it starts to rise it rises quickly. Replace the oil cap and place the vacuum pump to the left side of the freeze dryer. Step 3. Plug the power cord to the wall outlet and the other end to the back of the freeze dryer (○ main power inlet in page 4). Plug the vacuum pump cord to the back of the freeze dryer (○ stayfreshfreezedry.com... - Page 7 vacuum pump power outlet on page 4). Turn on the vacuum pump switch on the back of the vacuum pump. The following is a generic schematic of ON/OFF statuses for a switch. Step 4. Connect one end of the PVC vacuum hose to the freeze dryer (○ Vacuum port on page 4), and the other end to the vacuum pump the same way as shown below. Tighten the connection using the hose clamps. stayfreshfreezedry.com...
- Page 8 Step 5. Close the vacuum valve (○ vacuum valve on page 4) and the drain valve (○ drain valve on page 4). The following image shows the Open/Close statuses for a valve: Step 6. Connect drain hose to the drain valve (○ drain valve on page 4). Put the other end of the hose in a water bucket (not provided). Step 7. Turn on the power switch in the back of the freeze dryer (○ main power switch on page 4). The touch screen should light up and show the main menu. Let the freeze dryer settle for 24 hours before the first use. Go to Section 5 to learn how to run the automated freeze-drying process. stayfreshfreezedry.com...
-
Page 9: Freeze-Drying Process
3. Freeze-Drying Process The freeze-drying cycle includes three stages: freezing, main drying, and final drying. Freezing The freezing stage takes 6-15 hours if the food is unfrozen and 2-4 hours if frozen. The time of freezing also depends on the type, weight, and geometry of the foods. Foods of higher moisture and greater thickness need more freezing time. In the freezing stage, the cold trap (bottom of the chamber) temperature gradually drops to around -40F. In the freezing stage, only the compressor is running. You will observe frost on the interior surface of the chamber and sometimes condensation on the acrylic door and the gasket. Main drying The main drying stage starts automatically when the preset freezing time is reached, or preset shelf temperature is reached, or preset food temperature is reached. (Check the Auto-freeze- dry-setting in Section 10. Touch screen info for more details.) You can also start the drying process by pressing the ‘Drying’ button. At the start of the main drying stage, the vacuum pump will be turned on for a preset amount of time. Then the chamber should reach a low vacuum pressure at or below 550mTorr. The heater will then be turned on to maintain the pressure at the initial target pressure. Then the patented freeze-drying algorithm will start to control the heater to alternate between the constant-pressure phase and the constant-temperature phase. In the constant-pressure phase, the controller maintains the pressure at the same level while the shelf temperature will gradually increase. Once the target shelf temperature increase is reached, the algorithm will enter the constant-temperature phase, where the controller keeps the shelf temperature constant, and the vacuum pressure will gradually decrease. Once the target pressure decrease is achieved, the algorithm will go back to the constant-pressure phase and so forth until the maximum shelf temperature is reached. In the main drying stage, the compressor/vacuum pump are both running nonstop while heater is turned on and off according to the controller. At this point you should observe rings of ice grow on the interior surface of the chamber. Final drying The final dry stage starts when some indicators are observed: the maximum temperature is reached, or a preset food temperature measured by the temperature probe is reached (the later indicator will work only when the probe is being used). The indicators tell that most of the moisture is extracted from the food. The final dry stage will run a default seven hours. The stayfreshfreezedry.com... -
Page 10: Food Preparation
drying algorithm will automatically adjust the final dry time when the temperature probe is used. Add extra final dry hours manually if necessary. In the final drying stage, the compressor/vacuum pump/heater work the same way as the main drying stage. After the drying is complete, the vacuum pump and the heater will be turned off, while the compressor is still running to keep the chamber cool. 4. Food Preparation Size and shape If the food is liquid or semi-liquid, directly pour the food evenly on the trays. If the food is solid, cut or make them with less than half inch thickness. It is recommended to have foods of similar type and thickness on each tray for a better drying result. Always cut the food into small pieces, if possible, for a better drying result. The thicker the food, the longer it will take for freeze-drying. Type of food The freeze dryer only removes water from the food. Oily food may not be suitable for freeze- drying. Further, oil may go rancid after packaging in the mylar bag. Do not mix frozen and unfrozen foods in the same batch. It is recommended to have foods of similar moisture in one batch for efficiency reasons. The drying time will depend on the moisture level of the foods in the same batch. The higher the moisture, the longer the drying time. stayfreshfreezedry.com... -
Page 11: Automated Freeze-Drying
5. Automated Freeze-Drying Press the ‘FreezeDrying’ button on the main menu to enter the automated freeze-drying mode. There are slightly different ways to run the automated freeze-drying process, depending on 1. If the food is pre-frozen in a freezer before freeze-drying 2. If you use the temperature probe for assisting the drying process The following is a more detailed description on the slightly different automated freeze-drying process. In each section, you will find steps of operation and text enclosed in boxes. The steps of operation require your action, while the text enclosed in a box is for your information. Note that in each step you may find underscored touch screen names, e.g., Auto-freezedry-start screen, details of which can be found in Section 10. Touch Screen Info. stayfreshfreezedry.com... -
Page 12: Freeze-Drying Unfrozen Food Without The Temperature Probe
Freeze-drying unfrozen food without the temperature probe Step 1. Inspect and make sure there is no sign of ice or water in the bottom of the chamber. Step 2. Load trays with unfrozen food, insert the trays onto the shelves, and close the acrylic door. Step 3. Close the vacuum valve. Remove any residual water in the drain pipe, using the brush (refer to Section 6 for more details) and close the drain valve. Step 4. Press the ‘FreezeDrying’ button on the touch screen to go to the Auto-freezedry-start screen. Then press the ‘Settings’ button to go to the Auto-freezedry-setting screen. Adjust trigger conditions that automatically triggers drying to begin. Use the default setting for beginners. Press the ‘Back’ button to return to the Auto-freezedry-start screen. Step 5. Press the ‘Start’ button to go to the Auto-freezedry-freezing screen and the compressor will be turned on. Note that the ‘Drying’ button will be disabled for one minute. You can still adjust freezing drying parameters using the ‘Settings’ button on the right bottom during the freezing stage. The freeze dryer will automatically start the drying process and jump to Auto-freezedry- maindry screen when any of the default trigger conditions are met or the ‘Drying’ button is pressed. When the main drying stage is completed, the freeze dryer will enter the final dry stage automatically and the screen jumps to Auto-freezedry-finaldry. You can increase or decrease the final dry hours during the final dry stage. Use the default setting for beginners. Step 6. When the final dry stage is completed, the vacuum pump stops, the motorized ball valve closes, and the screen jumps to Auto-freezedry-complete and beeps for 30 seconds. If the drying is completed while you’re away, the trays might get very cold because the compressor is still running. Press the ‘Warm Tray’ button to warm the trays if necessary. When the final dry stage is completed, open the vacuum valve to let air in the chamber, then open the acrylic door. Check if the food is completely dry on each tray. stayfreshfreezedry.com... - Page 13 All pieces of food should be warm if the default maximum shelf temperature is used. Press the ‘Back to Final Dry’ button to go to the Auto-freezedry-finaldry-pause screen if more final dry hours are needed. Use the up arrow to add extra final dry hours to enable the ‘Final Dry’ button. Then press the ‘Final Dry’ button to restart the drying process. If the food is completely dry, press ’Exit’ to stop the compressor and go back to the main menu. Seal the freeze-dried food in the mylar bag as soon as possible. Step 7. Remove ice in the chamber. Read Section 6 for defrosting. stayfreshfreezedry.com...
-
Page 14: Freeze-Drying Unfrozen Food With Temperature Probe
Freeze-drying unfrozen food with temperature probe Step 1. Inspect and make sure there is no sign of ice or water in the bottom of the chamber. Step 2. Load trays with unfrozen food, insert the trays onto the shelves. If the food consists of solid pieces, pick the largest piece on the second tray (from top to bottom), and insert the temperature probe into the center of the piece. Place the piece back on the tray. If the food is liquid/semi-liquid, immerse the temperature probe in the food. Close the acrylic door. Step 3. Close the vacuum valve. Remove any residual water in the drain pipe using the brush (refer to Section 6 for more details) and close the drain valve. Step 4. Press the ‘FreezeDrying’ button on the touch screen to go to the Auto-freezedry-start screen. Then press the ‘Probe in use’ button. Press the ‘Settings’ button to go to the Auto-freezedry-setting screen. Adjust the trigger conditions that automatically triggers drying to begin. Use the default setting for beginners. Press the ‘Back’ button to return to the Auto-freezedry-start screen. Step 5. Press the ‘Start’ button on the Auto-freezedry-start screen to enter the freezing stage. The screen will jump to Auto-freezedry-freezing and the compressor will be turned on. Note that the ‘Drying’ button will be disabled for one minute. You can still adjust the freezing drying parameters using the ‘Settings’ button on the right bottom during the freezing stage. The freeze dryer will start the drying process and jump to Auto-freezedry-maindry screen when any of the default trigger conditions are met or the ‘Drying’ button is pressed. When the main drying stage is completed, the freeze dryer will enter the final dry stage and the screen jumps to Auto-freezedry-finaldry. You can increase or decrease the final dry hours during the final dry stage. stayfreshfreezedry.com... - Page 15 Step 6. When the final dry stage is completed, the vacuum pump stops, the motorized ball valve closes, and the screen jumps to Auto-freezedry-complete and beeps for 30 seconds. If the drying is completed while you’re away, the trays might get very cold because the compressor is still running. Press the ‘Warm Tray’ button to warm the trays if necessary. When the final dry stage is completed, open the vacuum valve to let air in the chamber, then open the acrylic door. Check if the food is completely dry on each tray. All pieces of food should be warm if the default maximum shelf temperature is used. Press the ‘Back to Final Dry’ button to go to the Auto-freezedry-finaldry-pause screen if more final dry hours are needed. Use the up arrow to add extra final dry hours to enable the ‘Final Dry’ button. Then press the ‘Final Dry’ button to restart the drying process. If the food is completely dry, press ‘Exit’ to stop the compressor and go back to the main menu. Seal the freeze-dried food in the mylar bag as soon as possible. Step 7. Remove ice in the chamber. Read Section 6 for defrosting. stayfreshfreezedry.com...
-
Page 16: Freeze-Drying Frozen Food Without Temperature Probe
Freeze-drying frozen food without temperature probe Step 1. Pre-freeze the food in a deep freezer for over 24 hours to make sure the food is completely frozen. Step 2. Inspect and make sure there is no sign of ice or water in the bottom of the chamber. Step 3. Close the vacuum valve. Remove any residual water in the drain pipe using the brush (refer to Section 6 for more details) and close the drain valve. Step 4. Press the ‘Freeze Dry’ button on the touch screen to go to the Auto-freezedry-start screen. Then press the ‘Frozen Food’ button to let the control algorithm know the food is frozen. Press the ‘Settings’ button to go to the Auto-freezedry-setting screen. Adjust the trigger conditions that automatically triggers drying to begin. Use the default setting for beginners. Press the ‘Back’ button to return to the Auto-freezedry-start screen. Step 5. Press the ‘Start’ button on the Auto-freezedry-start screen to enter the freezing stage. The screen will jump to Auto-freezedry-freezing and the compressor will be turned on. Note that the ‘Drying’ button will be disabled for one minute. You can still adjust freezing drying parameters using the ‘Settings’ button on the right bottom during the freezing stage. Step 6. Let the freeze dryer run 1-2 hours and come back to check the shelf temperature. When it reaches below -5F, load the freeze dryer with the frozen food. Close the acrylic door and then press the ‘Food in Chamber’ button. The freeze dryer will start the drying process and jump to the Auto-freezedry-maindry screen when any of the default trigger conditions are met or the ‘Drying’ button is pressed. When the main drying stage is completed, the freeze dryer will enter the final dry stage and the screen jumps to Auto-freezedry-finaldry. You can increase or decrease the final dry hours during the final dry stage. stayfreshfreezedry.com... - Page 17 Step 7. When the final dry stage is completed, the vacuum pump stops, the motorized ball valve closes, and the screen jumps to Auto-freezedry-complete. If the drying is completed while you’re away, the trays might get very cold because the compressor is still running. Press the ‘Warm Tray’ button to warm the trays if necessary. When the final dry stage is completed, open the vacuum valve to let air in the chamber, then open the acrylic door. Check if the food is completely dry on each tray. All pieces of food should be warm if the default maximum shelf temperature is used. Press the ‘Back to Final Dry’ button to go to the Auto-freezedry-finaldry-pause screen if more final dry hours are needed. Use the up arrow to add extra final dry hours to enable the ‘Final Dry’ button. Then press the ‘Final Dry’ button to restart the drying process. If the food is completely dry, press exit to stop the compressor and go back to the main menu. Seal the freeze-dried food in the mylar bag as soon as possible. Step 8. Remove ice in the chamber. Read Section 6 for defrosting. stayfreshfreezedry.com...
-
Page 18: Freeze-Drying Frozen Food With Temperature Probe
Freeze-drying frozen food with temperature probe Step 1. Disconnect the temperature probe in the chamber. If the food is of solid pieces, pick the largest piece and insert the temperature probe into the center of the piece. Place the piece back on the tray. If the food is liquid/semi-liquid, immerse the temperature probe in the food. Pre-freeze the food with the temperature probe in a deep freezer for over 24 hours to make sure the food is completely frozen. Step 2. Inspect and make sure there is no sign of ice or water in the bottom of the chamber. Step 3. Close the vacuum valve. Remove any residual water in the drain pipe using the brush (refer to Section 6 for more details) and close the drain valve. Step 4. Press the ‘Freeze Dry’ button on the touch screen to go to the Auto-freezedry-start screen. Then press the ‘Probe in Use’ button and the ‘Frozen Food’ button to let the controller know the food is frozen and the temperature probe is being used. Press the ‘Settings’ button to go to the Auto-freezedry-setting screen. Adjust the trigger conditions that automatically triggers drying to begin. Use the default setting for beginners. Press the ‘Back’ button to return to the Auto-freezedry-start screen. Step 5. Press the ‘Start’ button on the Auto-freezedry-start screen to enter the freezing stage. The screen will jump to Auto-freezedry-freezing and the compressor will be turned on. Note that the ‘Drying’ button will be disabled for one minute. You can still adjust freeze- drying parameters using the ‘Settings’ button on the right bottom during the freezing stage. Step 6. Let the freeze dryer run 1-2 hours and come back to check the shelf temperature. When it reaches below -5F, load the freeze dryer with trays of the frozen food. Re-connect the temperature probe in the chamber (make sure the female/male connectors are dry and clean before connecting). Place the piece with the temperature probe in the second tray (from top to bottom). Close the acrylic door and then press the ‘Food in Chamber’ button. stayfreshfreezedry.com... - Page 19 The freeze dryer will start the drying process and jump to the Auto-freezedry-maindry screen when any of the default trigger conditions are met or the ‘Drying’ button is pressed. When the main drying stage is completed, the freeze dryer will enter the final dry stage and the screen jumps to Auto-freezedry-finaldry. You can increase or decrease the final dry hours during the final dry stage. Step 7. When the final dry stage is completed, the vacuum pump stops, the motorized ball valve closes, and the screen jumps to Auto-freezedry-complete. If the drying is completed while you’re away, the trays might get very cold because the compressor is still running. Press the ‘Warm Tray’ button to warm the trays if necessary. When the final dry stage is completed, open the vacuum valve to let air in the chamber, then open the acrylic door. Check if the food is completely dry on each tray. All pieces of food should be warm if the default maximum shelf temperature is used. Press the ‘Back to Final Dry’ button to go to the Auto-freezedry-finaldry-pause screen if more final dry hours are needed. Use the up arrow to add extra final dry hours to enable the ‘Final Dry’ button. Then press the ‘Final Dry’ button to restart the drying process. If the food is completely dry, press ‘Exit’ to stop the compressor and go back to the main menu. Seal the freeze-dried food in the mylar bag as soon as possible. Step 8. Remove ice in the chamber. Read Section 6 for defrosting. stayfreshfreezedry.com...
-
Page 20: Defrosting
6. Defrosting Press the ‘Defrost’ button on the main menu to enter the defrosting mode after the freeze- drying process is done. After the freeze-dried food is removed from the chamber, open the drain valve and close the acrylic door. Make sure the drain hose leads to a water bucket. On the main-menu screen, press the ‘Defrost’ button to go to the Defrosting-setting screen. Set the defrosting time and temperature on the Defrosting-setting screen. A typical setting is two hours of defrosting at 130F. Press the ‘Start’ button to jump to the Defrosting screen and start defrosting. The Defrosting screen will show the current shelf temperature and the time passed. After it is done, the screen jumps to Defrosting-complete. Press the ‘Exit’ button to go back to the main-menu. When defrosting is completed (no ice in the chamber), remove residual water in the bottom of the chamber, and remove residual water in the drain pipe using the brush. To remove the residual water in the drain pipe, first remove the drain hose and open the drain valve, then use the brush as shown below and the brush tip will collect water in the pipe. Squeeze the brush tip to remove water. Repeat until the tip does not collect water any more. At the end, connect the drain hose back to the drain valve. stayfreshfreezedry.com... - Page 21 stayfreshfreezedry.com...
-
Page 22: Advanced Freeze-Drying
7. Advanced Freeze-Drying Press the ‘Functions’ button on the main menu to enter the advanced freeze-drying screen. Manual freeze-drying Manual freeze-drying is only for advanced users. Improper use will void the warranty on the vacuum pump. The following is the typical manual freeze-drying process: Step 1. Turn on all switches. Load the freeze dryer with trays of food. Close all valves and the acrylic door. Make sure the vacuum hose is connected and sealed tightly. Step 2. Press the ‘Functions’ button to go to the function-test screen. Press the ‘Compressor’ button to turn on the compressor. Monitor the shelf temperature (and food temperature if the probe is inserted into the food). Move to Step 3 until the food is completely frozen. A good indicator is that the shelf or food temperature is below -5F. Step 3. Press the ‘Valve’ button to open the motorized ball valve. Step 4. Press the ‘Pump’ button to start the vacuum pump. Monitor the vacuum pressure reading. Move to Step 5 until the value is below 400 mTorr. Step 5. Set the target temperature value in the input box to the right of the ‘TS’ button. Press the ‘TS’ button to turn on the temperature controller. Adjust the target temperature value as the drying process progresses. stayfreshfreezedry.com... -
Page 23: Pre-Set Curve Freeze-Drying
Keep monitoring the vacuum pressure reading during the drying process. If the vacuum pressure is higher than 550 mtorr, lower the target temperature to avoid damage to the vacuum pump. Step 6. When the drying is complete, press the ‘Valve’ button to close the motorized ball valve and then press the ‘Pump’ button to turn off the vacuum pump. Open the vacuum valve and then open the acrylic door to remove the freeze-dried food. Press the ‘Back’ button to stop the freeze-drying process and go back to the main-menu. Step 7. Remove ice in the chamber. Read Section 6 for defrosting. Pre-set curve freeze-drying Preset temperature curve freeze-drying is only for advanced users. Improper use will void the warranty on the vacuum pump. The following is the typical freeze-drying process with preset temperature curve: Step 1. Turn on all switches. Load the freeze dryer with trays of food. Close all valves and the acrylic door. Make sure the vacuum hose is connected and sealed tightly. Step2. Press the ‘Functions’ button to go to the function-test screen and then press the ‘Preset Curves’ button on the bottom left to go to the Preset-curve-drying screen. Fill the temperature curve in the ‘Temp’ (first row below) and ‘Time’ (second row below) arrays. There are nine slots for each array. Fill the desired shelf temperature in the ‘Temp’ array and desired time period in minutes in the ‘Time’ array starting from the left. Below is the example if you want to start with 0F and raise 10F every other 60 minutes, When the drying process starts, the shelf temperature will be kept at 0F for 60 minutes, and then at 10F for 60 minutes, and so forth. After 9 hours if the drying process is not stopped and the shelf temperature will stay at 80F. stayfreshfreezedry.com... - Page 24 Step 3. Press the ‘Compressor’ button to turn on the compressor. Monitor the shelf temperature (and food temperature if the probe is inserted into the food). Move to Step 4 until the food is completely frozen. A good indicator is that the shelf (or food) temperature is below -5F. Step 4. Press the ‘Valve’ button to open the motorized ball valve. Step 5. Press the ‘Pump’ button to start the vacuum pump. Monitor the vacuum pressure reading and the temperature readings. Move to the Step 6 until the vacuum pressure is low, e.g., 450 mTorr. Step 6. Press the ‘Run’ button to start the drying process. A green bar above the ‘Temp’ array indicates where the current drying time and target temperature is. Keep monitoring the vacuum pressure reading during the drying process. If the vacuum pressure goes above 550 mtorr, lower the temperature in current slot to avoid damage to the vacuum pump. Step 7. When the drying is complete, press the ‘Valve’ button to close the motorized ball valve and then press the ‘Pump’ button to turn off the vacuum pump. Open the vacuum valve and then open the acrylic door to remove the freeze-dried food. Press the ‘Back’ button to stop the freeze-drying process and go back to the main-menu. Step 8. Remove ice in the chamber. Read Section 6 for defrosting. stayfreshfreezedry.com...
-
Page 25: Freeze-Dryer Settings
8. Freeze-Dryer Settings Press the ‘Settings’ button on the main menu to enter the system and freeze-drying setting screen Settings. There are six main buttons on the Settings screen, Set parameters Press the button ’FreezeDrying Setting’ to go to the freeze-drying parameter screens. The default settings work for most the of the freeze-drying scenarios. Consult the manufacturer before resetting any parameters. Download data Insert a flash drive stick in the USB port. (Confirm that light on the flash drive blinks. If not, try a different flash drive stick). Press the ‘Download Data’ button, a pop-up window will show up. The pop-up window will tell you when the data transfer is completed, and it disappears afterwards. If the touch screen controller reboots, try a different flash drive stick. Set temperature Press button ‘Set EnvTemp’ to set the actual room temperature, which will help recalibrate the freeze-drying algorithm and improve its performance. System reboot Press the ‘System Reboot’ button to reboot the touch screen controller. stayfreshfreezedry.com... -
Page 26: Touch Calibration
Touch calibration If the touch screen response is not accurate, press the ‘Touch Calibrate’ button to calibrate the touch screen response. Use your finger to press the centers of all crosses following the numeric order. Reset time Press the ‘Set Time’ button to adjust Year/Month/Day/Hour/Minute/Second and day of the week. stayfreshfreezedry.com... -
Page 27: Vacuum Pump Oil Change
9. Vacuum Pump Oil Change The vacuum pump oil needs to be filtered after 2-3 cycles of freeze-drying or when it becomes murky in the sight glass. Step 1. Put a paper filter on the top plastic pot and put several layers of tissue paper on the inside of the paper filter. Open the bottom valve of the vacuum pump to release oil into the oil filter. Open the oil fill cap to accelerate the release. Tilt the vacuum pump forward and shake it a bit to ensure all oil is released. Step 2. Wail until all of the oil passes through the filter. If there is no murkiness and no water in the filtered oil in the bottom, pour all the oil back into the vacuum pump via a funnel; otherwise, pour oil in another container, replace the tissue paper, and repeat the filtering. Step 3. If the oil level is below MIN, pour extra new oil into the vacuum pump to make sure the oil level is between MIN and MAX. stayfreshfreezedry.com... -
Page 28: Touch Screen Info
Touch Screen Info In the following context, a screen name is underscored, a button name is enclosed by quotes, a displayed number ‘888’ is a placeholder for actual values, a timestamp YYYY/MM/DD HH:MM is a placeholder for the actual date and time. Main-menu There are four buttons on the main-menu screen: FreezeDrying’ is the entrance to the patented automated freeze-drying process. The ‘ screen will jump to auto-freezedry-start when this button is pressed. 2) ‘Defrost’ is the entrance to the defrosting process in order to remove the ice inside the chamber when the freeze-drying run is completed. The screen will jump to defrosting- setting when this button is pressed. 3) ‘Functions’ is the entrance to run tests on the condensing unit, the heater, the vacuum pump, and the motorized ball valve. It also provides more options for advanced freeze- drying: a manual freeze-drying process, a pre-set curve freeze-drying process. The screen will jump to function-test when this button is pressed. 4) ‘Settings’ is the entrance to system settings and input parameters. The screen will jump to settings when this button is pressed. stayfreshfreezedry.com... -
Page 29: Auto-Freezedry-Start
Auto-freezedry-start Press the ‘Settings’ button and the screen will jump to auto-freezedry-setting, where you can set conditions that prompt the drying process to start and set major parameters for drying. If the temperature probe is inserted in the food, press the ‘Probe in use’ button to assist the drying process to: 1. decide when to start drying during the freezing stage. The auto-freezedry-setting will display the trigger condition based on the probe temperature if the ‘Probe in use’ button is pressed. 2. decide when to switch to the ‘Final Dry’ stage during the main drying stage. By default, if the probe temperature is higher than 50F then the program will jump to the final dry stage. When the probe is being used, insert it into the center of the largest piece of the food being freeze-dried. If the ‘Probe in use’ button is not pressed, you can still use the probe to monitor the temperature wherever the probe is located. Press the ‘Frozen food’ button if the food has been frozen in a freezer before being loaded in the freeze dryer. Effectively this button will suspend all the trigger conditions in the auto- freezedry-setting screen. These trigger conditions will be re-activated after the ‘Food in Chamber’ button is pressed in the auto-freezedry-freezing screen. Press the ‘Exit’ button to go back to the main-menu. Press the ‘Start’ button to start the compressor to cool the chamber. The screen will jump to auto-freezedry-freezing, and the freeze dryer enters the freezing stage. In some cases, you’ll see that the ‘Start’ button is disabled: stayfreshfreezedry.com... -
Page 30: Auto-Freezedry-Setting
A) The compressor is just turned off (when you finish a freeze-drying session or manually press ‘Exit’). The ‘Start’ button is disabled for three minutes to protect the compressor from damage. B) The temperature probe is not plugged in when the ‘Probe in use’ button is pressed and the ‘Frozen food’ button is not pressed. It is required that the temperature probe is plugged in when you intend to use it. Auto-freezedry-setting This screen shows two sets of settings: conditions that trigger main drying, and the drying parameters. There are three conditions that trigger main drying: 1) Hours of freezing. Turned off by default. 2) Shelf temperature, which measures the temperature of the silicone heater under the second tray. -5F by default. Turned on by default. 3) Probe temperature, which measures the food temperature where the probe is inserted. 5F by default. The probe temperature setting is shown and turned on only when the ‘Probe in use’ button is pressed in auto-freezedry screen. if any of the above conditions is turned on and met, the drying process will be triggered, and the vacuum pump starts. You can adjust the parameters or turn on/off (green/grey) any conditions by pressing the off/on button to the right of the arrows. Here are the three examples of the setting, A. If you want to start drying only if shelf temperature hits -20F, set the temperature to -20, and press the green button for the probe temperature to turn it off if it is shown. stayfreshfreezedry.com... -
Page 31: Auto-Freezedry-Freezing
B. If you want to start drying only if a certain freezing time is reached, e.g., 15 hours, you can set the freeze time to 15, press the adjacent button to turn it on (green), press other green buttons to turn them off. C. If you want to start drying if the probe temperature hits -20F or the freeze time exceeds 13 hours, set the probe temperature to -20 and the freeze time to 13, turn off the green button for the shelf temperature and turn on the button for the hours. If all the conditions are turned off, you need to manually press ‘Drying’ to start the drying process in the auto-freezedry-freezing screen. There are three drying parameters you can adjust: initial target pressure, max shelf temperature, and final dry hours. Initial target pressure is the pressure level the heater is going to maintain when the main drying starts. Max shelf temperature is the highest allowed temperature for the silicone heater under the second tray. Default settings are 550 mtorr and 120F respectively. Typically, the higher the initial target pressure/max shelf temperature the faster the freeze-drying process is, but also the higher the chance that water vapor enters the vacuum pump or the food is thawed/shriveled. The default setting for final dry is seven hours. The more time final dry hours take, the higher chance that the food is completely dry. Auto-freezedry-freezing This screen indicates the freeze dryer is in the freezing stage. The ‘Auto’ sign in the top left indicates that trigger conditions set in the auto-freezedry-setting screen are active. When any of the conditions are met, the drying process will be started, and the screen will jump to the auto-freezedry-drying screen. If the ‘Auto’ sign is not shown (in the cases where 1) no trigger condition is selected, or 2) the main drying is interrupted and you come back to this screen again), you have to manually press the ‘Drying’ button to start the drying process. stayfreshfreezedry.com... - Page 32 In the center are two buttons ‘Freezing’ and ‘Drying.’ The ‘Freezing’ button highlighted in orange indicates the compressor is running. The ‘Drying’ button is in grey, indicating that drying has yet to start. If you are an advanced user, you can manually start drying by pressing the ‘Drying’ button when you know the food is ready for drying. In the case that all trigger conditions are turned off, meaning that you plan to start drying manually, make sure the food is completely frozen before pressing the ‘Drying’ button. Below the two buttons are three temperature readings: ‘Trap’ (evaporator coil, indicates cold trop temperature), ‘Shelf’ (temperature of the shelves that are holding the trays), and ‘Probe’ (food temperature when inserted in the food, otherwise the temperature where the probe is located), and a vacuum pressure reading. The cold trap temperature should reach -20F quickly and then slowly decrease to around -40F during freezing. The shelf temperature slowly decreases from room temperature to below 0F during the freezing stage. The probe temperature depends on the location of the probe. If it is inserted in the food, it should show a slightly higher value than the shelf temperature but follow the same trend. The vacuum reading shows the vacuum pressure in the chamber. The pressure reading is capped at 2000 mTorr. The number does not change until the pump starts and pulls the vacuum below 2000 mTorr. Press the bottom-left ‘Exit’ button to stop the freezing process and go back to the main-menu. When you press the ‘Frozen food’ button in Auto-freezedry screen, the ‘food in chamber’ button will show up in the bottom. After the frozen food is loaded on the trays in the chamber and all valves are closed, press ‘Food in chamber’ to un-mask the trigger conditions set in Auto- freezedry-setting screen. Press the ‘Settings’ button to make changes to the freeze-drying settings same as seen in Auto- freezedry-setting screen. stayfreshfreezedry.com...
-
Page 33: Auto-Freezedry-Maindry
Auto-freezedry-maindry This is the main drying screen. There are two buttons in the center: ‘Freezing’ and ‘Drying.’ ‘Freezing’ in yellow indicates the compressor is running to cool the chamber. This button is an indicator only. ‘Drying’ in yellow indicates the pump is running and the control algorithm turns the heater on/off. This button can be pressed to turn off the pump to pause the drying process (the screen will jump to auto- freezedry-freezing). The time stamps above the two buttons show the time passed for freezing and drying. Below the two buttons are the same temperature readings and the vacuum pressure reading mentioned in auto-freezedry-freezing. When the pump starts and the freeze dryer enters the drying stage, the freeze dryer will check if sufficient vacuum is reached at several check points. The pressure reading normally takes less than 10 minutes to reach below 2000 mtorr. If sufficient vacuum is not reached at check points, the freeze dryer will beep and the screen jumps to the Vacuum-not-reached-warning. Press the ‘Exit’ button and the screen will return to Auto-freezedry-freezing. Note on the top-left screen the ‘Auto’ sign is gone, which means you have to manually start drying. Fix any leaking issues by checking if the valves are closed, gasket and acrylic door are in close contact, any signs of water in the chamber, etc. Press the ‘Drying’ button and the pump will be turned on again. If the freeze dryer cannot reach the target vacuum the second time, it is better to stop this freeze-drying session by pressing the ‘Exit’ button on the bottom left corner and find out the root cause. Press the ‘Drying’ button in case the pump needs to be stopped. Press the left-bottom ‘Exit’ button to turn off the pump and stop the freeze-drying process. The screen will jump to the main-menu. stayfreshfreezedry.com... -
Page 34: Auto-Freezedry-Finaldry
When the main drying stage is completed, the screen will automatically jump to Auto- freezedry-finaldry. Auto-freezedry-finaldry The final dry screen is similar to the auto-freezedry-maindry screen. The main differences here are: 1) The button name becomes ‘Final Drying’ instead of ‘Drying.’ 2) There are two extra buttons, ‘INC’ and ‘DEC’ to increase and decrease the final dry hours. 3) The displayed time above the ‘Final Drying’ button is the countdown of the final dry time. Auto-freezedry-finaldry-pause This screen is similar to the Auto-freezedry-finaldry screen. The ‘Final Drying’ button is in grey, which means that the drying process is paused. Press the ‘Final Drying’ button to resume drying. stayfreshfreezedry.com... -
Page 35: Auto-Freezedry-Complete
Note that 1) when the countdown is negative the ‘Final Drying’ button will be disabled. Press ‘INC’ to increase the final dry hours to enable the ‘Final Drying’ button. 2) make sure all valves are closed before pressing the ‘Final Drying’ button. Auto-freezedry-complete This screen pops up and the vacuum pump stops when the drying is complete. Open the vacuum release valve and wait for the air to fill the chamber. Open the door to check if the food on each tray is completely dry. If not completely dry and the food is still frozen, put the trays back, close the door and press ‘Return to FinalDry.’ The screen will jump to Auto- finaldry-pause screen. Follow the instructions on Auto-finaldry-pause screen to resume drying. The stainless-steel trays could be very cold when you check them hours after the drying is complete. To avoid burning your hands and attracting moisture, press the ‘Warm Tray’ button to heat the trays to the max tray temperature. Preset-curve-drying This screen shows the operation and setting input for drying with a pre-set temperature curve. The top three buttons control the compressor, the vacuum pump, and the motorized ball-valve. The compressor and the pump buttons have a minute counter below. In the middle are the temperature sensor readings and the vacuum pressure reading. stayfreshfreezedry.com... - Page 36 The ‘Temp’ and ‘Time’ arrays are the target shelf temperatures and how long in minutes the shelf temperature should be maintained for each temperature. For example, in the below hypothetical setting, the shelf temperature is set at 50F for 60 minutes, then 55F for 120 minutes, then 60F for 120 minutes, and then 65F for 60 minutes, and so forth. The last segment is 110F for 60 minutes. When the time passed for the last segment, the control will keep the shelf temperature at 110F until the ‘Run’ button is turned off. The ‘Runtime’ displays the how many minutes the drying process has been run. 100 110 120 120 Press the ‘Exit’ button to go back to the function-test screen. stayfreshfreezedry.com...
-
Page 37: Function-Test
Function-test This is the function screen to test individual components of the freeze dryer: compressor, vacuum pump, heater, and motorized ball-valve. Below the buttons are the temperature readings and vacuum pressure. Below the compressor, pump, and heater buttons are the minutes counter that records how long each component has run for. This screen also works as the control panel for manual freeze-drying. The ‘TS’ button is the target shelf temperature you can set at any time during the drying process. Below the ‘TS’ button is the time that ‘TS’ is pressed for drying. Press the ‘Preset Curves’ button to enter the Preset-curve-drying screen. Press the ‘Back’ button to go back to the main-menu. Defrosting-setting In the Defrosting-setting screen you can reset the time and target shelf temperature. Click the ‘Start’ button to start defrosting. stayfreshfreezedry.com... -
Page 38: Defrosting
Defrosting This screen indicates the freeze dryer is in the defrosting mode and shows the time the freeze dryer has been in the defrosting mode, the preset defrosting time, and current shelf temperature. Press the ‘Exit’ button to go back to the main-menu. Defrosting-complete This screen pops up when the defrosting is complete. Press the ‘Exit’ button to return to the main-menu. stayfreshfreezedry.com... -
Page 39: Settings
Settings There are six main buttons on the screen: 1) ‘FreezeDrying Settings’ - Press this button to adjust all the default parameters for freeze-drying. 2) ‘Download data’ - This button is used to download the recorded freeze dryer status and sensor readings. 3) ‘Set EnvTemp’ – Press this button to set the actual room temperature. 4) ‘System reboot’ - Press this button to reboot the touch screen. 5) ‘Touch calibrate’ - Press this button to recalibrate the touch screen if you have inaccurate response using touch. 6) ‘Set time’ - Press this button to reset time. stayfreshfreezedry.com... -
Page 40: Cable-Connection-Warning
Cable-connection-warning This warning pops up when the cable connecting the heater and shelf temperature sensor is disconnected. Press the ‘Stop and exit’ button to return to the main menu. Vacuum-leak-warning This warning pops up during drying when the sensor detects an unusual drop in the vacuum pressure. The vacuum pump stops as result of this warning. Press the ‘Exit’ button to return to the freezing mode screen. stayfreshfreezedry.com... -
Page 41: Vacuum-Pressure-Abnormal
Vacuum-pressure-abnormal This warning pops up when the vacuum pressure reading is abnormal. Press the ‘Stop and exit’ button to the freezing mode or main menu screen. Vacuum-not-reached-warning When the vacuum pump starts, the vacuum pressure reading will be compared to benchmark values at various points. This warning pops up if any of the readings do not reach the benchmark values. Press the ‘Exit’ button to return to the freezing mode screen. stayfreshfreezedry.com... - Page 42 If you have any questions, contact us via info@stayfreshfreezedry.com, or visit stayfreshfreezedry.com. +1 (424) 420 7534 Stay Fresh Technology LLC, 3768 Rockwell Ave, El Monte, CA, 91731 stayfreshfreezedry.com...
Need help?
Do you have a question about the 4H11560US and is the answer not in the manual?
Questions and answers