
Subscribe to Our Youtube Channel
Related Manuals for Baja BA300

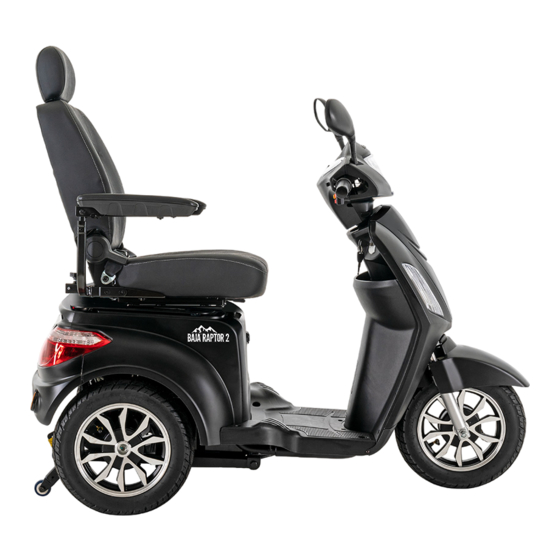
Summary of Contents for Baja BA300
- Page 1 OPERATION COMFORT BAJA™ BA300 MAINTENANCE NON-MEDICAL BATTERY CHARGING OWNER’S MANUAL...
- Page 2 S A F E T Y G U I D E L I N E S WARNING! An authorized dealer or qualified technician must perform the initial setup of this scooter and must perform all of the procedures in this manual. The symbols below are used throughout this owner’s manual and on the scooter to identify warnings and important information.
-
Page 3: Table Of Contents
C O N T E N T S SAFETY ......................4 YOUR SCOOTER ....................7 III. BATTERIES AND CHARGING ................14 OPERATION .....................20 COMFORT ADJUSTMENTS ................22 BASIC TROUBLESHOOTING ................24 VII. CARE AND MAINTENANCE ................26 Baja™ BA300... -
Page 4: Safety
Fully charge batteries before operating. Remove key from an unattended scooter. Does not meet ISO 7176-19 standards for occupied transport in a motor vehicle. When traveling in a motor vehicle, do not sit in your scooter. Wear head protection Baja™ BA300... - Page 5 „ Check the battery condition meter to ensure the batteries are fully charged. „ Ensure the manual freewheel lever is in drive mode before sitting on the scooter. If you discover a problem, contact your authorized dealer for assistance. Please refer to the Contact Information insert in your Owner’s Package. Baja™ BA300...
- Page 6 „ Disc Park Brake: Activates mechanically after regenerative braking slows the scooter to near stop or when power is removed from the system for any reason. „ Handbrake: This lever provides you with supplemental stopping power. See II. “Your Scooter.” Baja™ BA300...
-
Page 7: Your Scooter
14. Forward-Reverse Switch 6. Left Turn Signal Position 15. Lights Switch 7. Turn Signal Off Position 16. Full Lights Position 8. Right Turn Signal Position 17. Running Lights Position 9. Horn Buttons 18. Lights Off Position Figure 1. Tiller Console Baja™ BA300... - Page 8 These buttons activate a warning horn. Your scooter must be powered up for the horn to be operational. Do not hesitate to use the warning horn when doing so may prevent accident or injury. NOTE: When the horn button is pressed, the scooter’s blinker lights flash once as a hazard. Baja™ BA300...
- Page 9 WARNING! Scooter users are required to use their lights when visibility is restricted—day or night. LCD SCREEN The LCD screen offers easily intuited feedback information. See figure 2. IDENTIFICATION KEY Speed Battery Condition Indicator Odometer/Tripometer Figure 2. LCD Screen Baja™ BA300...
- Page 10 These fuses are located in a compartment within the rear shroud, 1. Off-board Charger Port below the seat. NOTE: Keep all electrical areas clean and free of moisture and foreign material. Figure 4. Off-board Charger Port Baja™ BA300...
- Page 11 NOTE: If the scooter is placed in freewheel mode (manual freewheel lever forward) while the key is in the “on” position, the scooter will not run until the manual freewheel lever is pushed backward and the key is turned to the “off” position, then back to the “on” position. Baja™ BA300...
- Page 12 WARNING: No personal propery, pets, or valuables should be stored in any storage compartment and left unattended. NOTE: Prior to latching, ensure that the keys are not in the storage compartment. NOTE: Ensure the seat is properly latched again before operating. Baja™ BA300...
- Page 13 NOTICE: If you are preparing the scooter for transport or service, or if there is a situation that requires you to manually shut down the electrical system, press the manual shut-off button on the circuit breaker. This will cut all power to the scooter. Baja™ BA300...
-
Page 14: Batteries And Charging
If the battery charger is exposed to adverse or extreme weather conditions, then it must be allowed to adjust to the difference in environmental conditions before use indoors. Refer to the manual supplied with the battery charger for more information. Baja™ BA300... - Page 15 What if my scooter’s batteries will not charge? „ Ensure the red (+) and black (-) battery cables are connected properly to the battery terminals. „ Ensure both ends of the charger power cord are inserted fully. „ Ensure the circuit breaker is not tripped. Baja™ BA300...
- Page 16 „ Try to maintain an even speed while your scooter is in motion. „ Avoid stop-and-go driving. „ We recommend charging your batteries for at least 48 continuous hours once per month to improve battery performance and battery life. „ Make sure all harness connections are secured properly. Baja™ BA300...
- Page 17 These batteries are Federal Aviation Administration (FAA) approved (United States only), allowing safe transportation on aircraft, buses, and trains, as there is no danger of spillage or leakage. We suggest you contact the carrier’s ticket counter in advance to determine that carrier’s specific requirements. Baja™ BA300...
- Page 18 7. Connect the red battery cable to the positive (+) battery terminal of each battery. 8. Connect the black battery cable to the negative (-) battery terminal of each battery. 9. Connect the battery harnesses and battery tie-down strap. 10. Reposition the terminal boots over the battery terminals. Baja™ BA300...
- Page 19 NOTE: For long term storage, it is recommended that you disconnect the battery set in order to prevent battery power drainage. Figure 11. Battery Configuration Figure 12. Battery Terminal Hardware Baja™ BA300...
-
Page 20: Operation
„ Is the key fully inserted into the key switch and turned clockwise to the “on” position? „ Does the scooter’s horn work properly? „ Is your proposed path clear of people, pets, and obstacles? „ Have you planned your route to avoid adverse terrain and as many inclines as possible? Baja™ BA300... - Page 21 Although the controller is shut down, power will still be supplied to the scooter’s lighting system. If the power down timer feature takes effect, perform the following steps to resume normal operation: 1. Remove the key from the key switch. 2. Reinsert the key and power up your scooter. Baja™ BA300...
-
Page 22: Comfort Adjustments
2. Raise or lower the armrest to the desired height. 3. Tighten the setscrew to secure the armrest. NOTE: If the seat position on top of the rear shroud needs to be adjusted forward or rearward, contact your authorized dealer. Baja™ BA300... - Page 23 To adjust the mirror: 1. Position yourself in a seated driving position facing forward. 2. Adjust the mirror left, right, up, or down until you have a good line of sight behind you. See figure Figure 16. Mirror Position Installation/Adjustment Baja™ BA300...
-
Page 24: Basic Troubleshooting
assistance. Motor volts error. Contact your authorized dealer for assistance. Other internal errors. Contact your authorized dealer for assistance. Baja™ BA300... - Page 25 ? „ Fully charge your scooter’s batteries. See IV. “Batteries and Charging.” If you experience any problems with your scooter that you are not able to solve, immediately contact your authorized dealer for information, maintenance, and service. Baja™ BA300...
-
Page 26: Care And Maintenance
„ Diluted Bleach Solution (10% dilution or less); Note: Bleach with pH factor between 7 and 9 is suitable; a product with a pH of 10.5 or higher may damage the vinyl surface integrity over an extended period of time. Baja™ BA300... - Page 27 Check electrical components frequently for signs of corrosion and replace as necessary. WARNING! Do not pull on electrical harnesses directly to detach them from the scooter. Always grasp the connector itself when disconnecting the harness to prevent wire damage. Baja™ BA300...
- Page 28 Nylon insert lock nuts should not be reused as it may cause damage to the nylon insert, resulting in a less secure fit. Replacement nylon insert lock nuts are available at local hardware stores or through your authorized dealer. Baja™ BA300...
- Page 29 Your scooter must be disposed of according to applicable local and national statutory regulations. Contact your local waste disposal agency or authorized dealer for information on proper disposal of packaging, metal frame components, plastic components, electronics, batteries, neoprene, silicone, and polyurethane materials. Baja™ BA300...
- Page 30 N O T E S Baja™ BA300...
- Page 32 Please fill out the following information for quick reference: Dealer: Address: Telephone: Purchase Date: Serial # UDI Label (if applicable)
Need help?
Do you have a question about the BA300 and is the answer not in the manual?
Questions and answers