Table of Contents
Advertisement
Quick Links
1
INTRODUCTION
Congratulations on your choice of an AgriMetal Pull-Type Turbine Debris Blower to complement your op-
eration. This equipment has been designed and manufactured to meet the needs of a discerning turf care
industry.
Safe, efficient and trouble free operation of your AgriMetal Debris Blower requires that you and anyone else
who will be operating or maintaining the machine, read and understand the Safety, Operation, Maintenance
and Trouble Shooting information contained within the Operator's Manual.
This manual covers the Model 270 Pull-Type Turbine Debris Blower. Use the Table of Contents or Index as a guide
to locate required information.
Keep this manual handy for frequent reference and to pass on to new operators or owners. Call your Ag-
riMetal Dealer if you need assistance, information or additional copies of the manuals.
OPERATOR ORIENTATION - The directions left, right, front and rear, as mentioned throughout this manual,
are as seen from behind the tractor driver's seat and facing in the direction of travel.
1
Advertisement
Table of Contents

Related Manuals for AgriMetal TB-270

Summary of Contents for AgriMetal TB-270
- Page 1 This equipment has been designed and manufactured to meet the needs of a discerning turf care industry. Safe, efficient and trouble free operation of your AgriMetal Debris Blower requires that you and anyone else who will be operating or maintaining the machine, read and understand the Safety, Operation, Maintenance and Trouble Shooting information contained within the Operator's Manual.
-
Page 3: Safety Alert Symbol
If you have any questions not answered in this manual or require additional copies or the manual is dam- aged, please contact your dealer or AgriMetal Inc., 1006 Rue Principale, Wickham, Quebec, Canada, J0C 1S0. Phone (819) 398-6883 or fax (819) 398-5311. -
Page 4: General Safety
GENERAL SAFETY Read and understand the YOU are responsible for the SAFE operation and Operator’s Manual and all maintenance of your AgriMetal Pull-Type Turbine safety signs before operating, Debris Blower. YOU must ensure that you and any- maintaining, adjusting or un- one else who is going to operate, maintain or work plugging the Debris Blower. -
Page 5: Equipment Safety Guidelines
EQUIPMENT SAFETY GUIDELINES Do not modify the equipment in any way. Safety of the operator and bystanders is one of Unauthorized modification result in serious in- the main concerns in designing and develop- jury or death and may impair the function and ing a machine. -
Page 6: Safety Training
SAFETY TRAINING SAFETY SIGNS Safety is a primary concern in the design and Keep safety signs clean and legible at all times. manufacture of our products. Unfortunately, our efforts to provide safe equipment can be wiped Replace safety signs that are missing or have out by a single careless act of an operator or become illegible. - Page 7 PREPARATION Never operate the tow vehicle and machine until Operate the machine only with you have read and completely understand this a tractor equipped with an ap- manual, the Tow Vehicle Operator's Manual, proved Roll-Over-Protective and each of the Safety Messages found on the Structure (ROPS).
- Page 8 OPERATING SAFETY 10. A heavy load can cause instability of the tow Please remember it is important that you read vehicle. Use extreme care during travel. Slow and heed the safety signs on the Blower. Clean down on turns and watch out for bumps. The tow or replace all safety signs if they cannot be vehicle may need front counterweights to coun- clearly read and understood.
-
Page 9: Refuelling Safety
2.8 STORAGE SAFETY TRANSPORT SAFETY Comply with state and local laws governing Store the unit in an area away from human highway safety and movement of machinery activity. on public roads. Do not permit children to play on or around The use of flashing amber lights is accept- the stored machine. -
Page 10: Battery Safety
2.11 MAINTENANCE SAFETY 2.12 BATTERY SAFETY Good maintenance is your responsibility. Poor Keep all sparks and flames away from batteries, maintenance is an invitation to trouble. as gas given off by electrolyte is explosive. Follow good shop practices. Avoid contact with battery electrolyte: wash off any spilled electrolyte immediately. -
Page 11: Gas Motor Safety
2.13 GAS MOTOR SAFETY BEFORE STARTING ENGINE, READ DERSTAND OPERATING MAINTE- NANCE INSTRUCTIONS THAT CAME WITH YOUR ENGINE. WARNING: DO NOT 15. DO NOT strike flywheel with a hard object or DO NOT run engine in an enclosed area. metal tool as this may cause flywheel to shatter Exhaust gases contain carbon monoxide, an in operation. -
Page 12: Sign-Off Form
2.14 SIGN-OFF FORM AgriMetal follows the general Safety Standards specified by the American Society of Agricultural Engineers (ASAE) and the Occupational Safety and Health Administration (OSHA). Anyone who will be operating and/ or maintaining the Pull-Type Turbine Debris Blower must read and clearly understand ALL Safety, Operating and Maintenance information presented in this manual. -
Page 13: Safety Sign Locations
SAFETY SIGN LOCATIONS The types of safety signs and locations on the equipment are shown in the illustrations that follow. Good safety requires that you familiarize yourself with the various safety signs, the type of warning and the area, or particular function related to that area, that requires your SAFETY AWARENESS. •... - Page 14 The types of safety signs and locations on the equipment are shown in the illustrations that follow. Good safety requires that you familiarize yourself with the various safety signs, the type of warning and the area, or particular function related to that area, that requires your SAFETY AWARENESS. •...
- Page 15 ASSEMBLING 4.1 MACHINE ASSEMBLY The machine is shipped from the factory in a par- tially disassembled configuration and attached to a pallet that provides for easy moving and handling. Always use tools, equipment and forklifts of appro- priate size and capacity for the job. Always use 2 men when lifting, moving and assembling the ma- chine.
- Page 16 Use a forklift to lift the pallet/machine from the truck. Carry the load close to the ground as it is moved to the assembly area and positioned. Remove duct and hitch tie-downs and lay-out. Duct Hitch Lay-Out FIG. 2 ANCHOR BOLTS...
- Page 17 Remove the anchor bracket clamps from around the rim of the duct. Removing Holding Fastener FIG. 3 DUCT CLAMPS...
- Page 18 Slide the duct into the discharge flange. Flange Aligning Install the mounting bolts through the anchor brackets to secure the duct to the flange. Bracket Tighten fasteners to their specified torque. Secured FIG. 4 DUCT INSTALLATION...
- Page 19 10. Remove the remote controller and ignition key from the manual cannister. Cannister Removed FIG. 5 CONTROLLER 11. Install key into ignition switch.
- Page 20 12. Remove the hitch mounting bolts. FIG. 6 BOLTS 13. Attach the hitch to the front of the frame. a. Install all the anchor bolts through the hitch and mounting plate. Aligning b. Center the hitch on the frame. Measure to be sure.
- Page 21 d. Tighten hitch fasteners to their specified torque. FIG. 8 HITCH INSTALLED 14. Connect Electrical System: a. Clip the plastic tie holding the battery cable. Tie Downs b. Connect cable to battery pole. Secure the battery. d. Tighten fastener to its specified torque. Cable Attached FIG.
- Page 22 15. Turn the ignition key to the RUN position to turn the electrical system ON. 16. Use the remote control module to turn the duct. IMPORTANT Do not start engine unless machine is hooked up to tow unit. Controller 17. Turn the duct to the left or right. 18.
- Page 23 19. Pull the blower off the pallet. Pulling FIG. 11 OFF PALLET 20. Attach to the tow vehicle as required. NOTE When the hitch is level or sloped down slightly toward the tow vehicle, the chute will not hit the ground during operation.
-
Page 25: Operation
TO THE NEW OPERATOR OR OWNER Follow all safety instructions exactly. Safety is AgriMetal Pull-Type Turbine Debris Blowers are de- everyone's business. By following recommend- signed to quickly and efficiently, blow away leaves, ed procedures, a safe working environment is cuttings and other debris. -
Page 26: Machine Components
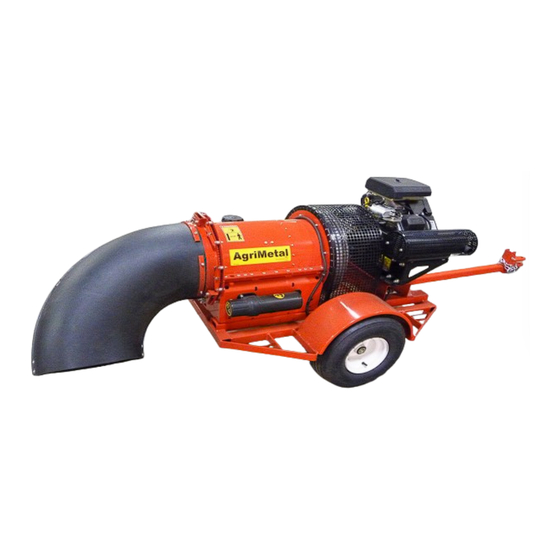
MACHINE COMPONENTS The AgriMetal Pull-Type Turbine Debris Blower is a large blower mounted on a trailer for moving debris on a stream of air. The air stream can be directed to the right , left or down depending on the duct position. -
Page 27: Pre-Operation Checklist
BREAK-IN 5.4 PRE-OPERATION CHECKLIST Although there are no operational restrictions on Efficient and safe operation of the AgriMetal Pull- the Blower when it is used for the first time, it is Type Turbine Debris Blower requires that each op- recommended that the following mechanical items... - Page 28 5.5 CONTROLS Before starting to work, all operators should famil- iarize themselves with the location and function of the controls. Gas Engine: Read the engine manufacturers operator's man- ual before starting for more detailed instructions. a. Ignition Switch: This key operated switch controls the elec- tric power to the engine.
- Page 29 ATTACHING/UNHOOKING The Turbine Debris Blower should always be lo- cated on a level, dry area that is free of debris and other foreign objects. When attaching the machine to a golf cart or a utility cart, follow this procedure: Clear the area of bystanders, especially small children.
- Page 30 Attach the safety chain around the drawbar cage to prevent unexpected separation. FIG. 19 SAFETY CHAIN Level The Frame: a. Move the unit to a hard level surface such as asphalt or concrete. b. Sight along the hitch. Use the adjustable clevis on the front of the hitch to set the angle of the frame.
-
Page 31: Field Operation
FIELD OPERATION OPERATING SAFETY • Please remember it is important that you read • Never allow children to operate or be around and heed the safety signs on the Turbine this machine. Debris Blower. Clean or replace all safety signs if they cannot be clearly read and understood. - Page 32 Starting Machine: a. Stop tow vehicle engine, set park brake, remove ignition key and wait for all moving parts to stop before dismounting. b. Move the throttle to its 1/4 throttle position. Use the ignition switch on the front frame to start the engine.
- Page 33 Duct Position: The Blower is designed with a moveable duct that can be used to direct the air to the left, or right. Use the wireless control module to change the duct position. NOTE The machine ignition switch must be in the run position when moving the duct.
- Page 34 Blower Engine Operating RPM: Run the blower engine at a fast enough speed to get the job done. 10. Clean the intake screen as required to insure ample flow of air to the fan. 11. Always try to blow with the wind. Blowing against the wind can result in lifting the material into the wind and having it blown over a wider area.
- Page 35 12. Application Hints: Cleaning fairways or large open areas: When moving the material to one side, start at the opposite side and blow to- ward the receiving side. Use the wire- less control module to adjust the duct position to change the air flow direction when coming back.
-
Page 36: Transport Safety
TRANSPORTING TRANSPORT SAFETY • Do not drink and drive. • Comply with state and local laws governing highway safety and movement of machinery • Attach safety chain between tow vehicle and on public roads. machine before transporting. • The use of flashing amber lights is accept- •... -
Page 37: Storage Safety
STORAGE STORAGE SAFETY • Store the unit in an area away from human activity. • Do not permit children to play on or around the stored machine. • Store the unit in a dry, level area. Support the frame with planks if required. At the end of the season, the machine should be thoroughly inspected and prepared for storage. -
Page 39: Service And Maintenance
SERVICE AND MAINTENANCE MAINTENANCE SAFETY • Good maintenance is your responsibility. SERVICE Poor maintenance is an invitation to trouble. 6.1.1 FLUIDS AND LUBRICANTS • Follow good shop practices. Gasoline: Keep service area clean and dry. Use a standard unleaded gasoline for all operat- Be sure electrical outlets and tools are ing conditions. -
Page 40: Servicing Intervals
6.1.3 SERVICING INTERVALS The period recommended is based on normal oper- ating conditions. Severe or unusual conditions may require more frequent lubrication or oil changes. 8 Hours or Daily Clean blower air intake screen. Check engine oil level. Check fuel level. FIG. - Page 41 200 Hours Change engine oil filter. FIG. 31 OIL FILTER Annually Change in line fuel filter. FIG. 32 IN-LINE FUEL FILTER Clean machine. FIG. 33 MACHINE...
-
Page 42: Service Record
6.1.3 SERVICE RECORD See Lubrication and Maintenance sections for details of service. Copy this page to continue record. ACTION CODE: CHECK CL CLEAN GREASE CH CHANGE Hours Serviced by 8 Hours or Daily CL Blower Air Intake Screen CK Engine Oil Level CK Fuel Level 100 Hours CH Change Engine Oil... -
Page 43: Maintenance
MAINTENANCE By following a careful service and maintenance program for your machine, you will enjoy many years of trouble-free operation. 6.2.1 CLEANING AIR CLEANER Review the Operator's Manual for the engine. Place all controls in neutral, stop engine and remove ignition key before maintaining. Remove the cover over the air cleaner. -
Page 44: Changing Engine Oil And Filter
6.2.2 CHANGING ENGINE OIL AND FILTER Review the Operator's Manual for the engine. Place all controls in neutral, stop engine and re- move ignition key before maintaining. Allow the engine to cool before changing the oil. Hot oil can cause burns if it contacts exposed skin. -
Page 45: In Line Fuel Filter
6.2.3 IN LINE FUEL FILTER The Turbine Debris Blower is designed with an in line fuel filter to remove any contaminants from the fuel prior to it reaching the engine. It is recom- mended that it be changed annually or more often if contaminants get into the fuel system. -
Page 47: Troubleshooting
TROUBLE SHOOTING The AgriMetal Pull-Type Turbine Debris Blower is a large portable blower that can be used to blow leaves, grass clippings, trash and debris. It is a simple system that requires minimal maintenance. In the following Trouble Shooting section, we have listed many of the problems, causes and solutions that can help you to solve the problems that you might encounter. -
Page 49: Specifications
SPECIFICATIONS MECHANICAL PULL-TYPE BLOWER TB-270 Engine 27 HP Kohler Command Pro Drive Direct Fan Design Axial Flow Fan Size 14" Diameter Number of Fins Chute Rotation 360° Chute Outlet Size Oblong 9.5” x 14” (24cm x 35cm) Unbreakable Chute Standard Tire Size 18 x 9.5-8... -
Page 50: Checking Bolt Torque
BOLT TORQUE CHECKING BOLT TORQUE The tables shown below give correct torque values for various bolts and capscrews. Tighten all bolts to the torques specified in chart unless otherwise noted. Check tightness of bolts periodically, using bolt torque chart as a guide. Replace hardware with the same strength bolt. ENGLISH TORQUE SPECIFICATIONS Bolt Bolt Torque*... - Page 51 INDEX PAGE PAGE Assembling .................15 Safety ..................3 Machine Assembly ..........15 Battery Safety ............10 Equipment Safety .............5 Gas Motor Safety ............ 11 General Safety ............4 Maintenance Safety ..........10 Operating Safety ............8 Introduction ................. 1 Preparation ..............7 Refuelling Safety ............9 Safety Signs ..............6 Safety Training ............6 Sign-Off Form ............
Need help?
Do you have a question about the TB-270 and is the answer not in the manual?
Questions and answers