Advertisement
DIGITAL AND ANALOG GUYS CAN AGREE.
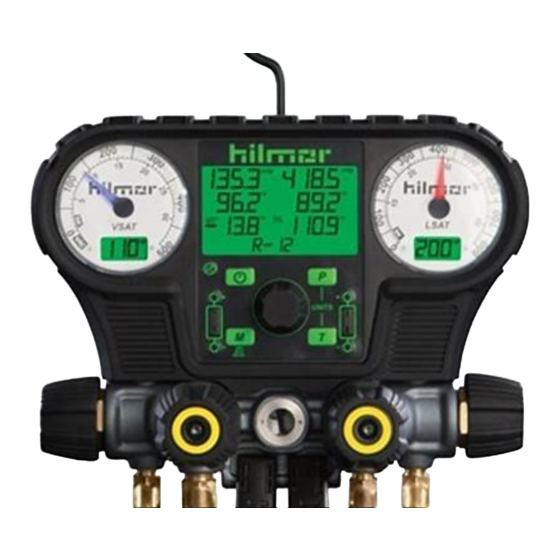
THIS GAUGE HAS IT ALL
Get out of the dark ages with the industry's first hybrid gauge. hilmor's Electronic
Gauge offers true analog capabilities with unmatched digital precision, all within
1% accuracy. Not to mention it's clad in a high-impact, protective boot.
Quick-Start Instructions:
1. Insert batteries.
2. Attach hoses, and insert thermocouple clamps.
3. Press and hold the power button
4. Select the appropriate refrigerant.
5. And forget the flashlight.
Important:
Read the entire instruction manual carefully, and have a complete
understanding of the tool's features, limitations and specifications before
using the hilmor Electronic Gauge. hilmor products are designed and
manufactured to be used by trained and licensed HVAC/R technicians.
Incorrect application could result in accidents, injuries or death.
Do not expose the hilmor Electronic Gauge to rain or wet conditions.
Safety glasses and gloves should be worn at all times while using the
manifold.
1874506 1.2
1839010 and 1839011 Electronic Gauge
.
.
Advertisement
Table of Contents

Related Manuals for hilmor 1839010

Summary of Contents for hilmor 1839010
- Page 1 DIGITAL AND ANALOG GUYS CAN AGREE. THIS GAUGE HAS IT ALL Get out of the dark ages with the industry’s first hybrid gauge. hilmor’s Electronic Gauge offers true analog capabilities with unmatched digital precision, all within 1% accuracy. Not to mention it’s clad in a high-impact, protective boot.
- Page 2 The corresponding VSAT and LSAT temperatures will display on the outside displays. 5. Insert hilmor K-style Thermocouple Clamp Probes (included) to measure T1 and T2 temperatures. Superheat and subcool will automatically calculate.
-
Page 3: Controls And Displays
“+” or ”-” button to adjust to 32° Fahrenheit (0° Celsius). To exit calibration mode, hit the power button. • Although the hilmor Electronic Gauge is manufactured to be used with the hilmor Thermocouple Clamps, different thermocouples may be paired with the hilmor tool after proper field calibration (see item 2 above for instructions). -
Page 4: Maintenance
Refrigerant Updates: This unit comes with 43 refrigerants preloaded to the device. On occasion, hilmor will make an update to the P/T Chart. Had your Electronic Gauge for a while? Check hilmor.com for the most up-to-date P/T version. 1. Download the refrigerant file from hilmor.com to an empty USB flash drive. -
Page 5: Limited Warranty
They will contact hilmor for next steps which could include field scrap or return to the factory for analysis and work with you on a replacement or credit. HILMOR MAKES NO OTHER WARRANTIES, EXPRESS OR IMPLIED, CONCERNING THE PRODUCT OR THE MERCHANTABILITY OR FITNESS THEREOF FOR ANY PURPOSE. -
Page 6: Technical Specifications
1839010 and 1839011 Electronic Gauge Technical Specifications: Preloaded Refrigerants: 11, 12, 13, 22, 23, 113, 114, 123, 124, 125, 134A, 401A, 401B, 402A, 402B, 404A, 406A, 407A, 407C, 407F, 408A, 409A, 410A, 414B, 416A, 417A, 420A, 421A, 421B, 422A, 422B, 422C,... - Page 7 + and – ends of the battery in the battery case. Do not use rechargeable batteries with this tool. • If repairs are needed, only use replacement parts approved by hilmor Technical Service. • If any part of the manifold is removed or damaged, discontinue the use of the tool.
Need help?
Do you have a question about the 1839010 and is the answer not in the manual?
Questions and answers