Table of Contents
Advertisement
Quick Links
Advertisement
Table of Contents

Related Manuals for hilmor 1950217

Summary of Contents for hilmor 1950217
- Page 1 Wireless Vacuum Gauge Operation and Maintenance Instructions Model 1950217...
-
Page 3: Table Of Contents
TABLE OF CONTENTS Introduction ......................2 Safety & Limited Warranty ................3 Certifications ......................4 Quick Start Guide ....................5 Wireless Vacuum Gauge Components .............6 Screen & Button Layouts ................7 Technical Specifications ................8 Operating Instructions ................9-10 Advanced Setting .................... 11 Maintenance ..................... 12 Troubleshooting .................... -
Page 4: Introduction
INTRODUCTION It is important to read the entire instruction manual carefully for a complete understanding of the hilmor® Wireless Vacuum Gauge features, limitations, and specifications before use. hilmor® products are designed and manufactured to be used by trained and licensed HVAC/R technicians. Incorrect use may result in accidents, injuries or death. -
Page 5: Safety & Limited Warranty
Contact with refrigerants may cause injury. Please see any warnings associated with refrigerants. LIMITED WARRANTY: • The hilmor® Wireless Vacuum Gauge has a 2-year limited warranty from the purchase date. • Product must be registered at hilmor.com/registration to activate the warranty. -
Page 6: Certifications
L'exploitation est autorisee aux deux conditions suivantes : (1) l'appareil ne doit pas produire de brouillage, et (2) l'utilisateur de l'appareil doit accepter tout brouillage radioelectrique subi, meme si le brouillage est susceptible d'en compromettre le fonctionnement. hilmor.com... -
Page 7: Quick Start Guide
Pull vacuum to desired vacuum reading. Quick Change-Out Guide for Replacement Sensor: Purchase the hilmor® Wireless Vacuum Gauge Replacement Sensor. Unscrew the 2 flathead screws on the back of the Remote Sensor. Disconnect the 2 white plugs that connect the Remote Sensor to the Replacement Sensor. -
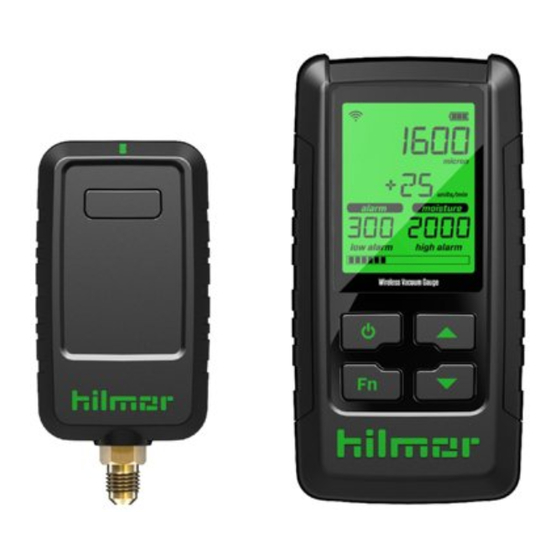
Page 8: Wireless Vacuum Gauge Components
WIRELESS VACUUM GAUGE COMPONENTS Remote Sensor SYNC Indicator Light Power/SYNC Button Remote Sensor Transmitter Replacement Vacuum 1/4" Female-to-Female Sensor Adapter 1/4" Male Fitting Handheld Display LCD Screen Power/Backlight Button Up/Down Arrows Function Button hilmor.com... -
Page 9: Screen & Button Layouts
SCREEN & BUTTON LAYOUTS SCREEN ICONS Sync / Signal Strength Check Sensor – check sensor Connection Lost check sensor Battery Level .8.8.8.8.8.8 Pressure Reading Pa kPa mTorr Torr mmHG micron .0.0.0.8 Units of Vacuum units/min .0.0.0.8 Rate of Change alarm moisture units/min .8.8.8. -
Page 10: Technical Specifications
TECHNICAL SPECIFICATIONS Part Number 1950217 Replacement Sensor Part Number 1950219 Handheld Display Batteries AA Alkaline (3) Remote Sensor AAA Alkaline (3) Wireless Range 33 Feet unobstructed Remote Sensor Connection Fitting 1/4" male flare Adapter Accessory 1/4" 45˚ Flare Female x 1/4" 45˚Flare Female... -
Page 11: Operating Instructions
• Minimize the number of hoses and fitting connections (including manifold) to reduce leaks. • Use hilmor® Valve Core Removal Tool accessory port as close as possible to the system for more accurate readings. TO CHANGE THE UNIT OF MEASURE ON THE HANDHELD DISPLAY 1. - Page 12 6. Re-attach the 2 flathead screws to secure the Replacement Sensor. 7. The Replacement Sensor has been pre- calibrated by hilmor, so it does not need any calibration. 8. Make sure the Handheld Display is powered on and the new Remote Sensor should auto-sync.
-
Page 13: Advanced Setting
ADVANCED SETTINGS High And Low Pressure Point Alarms To set high and low alarm values: 1. Hold down Function button to open menu. 2. Press Function button to navigate to H Po or L Po submenu. 3. Press arrow button to scroll through desired alarm. 4. -
Page 14: Maintenance
7. Re-install batteries. Notes: Do not attempt to clean with cotton swab or other similar products. After contamination, cleaning the vacuum gauge sensor using the above procedure may improve sensor accuracy but, for most accurate reading, replace suspect sensors. hilmor.com... -
Page 15: Troubleshooting
Check sensor filter for Sensor discoloration. Clean or Erratic replace if necessary Readings Sensor damaged from over- Replace remote sensor pressurization If these procedures do not correct the issue, contact your nearest hilmor distributor or call hilmor® Technical Support at 1-800-642-0010 1-800-628-8810... - Page 16 1-800-628-8810 ©2017 hilmor...
Need help?
Do you have a question about the 1950217 and is the answer not in the manual?
Questions and answers