Muse M-182 RDC - Portable CD Radio Cassette Recorder Manual
- User manual (2 pages)
Advertisement
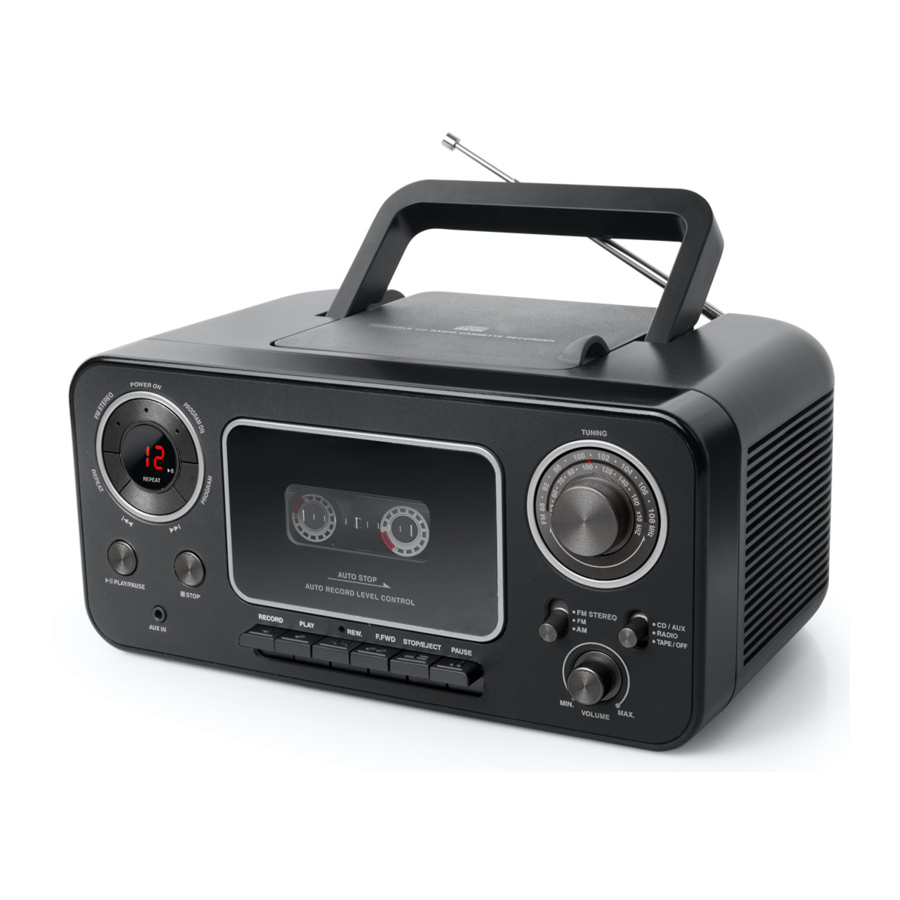
LOCATION OF CONTROLS


- FM STEREO indicator
- POWER ON indicator
- PROGRAM indicator
![]() PLAY/PAUSE indicator
PLAY/PAUSE indicator- Cassette compartment
- Dial pointer
- TUNING knob with dial scale
- Function switch [CD/AUX, RADIO, TAPE/OFF]
- Volume control
- Band selector [FM stereo, FM, MW]
- Cassette recorder keys:
RECORD![]() : record
: record
PLAY![]() : play
: play
REW.![]() : fast rewind
: fast rewind
F.FWD![]() : fast forward
: fast forward
STOP/ EJECT![]() Stop the tape /open the cassette compartment
Stop the tape /open the cassette compartment
PAUSE![]() pause
pause - PROGRAM button
![]() STOP button
STOP button- Aux in jack (3.5mm)
![]() PLAY/PAUSE button
PLAY/PAUSE button![]() /
/ ![]() skip buttons
skip buttons- REPEAT button
- Repeat indictor
- LED display
- FM telescopic antenna
- Carrying handle
- CD compartment
- Speakers
- AC socket
- Battery compartment
 : record
 : play
 : fast rewind
 : fast forward
 Stop the tape /open the cassette compartment
 pause
pause STOP button
 PLAY/PAUSE button
Read the instructions carefully before operating the
POWER SUPPLY
This set operates on AC 230V  50Hz or 6 x 1.5V R14/ UM-2/ "C" size batteries (not provided).
AC OPERATION
Connect the detachable AC cord (included) to the AC socket on the rear of the unit. Insert the AC power cord into a convenient standard AC wall outlet.
DC OPERATION
Install the batteries in their compartment. Use only the size and type of batteries specified. Respect the polarity indicated in the compartment. Improper polarity can cause damage to the device. Do not attempt to recharge the batteries, they can catch fire or explode. The batteries need to be replaced when: The volume decreases, or sound is distorted during operation. In order to avoid leakage, remove the batteries when unit will not be used for a long period of time.

Danger of explosion if batteries are incorrectly replaced. Replace only with the same or equivalent type.
Note:
- The AC cord must be unplugged from both the socket on the unit and the power outlet for the unit to run on the batteries.
- When the set is connected to the mains, the power source automatically switches to AC.
- In a concern of saving energy, when playback has reached to the end or not playing, the unit will automatically turn off after 10 minutes. To reset the unit, slide the Function switch to TAPE/ OFF position. Wait a few seconds and then turn ON the unit again.
TURNING UNIT ON/OFF
- Slide the Function switch to CD/AUX or RADIO position to turn on the unit. The POWER ON indicator will light up.
- Slide the Function switch to TAPE/OFF position to turn off the unit. The POWER ON indicator will turn off.
LISTENING TO THE RADIO
- Slide the Function switch to RADIO position.
- Slide the Band selector to select desired band: FM STEREO, FM or MW.
- Use the TUNING control to tune to your desired radio station.
- Adjust the volume level.
To enhance radio reception ability
FM: Extend the telescopic antenna.
MW: Rotate the unit horizontally for optimum reception.
LISTENING TO CD
- Slide the function switch to CD/AUX position. The POWER ON indicator will light up.
- Open the CD door. Insert a CD with label facing up and close the CD door. After a few seconds, the total number of tracks will show on display.
- Press
![]() PLAY/PAUSE to start playback. The current track number will show on display. The
PLAY/PAUSE to start playback. The current track number will show on display. The ![]() indicator will light up.
indicator will light up.
PLAY/PAUSE
To temporarily stop playing, press  PLAY/PAUSE button. The indicator will flash. To resume play, press this button again.
STOP
If the  STOP button is pressed in the course of playing, the disc will cease to play. (Total number of tracks will show on display).
SKIP AND SEARCH
You can always skip forward or backward to your desired track number by pressing the SKIP ( /
/  ) buttons. When playing any audio CD, press and hold the SKIP button. The CD will search at high speed in the forward or backward direction. Normal play will continue when you release the button.
REPEAT
To repeat the track currently playing, press the REPEAT button once. The repeat indicator will flash.
To repeat all tracks, press the REPEAT button twice. The REPEAT indicator will light up and stay lit.
To cancel the repeat function, press REPEAT button again. The repeat indictor will turn off.
PROGRAM
- In stop mode, press PROGRAM button. "
![]() " will flash on display.
" will flash on display. - Press
![]() /
/ ![]() to select a desired track and press PROGRAM button to conform. The program indicator will flash in the course of programming.
to select a desired track and press PROGRAM button to conform. The program indicator will flash in the course of programming. - Repeat above steps to program up to 20 tracks.
- Press
![]() PLAY/PAUSE button to start program playback. The program indicator will light up and stay lit.
PLAY/PAUSE button to start program playback. The program indicator will light up and stay lit. - To cancel program playback, press
![]() STOP button twice. The program indicator will turn off.
STOP button twice. The program indicator will turn off.
 " will flash on display.
  PLAY/PAUSE button to start program playback. The program indicator will light up and stay lit.
 STOP button twice. The program indicator will turn off.
If you encounter CD playback problem, either of the following ways may help:
- Turn off the unit. Disconnect the AC power cord from AC outlet and reconnect it again.
- Clean your CD disc.
CONNECTING AUXILIARY SOURCE
- Slide the Function switch to CD/AUX position. Connect your auxiliary source (e. g. mp3 player) to the AUX IN jack on the unit (cable not included). The unit will switch to AUX mode automatically.
- Start playback from your auxiliary source.
- Adjust the volume to desired level.
- To stop playback, disconnect your auxiliary source from the AUX IN jack.
Note:
Once the audio cable is disconnected from the AUX IN jack, the unit will switch to CD mode automatically.
LISTENING TO THE CASSETTE
- Slide the function switch to TAPE/OFF position.
- Press
![]() to open the cassette door and insert the cassette (tape at the bottom) in the compartment. Then close the cassette door.
to open the cassette door and insert the cassette (tape at the bottom) in the compartment. Then close the cassette door. - Press
![]() to start play.
to start play. - Adjust the volume to desired level.
- Press
![]() or
or ![]() to rewind or fast forward the cassette.
to rewind or fast forward the cassette. - Press
![]() to suspend momentarily the tape and release
to suspend momentarily the tape and release ![]() to resume play.
to resume play. - To stop playing, press
![]() .
. ![]() .
.
 to open the cassette door and insert the cassette (tape at the bottom) in the compartment. Then close the cassette door.
 to start play.
 or
or  to rewind or fast forward the cassette.
 to suspend momentarily the tape and release
 Note:
In TAPE mode, the POWER ON indicator will light on except in stop mode.
RECORDING FROM RADIO/ CD/ AUXILIARY SOURCE
- Press
![]() to open the cassette door and insert the cassette (tape at the bottom) in the compartment. Then close the cassette door.
to open the cassette door and insert the cassette (tape at the bottom) in the compartment. Then close the cassette door. - Select the desired sound source.
In radio mode, tune to your desired radio station.
In CD mode, select your desired track and start playback.
In AUX mode, start playback from your auxiliary source. - Press
![]() together with the
together with the ![]() button to start recording from radio, CD or auxiliary source in the respective mode.
button to start recording from radio, CD or auxiliary source in the respective mode. - To suspend momentarily recording, press
![]() button. To resume recording, release
button. To resume recording, release ![]() button.
button. - To stop recording, press
![]()
- To listen to your recording, slide the function switch to TAPE /OFF position, press
![]() to rewind the tape to search your recording, then press
to rewind the tape to search your recording, then press ![]() to listen.
to listen.
 together with the
  button to start recording from radio, CD or auxiliary source in the respective mode.
 to rewind the tape to search your recording, then press
  to listen.
SPECIFICATION
POWER SUPPLY:
AC230V 50Hz, Power consumption: 14W
DC: 9V 6x 1,5 V type UM-2/R14/ 'C' (not provided)
RADIO Frequency range
FM: 88 - 108 MHz
MW: 530-1600 kHz
CASSETTE SECTION
TAPE SPEED: 4.75 CM / SEC.
FREQUENCY RESPONSE: 125 Hz - 8 kHz
COMPACT DISC SECTION
OPTICAL PICKUP: 3 - BEAM LASER
FREQUENCY RESPONSE: 100 Hz - 16 kHz
Note:
Design and specifications are subject to change without notice.
MAINTENANCE
Cleaning

Disconnect the unit from the mains supply before cleaning.
- Use a soft, dry, clean cloth. Regularly dust the vents at the back or sides.
- Using solvents, abrasive or alcohol-based products risks damaging the appliance.
- If an object or liquid enters inside the appliance, unplug it immediately and have it checked by an authorized engineer.
Notes on disc
- Do not use irregular shape CDs (example: heart-shaped, octagonal ones). It may result in malfunctions.
- Do not place more than one disc in the disc compartment.
- Do not try to open the disc compartment during playing.
- Do not touch the lens. Doing so may cause malfunction.
- If there is a scratch, dirt or fingerprints on the disc, it may cause tracking error. Before playing, clean the disc with a cleaning cloth. Wipe the disc from the center out. Don't store discs in places with high temperatures or high humidity, they can become warped. After playing, store the disc in its case.

Before transporting the unit, remove the disc from the disc compartment.
Notes on cassettes
Quit slacking - A little bit of slack in your tapes can cause scratches on the tape, or worse yet, the tape could break. If you notice some slack in the tape, use a pencil to tighten it up before you insert it into the cassette holder.
- To prevent accidental erasure, bread off the plastic tabs on the cassette tape after recording with a screw - driver or other pointed tool. To record on the tape again, cover the tab opening with adhesive tape, etc.
- Any distortion or poor sound quality may be due to the dust or dirt on parts that are in contact with the magnetic band (magnetic heads, pinch roller and capstan); in this case, open the cassette door and clean them with a cotton bud dipped in alcohol.
Hereby, NEW ONE S.A.S, declares that this MUSE M-182 RDC is in compliance with the essential requirements and other relevant provisions of Directive 2014/53/EU. The declaration of conformity may be consulted at www.muse-europe.com

Documents / Resources
References
Download manual
Here you can download full pdf version of manual, it may contain additional safety instructions, warranty information, FCC rules, etc.
Download Muse M-182 RDC - Portable CD Radio Cassette Recorder Manual
Advertisement


Need help?
Do you have a question about the M-182 RDC and is the answer not in the manual?
Questions and answers