
Subscribe to Our Youtube Channel
Related Manuals for Rio Mobility Firefly 2.5


Summary of Contents for Rio Mobility Firefly 2.5
- Page 1 Electric Wheelchair Attachment Firefly 2.5 User Manual Ver 1.4.4 04/11/2023 Phone: 415-552-6277 Email: sales@riomobility.com Website: www.riomobility.com...
- Page 2 Do not carry anything that obstructs your view ahead or interferes with the operation of the controls on the handlebar. Do not carry any additional weight on the frame (objects or people). RIO MOBILITY IS NOT RESPONSIBLE FOR ANY DAMAGE OR INJURY DUE TO MISUSE OF YOUR WHEELCHAIR ATTACHMENT.
-
Page 3: Wheelchair Requirements
1. Wheelchair Requirements The Firefly fits most wheelchairs, but our mounting clamps will not fit onto some wheelchairs. Consider these five items to determine whether your wheelchair is compatible with the Firefly 2.5: 1) Seat width: Must be between 9 and 23 inches (23 to 58 cm). (measured center-to-center between the vertical tubes where the mounting clamps are installed) 2) Tube diameter: Currently supported wheelchair tube diameters are: (measured where the mounting clamps are installed) - Page 4 All our devices require 1.25 inches (32 mm) of vertical clearance on the wheelchair tubes where the mounting clamps are installed. The mounting clamps should be installed about 2/3 of the distance from the floor to the wheelchair seat. The mounting clamps also require two inches (50 mm) of horizontal clearance from the wheelchair tubes extending outward away from the sides of the wheelchair and two inches (50 mm) of horizontal clearance extending backward toward the rear of the wheelchair.
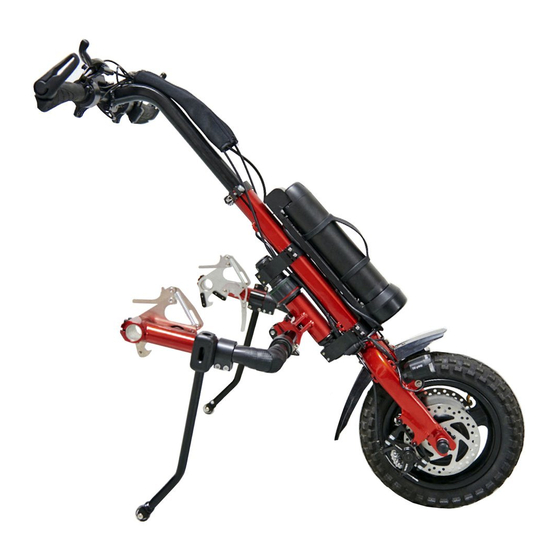
- Page 5 2. Components of the Firefly Visit our website for the Firefly installation video: www.riomobility.com Connector cover Display wtih power button Battery on/off switch Battery key lock Handlebar Battery Quick-release Stem clamp Stem Controller Quick-release frame clamp Light Locking headset Disc/rotor Coupler plate Motor/wheel Kickstand...
- Page 6 3. Installing the Firefly Place foam blocks Place the black foam blocks under the wheelchair’s caster wheels while the wheelchair’s parking brake is on. A wooden block or stacks of hardcover books two inches in height can be used in place of the foam blocks. Installation must be done with the caster wheels raised off the floor to provide safe clearance while using the Firefly.
- Page 7 Align mounting clamps Place a long level or other rigid object against the front surface of the two clamps. Rotate the mounting clamps so that they sit flat against the flat surface of the level or rigid object. This ensures that the pins of both mounting clamps extend exactly perpendicular away from the wheelchair.
- Page 8 Install Firefly frame Open the quick-release crossbar clamp by rotating the red safety latch to the “up” position. Then open the clamp (1), and attach the U-bar, with the U-bar fitting securely into the horizontal slots in the clamp (2). Close the clamp, making sure both quick-release screws are tight. When the screws are properly tightened, a strong but not excessive force from the palm of the hand is needed to close the clamp (3).
- Page 9 Attach Firefly 2.5 to wheelchair First apply the wheelchair's wheel locks. Next lock the Firefly's steering by twisting the headset clockwise until the line on the bottom of the headset turns red. A red line on the bottom of the headset means the steering is locked, convenient for installing and storing the Firefly.
- Page 10 IMPORTANT! The locking levers must be fully closed and secure before the Firefly 2.5 can be safely used. A curved green line appears on the inner surface of the coupler plate when it is fully closed and locked onto the pins. Do not use the Firefly 2.5 if you cannot see this curved green line.
- Page 12 Then press and hold, for two seconds, the right- hand button of the two buttons on the bottom of the display, which is labeled with the power on/off . When the Rio mobility logo appears, the unit is on and ready to use. symbol:...
- Page 13 To increase the power assist level: Press the large plus [+] button in the upper-left corner of the display once to increase the power assist by one level. The power assist level, ranging from 1 to 5, is shown in the lower-right of display.
-
Page 14: Maintenance
5. Maintenance Inspection / Maintenance Item Initially Monthly 6 Months Check and Tighten Hardware Tighten Headset Compression Nut ✓ Brake Pad Wear and Adjustment Temperature and Humidity Operate the Firefly 2.5 only at temperatures from 14 to 104 degrees F (-10 to 40 degrees C). Charge the battery at temperatures from 41 to 77 degrees F (5 to 25 degrees C). -
Page 15: Troubleshooting
6. Troubleshooting When climbing a hill, the front wheel slips. The front wheel is too far forward of your center of gravity. Adjust the Firefly so that the front wheel is as close as possible to the wheelchair without interfering with the wheelchair's footrests or your body. While climbing, lean forward to place more weight on the front wheel. - Page 16 Make sure the hand brakes work properly before using your wheelchair attachment. • Do not add any parts or accessories not authorized by Rio Mobility to your wheelchair attachment. Any modifications could be unsafe and will void your warranty. Before You Ride Make sure that your Firefly 2.5 is installed, adjusted, and maintained properly.
-
Page 17: Limited Warranty
(1) year from the date of initial consumer purchase. This warranty covers any MANUFACTURING defects in materials and workmanship. Rio Mobility warrants the lithium-ion battery for six (6) months from the date of initial purchase. This covers any MANUFACTURING defects in materials and workmanship.
Need help?
Do you have a question about the Firefly 2.5 and is the answer not in the manual?
Questions and answers