Table of Contents
Advertisement
Quick Links
75028 Asst.
72970 Asst.
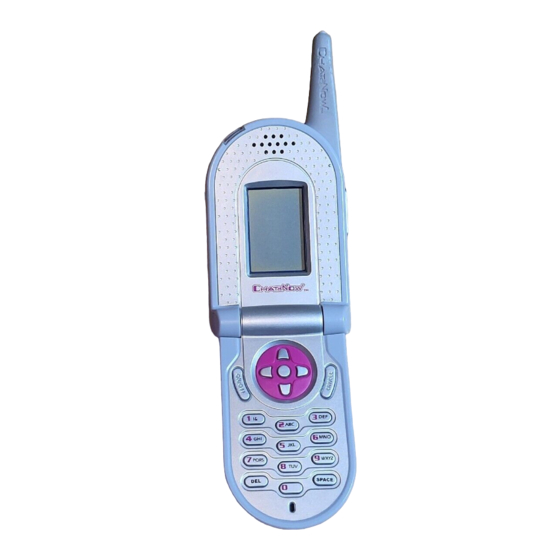
Communicator
Thank you for purchasing the
CHATNOW Communicator. Be
sure to read and follow all
instructions carefully before
using this product.
CHATNOW is the 3-in-1 personal
communicator designed just for
you! Now you can chat with your
friends up to 2 miles away, send
them text messages, and take
their photos! Store 30 photos
to your electronic buddy list
and when your friends call,
their stored photo pops up! You
can even customize or animate
the photos to make your friends
look funky!
Each Communicator requires 4 x 1.5V "AAA" alkaline batteries
(not included). Phillips/cross head screwdriver (not included)
needed to insert batteries.
22
AGES 8+
FLIP-OUT
COMMUNICATOR
SLIDE-OUT
COMMUNICATOR
Advertisement
Table of Contents

Related Manuals for Hasbro Tiger Electronics ChatNow Communicator


Summary of Contents for Hasbro Tiger Electronics ChatNow Communicator
- Page 1 AGES 8+ 75028 Asst. 72970 Asst. Communicator Thank you for purchasing the CHATNOW Communicator. Be FLIP-OUT sure to read and follow all COMMUNICATOR instructions carefully before using this product. CHATNOW is the 3-in-1 personal communicator designed just for you! Now you can chat with your friends up to 2 miles away, send them text messages, and take their photos! Store 30 photos...
-
Page 2: Table Of Contents
TABLE OF CONTENTS WRITE YOUR PERSONAL BUDDY # HERE: ___________________________________________________ Product Features & Control Keys..Page 1 Forwarding a Text Message ....Page 10 Replying to a Text Message....Page 10 Installing the Batteries......Page 2 Photo ............Page 10 Low Battery Indicator ......Page 2 Taking a Photo ........Page 10 Buddy Directory........Page 3 Saving a Photo to your Album ....Page 11... -
Page 3: Product Features & Control Keys
Product Features & Control Keys Push To Talk Antenna [PTT] Button Removable Speaker Faceplate Indicator Light Earpiece Jack (Earpiece sold LCD Screen separately) Release On/Off Button (slide-out communicator Cancel only) Enter Control Pad (Left, Right, Up, Down) Microphone Keypad Digital Camera FOR BEST USE: When using your CHATNOW Communicator... -
Page 4: Installing The Batteries
TO INSERT BATTERIES: For each Communicator, use a Phillips/cross head screwdriver to loosen the screw in the battery compartment cover (screw stays attached to cover). Remove cover. Insert 4 x 1.5V “AAA” alkaline batteries (not included). Replace cover and tighten screw. CAUTION: 1. -
Page 5: Buddy Directory
BUDDY DIRECTORY Write your friends’ names and buddy numbers here NAME:____________________ BUDDY #: _ _ _ _ _ _ _ _ _ _ NAME:____________________ BUDDY #: _ _ _ _ _ _ _ _ _ _ NAME:____________________ BUDDY #: _ _ _ _ _ _ _ _ _ _ NAME:____________________ BUDDY #: _ _ _ _ _ _ _ _ _ _ NAME:____________________... -
Page 6: Important Tips
IMPORTANT TIPS PERSONAL BUDDY # Each CHATNOW Communicator has its own private, personal, 10-digit buddy ID number. To find out what yours is, scroll to “PERSONAL” in the Main Menu and then “MY BUDDY #.” Your personal buddy number will appear. Keep this handy and exchange your number with your friends so that you can receive calls and call friends directly. -
Page 7: Getting Started
GETTING STARTED TURNING YOUR CHATNOW COMMUNICATOR ON AND • Press the On/Off Button to turn the On/Off CHATNOW Communicator ON. Button • Press and hold the On/Off Button for one second to turn the CHATNOW Communicator OFF. BASIC NAVIGATION • Use the Control Pad [5634 keys] to scroll to and select an item. -
Page 8: Main Menu
Main Menu BEFORE YOU BEGIN USING YOUR COMMUNICATOR, MAKE SURE TO FOLLOW THE TIPS BELOW. TIPS MAKE SURE: 1. ALL THE COMMUNICATORS ARE TURNED ON. 2. ALL THE COMMUNICATORS ARE ON THE SAME CHANNEL. 3. EVERYONE IS WITHIN THE CHAT ZONE (UP TO 2 MILE RANGE). -
Page 9: Call
CALL Call one of your friends directly! Scroll to “CALL” on the Main Menu and press ENTER. Scroll to “BUDDY” to select and call an existing buddy from your buddy list or “NUMBER” if you wish to call a new buddy. CALLING A BUDDY Buddy: Select a buddy and press ENTER. -
Page 10: Text
TEXT Send and receive text messages from your friends! How to Use the Keypad Each numbered button features specific letters. For example, press the number 2 button and “A” will appear. Press it again to see “B”, press it a third time to see “C” and a fourth time to see “2.”... -
Page 11: Viewing Your Inbox
SAVE: Store your message in the Outbox. EDIT: Make any necessary corrections to your message and press ENTER when finished. You can only send a text message to a friend on your Buddy List. NOTE: If system is busy, try again in 30 seconds. NOTE: You can only add one symbol to the end of each message. -
Page 12: Saving A Received Text Message
SAVING A RECEIVED TEXT MESSAGE SAVE: To save your message, select “SAVE” and press ENTER. Your message will be saved to your inbox. DELETING A TEXT MESSAGE DELETE: To delete your message, select “DELETE” and you will be asked “R U SURE?” Press ENTER and your message will be deleted, or CANCEL to exit. -
Page 13: Saving A Photo To Your Album
Press ENTER again and now you can save your photo to your ALBUM, BUDDY LIST or DELETE it. SAVING A PHOTO TO YOUR ALBUM ALBUM: Select “2 ALBUM” to save your photo to your personal photo album and return to the Photo Menu. You can always pull a photo out of the album and save it to your buddy list later. -
Page 14: Adding Designs To A Photo
Adding Designs to a Photo Design mode lets you add text and props to your photos! From the Photo Menu select “ALBUM” and press ENTER. Select a photo and press ENTER. Select “DESIGN” and press ENTER for Design Mode. NOTE: Other options are available such as assigning the photo to a buddy (2 BUDDY) or to delete the photo from your album (DELETE). -
Page 15: List
LIST Here’s where you can find and manage your list of buddies! Scroll to “LIST” on the Main Menu and press ENTER. Scroll to the buddy you wish to access and press ENTER. CALLING A BUDDY CALL: Select “CALL” from the Menu and you will automatically call your buddy directly. -
Page 16: Editing A Buddy
EDITING A BUDDY EDIT: Select “EDIT” from the Menu. Here you can edit your buddy’s name, personal buddy #, address, home phone number, birthday and any notes. Press ENTER to save each entry and move on to the next. Press CANCEL to back up a step or exit back to the menu shown above. DELETING A BUDDY DELETE: Select “DELETE”... -
Page 17: Customize
CUSTOMIZE Here is where you can select and save your personal settings! Select “CUSTOMIZE” from the Main Menu and you will be given several options: SELECTING A RING TONE RING TONE: You can select one of 10 ring tones. Select the one you wish to preview. -
Page 18: Controlling The Contrast
CONTROLLING THE CONTRAST CONTRAST: Adjust the contrast of your screen by using the keys to select one 5634 of the five levels. Press CANCEL to return to the Customize Menu. SETTING THE TIME TIME: Set the current time on your Communicator. Use the keys to set the hour and then minutes. -
Page 19: Accessories
Accessories CARRY CASE/FACEPLATES (SOLD SEPARATELY.) Place your CHATNOW Communicator into this fashionable carry case, snap on a faceplate and get moving! Designed with a hip belt loop, it‘ll go everywhere you go and you’ll always be in touch! EARPIECE (SOLD SEPARATELY.) Plug it in and go! This cool earpiece allows you to chat with your friends without holding onto your CHATNOW Communicator! Simply plug it in, clip it on and press to talk! - Page 20 - Increase the separation between the equipment and the receiver. - Consult the dealer or an experienced radio/TV technician for help. Product and colors may vary. © 2005 Hasbro. All Rights Reserved. TM & ® denote U.S. Trademarks. 75028 Asst./72970 Asst.
Need help?
Do you have a question about the Tiger Electronics ChatNow Communicator and is the answer not in the manual?
Questions and answers