Table of Contents
Advertisement
Advertisement
Table of Contents

Related Manuals for Zhongdi ZD-985

Summary of Contents for Zhongdi ZD-985
- Page 1 ZD-985 Desoldering Station...
-
Page 4: Unpacking And Setting Up Your Zd-985 Desoldering Station
Unpacking and Setting Up Your ZD-985 Desoldering Station Carefully unpack the ZD-985 from the shipping box. The box should contain the following items: ZD985 Base unit with attached gun holder base Handpiece Gun with attached vacuum hose and control cable... -
Page 5: Setting Up The Unit
A 0.75 mm B 0.94 mm C 1.25 mm Ref. B) Black Filter Housing and Rubber Gasket (Mates to vacuum inlet on ZD-985 Base) Ref. C) (1) Additional Base Vacuum Filter (One is already in the front of the vacuum inlet) Ref. - Page 6 Step 4: Attach the power cord to the receptacle in the back of the ZD-985 unit and plug the other end into a mains AC outlet.
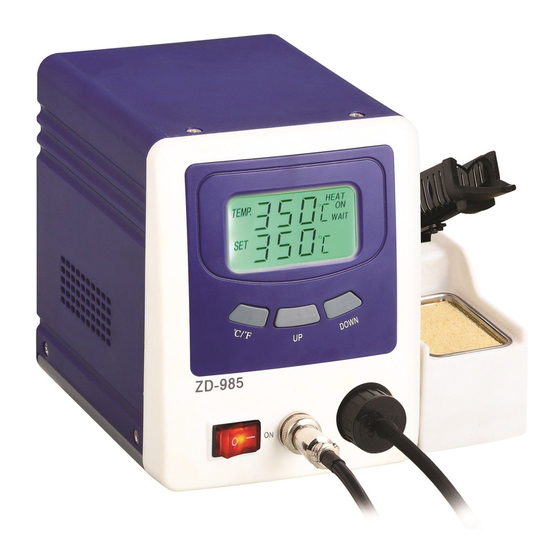
- Page 7 Step 5: Turn on the ZD-985. The display will light all the LCD segments briefly followed by a version number and finally the main screen readout. The screen will appear similar to Figure 2. Figure 2 The “TEMP.” gives us the current temperature of the Tip in degrees centigrade.
-
Page 8: Auto Tip Saver Function
Auto Tip Saver Function As an additional protection against tip corrosion due to excessive heat the ZD-985 has a timed Auto Tip Saver function that drops the SET to 200 degrees C every 15 minutes. -
Page 9: Tips And Techniques
Choose a solder tip hole size that is appropriate for the size of the solder pads that you will be cleaning. See the “Maintenance of the ZD-985” section for the proper tip changing procedure. Use enough tip heat so that you can place the tip over the target solder joint and within a second or two push the trigger of the gun. -
Page 10: Maintenance Of The Zd-985
Maintenance of the ZD-985 Changing the Tip Make certain that the gun is cool before attempting to change tips. When under power all the metal parts associated with the tip of the gun become dangerously hot and can create serious injury. Once the gun has cooled to room temperature unscrew the knurled finger nut near the base of the heater element. -
Page 11: Cleaning The Solder Capture Container
ERROR Message The ERROR message on the display indicates that something is wrong with the system. Most simply the handpiece gun may not be plugged into the front jack or it may be loose. Make certain the plug is tight and turn the unit off and on again once more to see if the problem has cleared. - Page 12 Figure 5 Please note that there is a thin black vacuum seal washer that sits ahead of the black plastic cap of the Solder Capture Chamber. It is possible for this washer to be pulled out along with the chamber. When the washer sticks to the Capture Chamber it makes the removal of the chamber more difficult.
- Page 13 ZD-985. The Spring slips over the small shoulder of the cap. The Splash Shield sits on top of the Spring and the Felt Filter sits on top of the Splash Shield.
- Page 14 Finally push the Breach forward until it clicks and locks into place. The ZD-985 is now once again ready to return to service. Figure 4 identifies the Plunger and Silicone Seal.
- Page 15 Fuse Replacement Note: A blown fuse may indicate an internal problem with the circuitry of the unit. Never use a fuse larger than the one specified. (3.15A for 120 Volt unit). Repeated replacement of a fuse can push the problem with the unit deeper into the circuitry and exacerbate the problem.
-
Page 16: Poor Vacuum
Poor Vacuum Begin the trouble shooting process by removing the Solder Capture Chamber from the gun. Make sure there is no debris around the large hole in the Breach Plunger. Briefly turn on the unit and trigger the vacuum. Place your finger tip over the hole in the center of the Plunger and test the strength of the vacuum. -
Page 17: Specifications
Specifications Supply Power: AC 110-130 V or AC 220-240 V 140 Watts Gun Rated Voltage and Power: 24 Volts 80 Watts Dimensions: W: 18 cm H: 16 cm D: 16 cm (Not including Gun profile or AC Cord) Weight: 2.2 Kg Temperature Range: 160 C to 480 C or 320 F to 896 F Tip Orifice: 0.8 mm, 1.0 mm, 1.3 mm Static Vacuum Level: 23 cm of Hg... -
Page 18: Parts And Accessories
Parts and Accessories The following Parts and Consumables are available on the Memotronics Web Site: www.memotronics.com Note: Please inquire for the availability of any non-listed parts. Description Reference Part Number Desoldering Tip, Large Fig. 1 (D) Pg. 4 SOLTIPLG Desoldering Tip, Medium Fig. - Page 19 !!! Words of Caution !!! The manufacturer and distributor assume no responsibility for uses of this device other than those described in the operating instructions. The manufacturer and distributor assume no liability for any alteration of the device mechanically or electrically.
- Page 20 Use only accessories and replacement parts that are designed for the ZD- 985 and are listed in the operation manual. Turn off the power before disconnecting the Handpiece Gun from the main unit. This unit is not intended for the use of unsupervised children. Proper training in the use of the unit is important for all ages.
- Page 21 This can be adjusted up or down depending on the size of the solder pads. Check to make certain that you have the ZD-985 set for Celsius and not Fahrenheit as there is a considerable difference. Give the unit...
- Page 22 The unit is supplied with three stainless steel wires to be used to clear clogs but they do not work very well. The stainless steel doesn’t have the ability to conduct enough heat to melt the clog. The best solution is to get some copper wire of different gauges to use for ram rods.
- Page 23 screw driver. Now push the rubber seal inward away from the gun body and remove the container. Cleaning the Solder Waste Container: The waste in the container is a mixture of solder and flux resin. Push the contents of the container out onto a sheet of glass for easy clean up. The solder must be broken away and removed from the spring and aluminum splash plate.
-
Page 24: Other Tips
A solder gun like a Weller can be placed on the solder pad to preheat it and alongside the ZD-985 gun tip at the time of desoldering to facilitate the melting of all the solder on the pad. - Page 25 It is often useful to wiggle the tip of the ZD-985 around on the pad as the solder is being vacuumed away. This moves the component lead in the board hole and allows solder to be removed from all sides of the component lead. Components will frequently fall out of the board during desoldering with this procedure.
Need help?
Do you have a question about the ZD-985 and is the answer not in the manual?
Questions and answers