
Related Manuals for EHP KGW Series


Summary of Contents for EHP KGW Series
- Page 2 Warranty ............................. 8 Digital- crane scale KGW | KGW-Y | KGY ..................10 Eyelet & braket ..........................12 Load hook ............................12 Heat protection ..........................12 LED-Display ............................13 Control panel ............................. 15 Infrared remote control ........................17 Setting the channel of the infrared remote control ................21 Charger &...
- Page 3 Manufacturer: EHP-Wägetechnik GmbH Address: Dieselstrasse 8 D-77815 Bühl (Baden) Germany hereby declares that the product: digital crane scale type KGW / KGW-Y / KGY Plant number: Year of manufacture: complies with the following harmonized standards with all options: Machinery Directive 2006/42/EC...
- Page 4 In this technical manual you will find the necessary information for operating the digital crane scale KGW | KGW-Y | KGY. ► Please read the operating instructions before you put your crane scale into operation. This will protect you and prevent damage to your equipment. ►...
- Page 5 Table 1 - Technical data...
- Page 6 (ropes, chains, etc.) from unhooking. ● Check that the eyelets, shackles, lower load hooks, bolts and safety pins are in perfect condition. In case of heavy wear (≥10% of the original dimensions) of these parts, please contact the EHP customer service.
- Page 7 ● The verification marks and seals on CE-M approved scales must be handled with care. If they are damaged, please notify your regional weight and measures authorities. In case of malfunctions: ● Repairs may only be carried out by qualified personnel! ● Read the chapter "Troubleshooting“ and „Error detection“. ● Contact the EHP customer service.
- Page 8 If you still wish to use the crane scale in these areas, it must be specially equipped by EHP. Even if the crane scale is well-protected, damage can still occur from this application. Technical defects caused by use in these baths are not covered by warranty or liability.
- Page 9 ● Digital crane scale KGW | KGW-Y | KGY For extreme foundry applications, shock and For permanent industrial use heat protected (KGW-Y=calibrated; KGY=CE-M approved) Figure 2 - Digital crane scale KGW and KGW-Y/KGY The following accessories are included in the scope of delivery: ●...
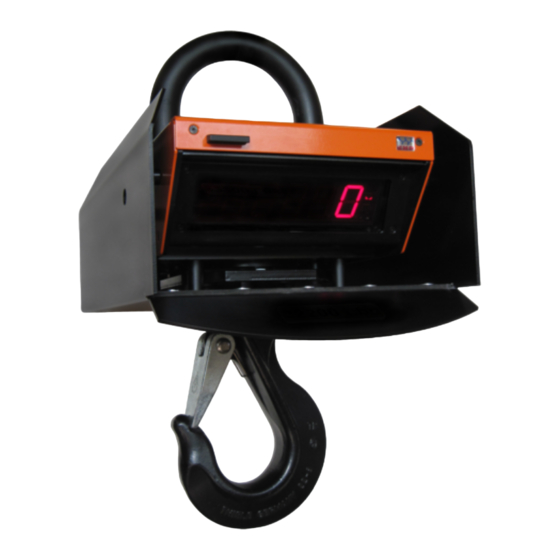
- Page 10 Figure 3 - Front view The LED-Display (1) is located at the front of the crane scale. The control panel with 6 functional keys is covered and protected by a protection cover (2). The bracket or eyelet (3) is located on top of the crane scale and the load hook (4) is located at the bottom.
- Page 11 At the back of the digital crane scale KGW | KGW-Y | KGY the battery box is located, which can be opened by releasing the quick release. Inside the housing is the 12V battery. Figure 4 - 12V battery/14.4Ah (Article-No. 79849) This is connected via the two round connectors.
- Page 12 The crane scale will be hung up with its eyelet or braket in the crane hook. It must be ensured that the eyelet can move freely in the hook base of the crane hook, rests properly in the hook and is not tilted. Figure 6 - Eyelet The load hook is used to weigh and transport the goods.
- Page 13 The LED display shows the weight of the lifted goods and additional parameter. Figure 9 - LED-Display 1. 5-digit weight display 2. +/- sign 3. Battery empty 4. PT (PreTara) 5. Net weight value (Tare function activated) 6. 1 / 2 range display 7.
- Page 14 Example: The scale has a weighing range of 10t; calibration value 5 kg x 2e = 10 kg, i.e. the display flashes at a weight exceeding 10010kg and "OL" appears from 10045 kg. Always pay attention that the crane scale is never overloaded due to safety reasons.
- Page 15 The crane scale can be operated via the integrated control panel below the LED display. Figure 10 - Control panel • Switch on the crane scale • Activates the automatic segment control • Crane scale automatically is set to „0“ Always switch on the crane scale 5 minutes before the first weighing operation.
- Page 16 L A H (Software version) 1 2.2 1 (Version number, Release) (Scale number) (Channel frequency) (Canal of IR remote control) I n I t (Self test of crane scale) • TARE (subtractive) is activated • Scale stores the current weight value in the tare memory •...
- Page 17 (less than 20m), this is an indication that the batteries need to be changed (3 pieces 1.5V Type AAA, Micro LR03, AM4, MN2400). Figure 11 - Infrared remote control Some functions like Print, Add or Total can only be used in combination with EHP weighing data receiver (see Accessories on page 37).
- Page 18 This button has the same function as on the crane scale control panel. Press this key to transfer the weighing data to optionally available EHP receiving devices (see Accessories on page 37). For example, an individual receipt can be printed out on TELEDATA USB weighing data receiver.
- Page 19 Special functions are not included in the standard scope of delivery. Contact your EHP contact person for further information. Press this button to activate the pre-tare function. The display shows now the last pre-tara value. Use the keys 1 to 0 to enter the tare value and confirm with the ENTER key.
- Page 20 Press this key to confirm the numerically entered values. Flashing of this LED indicates that the IR remote control is transmitting data. Table 4 - Buttons of IR remote control...
- Page 21 To establish communication between the scale and the remote control, the transmission channel may have to be adjusted. 1. By pressing the „TEST“-Button the crane scale display shows the current setting parameter in following sequences: 88888 Segment test Release 12.21 Version Scale number (01-16) Canal number (01-28)
- Page 22 Example: After pressing the TEST button on the crane scale the setting parameters are shown with the remote control number H01. This indicates that the crane scale is sending on Channel 1. Therefore the IR remote control must be set to the transmission channel by pressing the key combination: and then followed by the key combination 2 0 1.
- Page 23 The channel number search can be performed automatically. Align the infrared remote control with the crane scale display. Press the following key combination quickly, one after the other: The canal search is indicated by blinking of the transmitter LED. As soon as the scale reacts to the signal of the remote control press ENTER again.
- Page 24 The status LED (3) indicates the charging status of the accumulator. Figure 12 - Charger & adapter The charger is only suitable for charging maintenance-free original EHP accumulators. The charger cannot be opened. If the device is damaged due to improper opening, the warranty is voided. Before putting the device into operation, make sure that sufficient ventilation is provided.
- Page 25 At the front of the crane scale is the charging socket, as well as the fuse holder (fuse 1A, 5 x 20mm.) The plug of the charger is inserted into the charging socket. Before disconnecting the charger cable, the plug lock must be pressed. Table 5 -Connecting the charger When the charger is connected, the status LED on the charger lights up.
- Page 26 • With delivery the accumulator is already charged for 8 hours and is immediately ready for use. • The accumulator should never be stored uncharged. • A completely discharged battery requires at least 12 hours of charging. • If the charging time is less than 12 hours, a longer charging period of approx. 24 hours is recommended for the next time.
- Page 27 The crane scale is equipped with an automatic switch-off function, which is deactivated by default. The automatic switch-off is activated using the buttons on the control panel, as described in Table 7. With the crane scale switched on, press the Power On and TEST buttons simultaneously to open the SETUP menu.
- Page 28 Press the TARE key, then press the ZERO key. S t o (Store) flashes several times in the display. This permanently stores the parameter change. To exit the SETUP menu, press the Power-On and Power-Off buttons simultaneously or interrupt the power supply by disconnecting the round connectors at the accumulator.
- Page 29 Some parameters can be adjusted by the enduser. These adjustments can be useful, for example, if several EHP crane scales are operated at one location and the radio link might be disturbed by other machines. 88888 = Segment test LAH = Release-Firmware 12.21 =...
- Page 30 Confirm and close the parameter by pressing the ZERO key. The display alternately shows P13 and xx, where xx corresponds to the newly set channel number. Press the TEST key repeatedly until P14 appears in the display. Parameter P14 is used to set the scale number. Press the TARE key to activate the parameter.
- Page 31 Press the TARE key to activate the parameter. Confirm and close the parameter by pressing the ZERO key. Sto (Store) flashes several times on the display. This indicates that the parameter change has been successfully stored. To exit the SETUP menu, press the Power-On and Power-Off buttons simultaneously or interrupt the power supply by disconnecting the round connectors on the battery.
- Page 32 Master -Slave scale function can be retrofitted at existing scales. Please contact your EHP contact person. Up to four EHP crane scales can be used in a compound system (Master - Slave) to weigh long materials or large assemblies.
- Page 33 The activation / deactivation of the master – slave function requires scale setup adjustments which can only be carried out in agreement with the manufacturer. Please contact directly EHP Wägetechnik GmbH. The following characteristics apply only for CE-M approved master – slave systems: •...
- Page 34 This function can only be used with optional equipment. With this function an acoustic signal or a warning message as output can be given out when certain weights are reached. You can enter up to four different weight values. Open the function menu by pressing ENTER. Selection of weight limit.
- Page 35 As soon as a weight limit value (L1-L4) is reached, an acoustic signal sounds or a warning message is given out. The duration of the signal can be selected as a continuous signal or limited in time between 1-9 seconds. This function can only be used with optional equipment.
- Page 36 With this function automatic taring is performed as soon as one of the defined weight values (L1-L4) is reached. This function can only be used with optional equipment. Open the function menu by pressing ENTER. tAr 0 Autotaring is deactivated as default value. Autotaring enabled by pressing button 1.
- Page 37 EHP crane scales can be upgraded with a radio transmitter unit to send weighing data to EHP receiving units. This allows weighing data to be processed quickly and easily. A selection of additional accessories is shown below. For more information, please contact your weighing partner or directly EHP-Wägetechnik GmbH (www.ehp.de).
- Page 38 50182 Heat resistant glazing 303 x 95 x 9 mm 73326 Heat resistant glazing (for KGW 15-100 till 2011) 10700 Infrared remote control 12 Button 79849 Accumulator 12 V/ 14.4 Ah 79860 Accumulator 12 V/ 21.6 Ah (for KGW/KGW-Y/KGY 15-100 till 12/2015) 58366 Power cable KGW / KGY / LK with round connectors 78206...
- Page 39 Display is dark No power Check if crane scale is switched on. Check if accumulator is charged. Check condition of fuse. After switching on, the display briefly The crane scale is beyond the Switch off scale, unload shows the "+" sign and then switches zero setting range and switch scale on again.
- Page 40 Displayed weight changes rapidly Load is swinging Pick up load more carefully. Strong temperature fluctuations Switch crane scale off and let it adjust to ambient temperature for several hours. Battery can no longer be used Battery charger defect / not Check power supply.
- Page 41 The input voltage of the Switch scale off and on measuring amplifier is too low. again to see if Error is detected again. Contact your EHP Service partner for further information. The input voltage of the Switch the scale off and measuring amplifier is too high.
- Page 44 EHP WÄGETECHNIK GmbH...
Need help?
Do you have a question about the KGW Series and is the answer not in the manual?
Questions and answers