
Subscribe to Our Youtube Channel
Related Manuals for Kaabo MANTIS KING GT


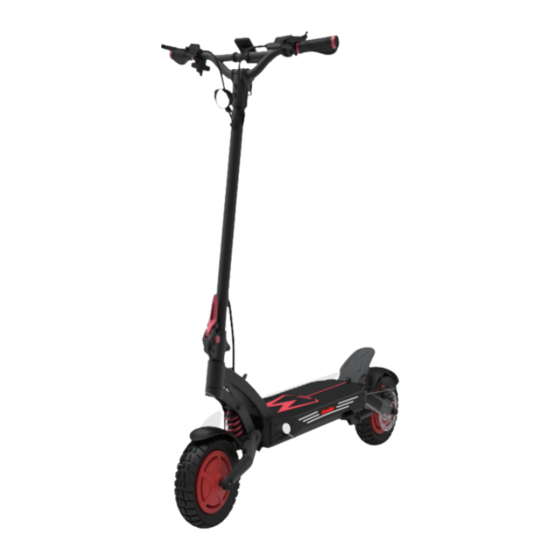
Summary of Contents for Kaabo MANTIS KING GT
- Page 1 MANTIS KING GT Notice originale Original user manual KAABO France 16 Avenue Christian Doppler 77700 Bailly-Romainvilliers contact@kaabofrance.fr...
-
Page 2: Table Of Contents
S O M M A I R E Présentation de l'entreprise ..................Avant de commencer...................... Consignes de sécurité et avertissements..........Rappel des précautions avant de conduire.............. Avis de sécurité........................ Batterie......................Chargement........................Stockage..........................Avertissements ........................ Mise en service de la trottinette.............. Montage de la trottinette.................... -
Page 3: Présentation De L'entreprise
Kaabo Co. LTD., est une entreprise qui fabrique des trottinettes électriques et des Rapide, solide et fiable, la marque KAABO s’adresse à tous les utilisateurs à la accessoires de haute qualité aux prix les plus compétitifs du marché depuis 2013. - Page 4 Ne montez pas à deux sur la trottinette électrique en adéquation avec cette limitation de vitesse. Les véhicules électriques KAABO sont conçus pour une seule personne. Toute modification de la trottinette entraînant une augmentation de la Eviter les acrobaties qui peuvent provoquer des dysfonctionnements vitesse maximale est interdite et annulera l'ensemble de votre garantie.
-
Page 5: Consignes De Sécurité Et Avertissements
Consignes de sécurité et avertissements RAPPEL DES PRECAUTIONS AVANT DE CONDUIRE AVIS DE SECURITE Portez un casque et autre protection corporelles / Conduisez prudemment / Comme il en est de tout composant mécanique, un véhicule est soumis à de Taille maximal de l'utilisateur 2,10m - Taille minimale de l'utilisateur 1,50m / fortes contraintes et à... -
Page 6: Batterie
BATTERIE AVERTISSEMENTS Chargement Ne jamais essayer de réparer la batterie de la trottinette par vous-même. En cas d'anomalie contactez votre revendeur. Eteindre la trottinette avant de la charger Ne pas utiliser la batterie pour un autre produit que votre trottinette. Brancher le chargeur à... -
Page 7: Mise En Service De La Trottinette
PRÉPARER LA CONFIGURATION SUIVANTE: Toute réparation doit être effectuée par un professionnel et / ou distributeur officiel de la marque KAABO. 1. Positionnez le guidon à l’aide de la potence dans l’axe de la colonne de direction. N’effectuez jamais de maintenance sur la batterie lorsqu’elle est allumée 2. -
Page 8: Structure Du Produit
Structure du produit Nom de chaque partie Schéma de câblage électrique Guidon Comme le dessin est trop grand et que l'espace est limité, veuillez vous référer à la page 36 de ce manuel. Levier de frein (frein électronique) Levier de frein Ecran TFT Déplié... -
Page 9: Composants Du Produit
Comment utiliser le produit Composants du produit Pliage du produit Potence Pile standard (2A), kit outils, manuel d'utilisation, étiquetage, ensemble du produit (pile au lithium incluse). Lorsque vous sortez la trottinette de son carton, veillez à ne pas tirer uniquement le guidon, aidez vous de l'ensemble du produit (repose pieds) à... -
Page 10: Comment Démarrer
Comment démarrer Comment s'arrêter Étape 1. Allumer l'interrupteur principal Assurez vous d'utiliser d'abord le frein arrière pour décélérer lorsque vous vous arrêtez pendant la conduite. Vous pouvez commencer à conduire en allumant Vous pouvez utiliser les leviers de frein avant et arrière ensemble pour vous arrêter en douceur et d'abord l'interrupteur d'alimentation principal et en toute sécurité... -
Page 11: Guide D'utilisation Du Display Tft
Guide d'utilisation du display TFT Nom du produit et modèle Trottinette électrique 3,5 pouces IPS couleur LCD Display D M06.KB. : Modèle : DM06.KB Présentation du produit L'écran est en verre trempé, d'une dureté de 2,5D. Écran LCD couleur IPS haute définition de 3,5 pouces à angle de vision complet et haute luminosité. - Page 12 14.5mm 1. Signification des boutons 1.1 Nom et définition des boutons 61mm Bouton power (sur le côté) Changement de fonction Boutons d'ajustements Prise USB Bouton power (en dessous) 22.2mm (sur le côté) 5.4mm 31.8mm Boutons d'ajustements (+/-) : ajuster la vitesse pendant la conduite et naviguer →...
- Page 13 3. Interface de base et bouton de commande 2. Fonctionnements de base Interface de démarrage et interface des fonctions de base On/off Port USB Heure Appuyez longuement sur la touche lorsque l'écran est éteint. L'écran Feux on/off affichera l'interface du logo de démarrage lorsqu'il sera allumé, puis entrera Moteur simple ou double dans l'écran d'accueil et commencera à...
- Page 14 4.2 Fonctionnement de l'éclairage 5. Présentation 5.1 Vitesse Les phares sont contrôlées par l'interrupteur d'éclairage. Le contrôleur principal détecte l'état d'allumage des feux et renvoie la valeur d'état à l'écran. Il affiche ainsi Selon les données renvoyées par le contrôleur, la vitesse du véhicule en l'icône d'allumage des feux dans le coin supérieur gauche de l'écran en fonction des temps réel est affichée.
- Page 15 5.3 Heure 5.5 Mode double moteur L'écran peut afficher l'heure actuelle, elle peut être programmée via les réglages. Maintenez les boutons + et - enfoncés en même temps pendant plusieurs secondes jusqu'à voir le changement d'icone en haut à droite de l'écran. Le coin supérieur droit de l'écran affichera 5.4 Mode mono-moteur 5.6 Témoin de freinage...
- Page 16 5.7 Mode ECO 5.9 Affichage niveau de batterie Lorsque la vitesse est à 1, appuyez brièvement sur - pour passer en mode éco. L'écran affiche les informations concernant le niveau de batterie L'affichage est allumé, et le mode économie d'énergie peut être quitté en changeant de vitesse (en appuyant sur +).
- Page 17 5.10 Informations statistiques de conduite Le tableau correspondant au pourcentage de capacité de la batterie et à l'icône d'affichage L'écran peut vous indiquer le kilométrage total du véhicule (1); le kilométrage du de la puissance est le suivant : trajet en cours (2); vitesse moyenne (3) ; vitesse maximale (4) ; temps de mise sous tension (5).
- Page 18 6. Configuration utilisateur Code d'erreur Description des codes erreurs Les fonctions de configuration utilisateur sont les suivantes, divisées en un menu de Défaut phase moteur premier niveau et un menu de second niveau. Défaut capteur hall Défaillance de la partie électronique du guidon Alerte de sous-tension (batterie vide) Défaillance du contrôleur...
-
Page 19: Caractéristiques Techniques
Caractéristiques techniques Schéma du répertoire du menu de réglage Régler l'unité de système Régler l'heure Régler la luminosité de l'écran Définir l'intervalle de mise en veille automatique Entrez le mot de passe pour les paramètres avancés Lecture seulement Entrez le mot de passe pour les paramètres avancés Remise à... -
Page 20: Schéma De Câblage Électrique
Schéma de câblage électrique GARANTIE Attention, cette garantie ne couvre pas la mauvaise utilisation des produits. Vous ne devez pas rouler sous la pluie ni effectuer de réparations vous-même. Les accidents ou les dégâts suite à une chute ne rentrent pas en compte dans la garantie. - Page 21 38 MANUEL D’UTILISATION - FR MANUEL D’UTILISATION - FR 39...
- Page 22 ATTENTION, veuillez respecter les règles de circulation Produit importé par la société RISE UP 16, Avenue Christian Doppler 77700 BAILLY-ROMAINVILLIERS Bâtiment B3 www.e-ride.fr contact@e-ride.fr 01.85.49.07.08 40 MANUEL D’UTILISATION - FR MANUEL D’UTILISATION - FR 41...
- Page 23 S U M M A R Y Compagny introduction....................Before starting........................ Safety instruction and warnings............Reminder of the precautions before driving............Safety advices......................... Battery……………………................Loading storage…………....................Storage……………………..................... Warnings ......................... How to set up the scooter............... Assembly of the scooter....................Maintenance of the scooter..................Product structure......................
-
Page 24: Compagny Introduction
BEFORE STARTING Compagny introduction Kaabo Co. LTD., is a company that has been manufacturing high quality electric scooters and Fast, solid and reliable, the KAABO brand is aimed at all users looking accessories at the most competitive prices on the market since 2013. -
Page 25: Safety Instruction And Warnings
Please comply with the traffic laws and related regulations of the country in Do not ride two on the electric scooter which you are driving. KAABO electric vehicles are designed for one person The speed of the scooter is limited to 25 km/h. Avoid acrobatics that can cause malfunctions and/or accidents The use of new electric mobility devices is subject to a maximum speed. -
Page 26: Reminder Of The Precautions Before Driving
SAFETY INSTRUCTIONS AND WARNINGS SAFETY ADVICES REMINDER OF THE PRECAUTIONS BEFORE DRIVING As with any mechanical component, a vehicle is subject to high stress and Wear a helmet and other body protection / Drive carefully / Maximum user wear. height 2.10m - Minimum user height 1.50m / Get to know your vehicle and Different materials and components may react differently to wear or fatigue. -
Page 27: Battery
Switch off the scooter before charging it. Do not use the battery for any product other than your KAABO scooter Connect the charger to a electrical outlet Avoid shocks and possible contact with the liquid components inside. -
Page 28: How To Set Up The Scooter
FOLLOWING CONFIGURATION: Any repair must be carried out by a professional and / or official distributor of the KAABO brand. 1. Position the handlebars using the stem in line with the steering column. Never perform maintenance on the displayed battery is on or charging. -
Page 29: Product Structure
Product structure Name of each part As the drawing is too large and space is limited, please refer to page 78 of Handlebar this manual. brake lever (electronic brake) Unfolded Brake lever TFT screen (electronic brake) Handle Commodo thumb throttle Handlebar base Frame Front light... -
Page 30: Product Components
How to use the product Product components Folding the product Standard battery (2A), tool kit, user manual, labeling, the whole product (lithium battery included). When you take the scooter out of the box, be carefull not to pull only the handlebares, help yourself with the entire product (deck) using both hands. -
Page 31: How To Start
How to stop How to start Be sure to use the rear brake first to decelerate when stopping while driving. Step 1. Turn on the main switch You can use the front and rear brake levers together to come to a smooth and safe When you turn on the product, you can start stop after decelerating with the rear brake. -
Page 32: How To Use The Display Tft
How to use the display TFT Product's name and model 3.5 inch electric scooter IPS colour LCD display D M06.KB. : Model : DM06.KB Product's presentation The screen uses imported tempered glass, 2.5D bevelling technology. High definition 3.5" IPS colour LCD with full viewing angle and high brightness Use of special bonding technology to ensure visibility outdoors. - Page 33 14.5mm 1 . Button's signification 1.1 Name and definition's buttons 61mm Power button (on the side Change of function Adjustment button 22.2mm USB connection 5.4mm (on the side) 31.8mm Adjustment buttons (+/-) : adjust the speed while driving and navigate in the menus. →...
- Page 34 3. Basic interface and control button 2. Basic operation Start-up interface and basic operation interface 2.1 On/off Long press the button when the screen is off. The screen will show the interface RTC clock USB charging of the startup logo when it is turned on and will enter the home screen and start Light on/off working.
- Page 35 4.2 Headlight operation 5. Presentation 5.1 Speed When the product is ON, the lights are controlled by the light switch. The main controller detects the lights on state and sends the status value back to the According to the data returned by the controller, the vehicle speed in real time is instrument.
- Page 36 5.3 Clock 5.5 Dual motor mode The display can show the current time. The current time can be programmed Press + and - buttons in the same time during few seconds until you see the icon via the settings. change on the upper right of the screen. The upper right corner will displays 5.4 Single motor mode The screen show the single-motor mode y default.
- Page 37 5.7 ECO mode Power display When the gear number show 1, short press the - button to enter the eco The screen show the battery informationd gear. The icon wil show. The eco mode can be left by changing the gears The screen show the corresponding power bar according to the battery (pull +) capacity...
- Page 38 5.10 Driving statistics information The corresponding table of battery capacity percentage and power display icon is as The screen can show the mileage of the vehicle (1), the mileage of the current trip (2), follows. average speed (3), max speed (4), power-on time (5). Information on the The battery percentage of...
- Page 39 6. User configuration Error code Description of the failure motor phase failure status The user configuration functions are as follows, divided into a first level menu and a second level menu. hall sensor failure status handle bar electronic failure status under voltage status alarm status controler failure status communication failure status...
- Page 40 Diagram of the setting menu directory Technical characteristics Method of operation → Long press the M button within 10s after the scooter is powered-on to enter the basic setting menu. To exit the setting page or return to the previous menu, repeat the same operation.
-
Page 41: Electric Wiring Diagram
Electric wiring diagram WARANTY Please note that this warranty does not cover misuse of the products. You should not ride in the rain or carry out repairs yourself. Accidents or damage following a fall are not taken into account in the guarantee. For any issues, please contact the store you purchased the scooter from. - Page 42 80 USER MANUAL - EN USER MANUAL - EN 81...
- Page 43 TRAVELOGUE - CARNET DE ROUTE TRAVELOGUE - CARNET DE ROUTE 82 USER MANUAL - EN USER MANUAL - EN 83...
- Page 44 ATTENTION, please respect the traffic rules Product imported by the company RISE UP 16, Avenue Christian Doppler 77700 BAILLY-ROMAINVILLIERS Building B3 www.e-ride.fr contact@e-ride.fr 01.85.49.07.08 84 USER MANUAL - EN...
Need help?
Do you have a question about the MANTIS KING GT and is the answer not in the manual?
Questions and answers