Table of Contents
Advertisement
USER MANUAL: ROAMER
Before using your new REYHEE Roamer foldable electric wheelchair, please read
and comprehend all warnings, cautions, and safety instructions as labeled on the
product packaging box, on the product itself, and in this user manual.
SKU number: XW-LY001
FDA Certified Class II Medical Device
www.reyhee.com
Advertisement
Table of Contents

Related Manuals for REYHEE Roamer

Summary of Contents for REYHEE Roamer
- Page 1 USER MANUAL: ROAMER Before using your new REYHEE Roamer foldable electric wheelchair, please read and comprehend all warnings, cautions, and safety instructions as labeled on the product packaging box, on the product itself, and in this user manual. SKU number: XW-LY001 FDA Certified Class II Medical Device www.reyhee.com...
-
Page 2: Table Of Contents
• How to use the dual rear levers 30 - 31 • How to use the controller 32 - 36 • Standing up and getting out of the Roamer Maintenance 37 - 38 Technical specifications 39 - 40 Troubleshooting Warranty... -
Page 3: Introduction
Because life happens, and sometimes events and changes create challenges for us to overcome, Reyhee prides itself on being able to offer that bit of help we sometimes need so that we may get back to doing those activities we cherish. -
Page 4: Packaging Contents
DO NOT ATTEMPT to unpack - to prevent potential injury to yourself & potential damage to the product - and seek assistance.) The Roamer comes with the following items in the packaging box. Please identify and locate all of the following prior to assembly:... -
Page 5: Getting To Know Your Roamer
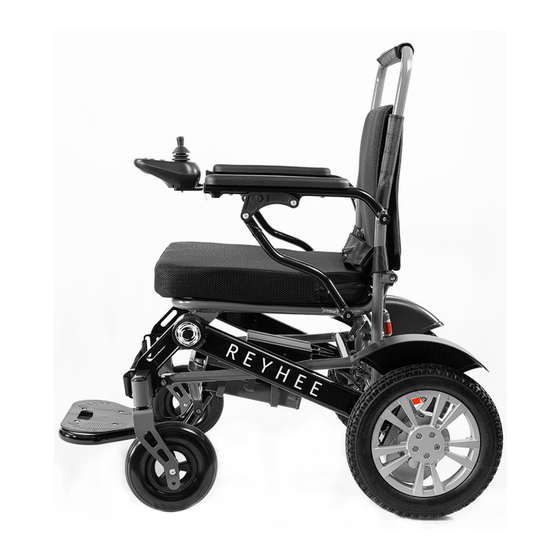
Getting to know your Roamer Parts Diagram: Side view Joystick (pre-installed on controller) Rear wheel (motor integrated inside) Armrest lock Lithium-ion battery box Right-side armrest (removeable - located beneath seat) Power cable Caster fork Push handle Caster front wheel Storage pocket (on back of seat) - Page 6 Getting to know your Roamer (cont.) Parts diagram: Back view Folding latch Shock absorption springs Stability feet (use when Roamer is folded) Dual rear levers (“D” = drive mode) (“N” = neutral / freewheel mode)
- Page 7 Getting to know your Roamer (cont.) Dimensions diagram: Unfolded (front view) Armrest width 19.8” (50.5cm) Height from seat to push handle 18.7” (47.5cm) Seat-back height 13.7” (34.8cm) Seat width 18” (45.7cm) Height from ground to push handle 38.4” (97.5cm) Height from ground to seat 19.5” (49.5cm)
- Page 8 Getting to know your Roamer (cont.) Dimensions diagram: Unfolded (side view) Controller length 6” (15.2cm) Seath depth 17.7” (44.9cm) Length from front axle to rear axle 23” (58.4cm) Caster front wheel diameter 8” (20.3cm) Rear wheel diameter 12.5” (31.8cm) Total length 37.4” (95cm)
- Page 9 Getting to know your Roamer (cont.) Dimensions diagram: Folded (side view) Total height including controller 34” (86.4cm) Total length 16” (40.6cm)
-
Page 10: Assembly
Assembly IMPORTANT: Your Roamer comes folded and mostly pre-assembled. Please read, comprehend, and follow ALL warnings and instructions below PRIOR to operating your Roamer. WARNINGS: If you observe damage to any part of the product after unpacking, please DO NOT ATTEMPT to assemble it and contact customer support for further instructions. - Page 11 Assembly (Cont.) Step one: Unfolding the Roamer Ensure the Roamer is upright and resting both its stability feet on a flat, even, and dry indoor floor surface. Ensure there is ample room for unfolding the Roamer. Grasp the push handle firmly with one hand.
- Page 12 Assembly (Cont.) Step two: Connect the controller cable to the power cable Ensure that your hands are completely DRY. Wet hands may cause an electrical shock or fire hazard. Locate the controller. Ensure the controller cable attached to it has no damage or exposed wiring. Locate the power cable (attached by velcro strap to the right-side armrest).
- Page 13 Assembly (Cont.) Step two: Connect the controller cable to the power cable (cont.) Pull the power cable’s rubber safety cover over the connection. Push the controller cable’s rubber safety cover until it touches the other safety cover. Step three: Connecting the power cable to the battery box Locate the other (unconnected) end of the power cable beneath the seat.
- Page 14 Step four: Installing the controller Instructions for installing the controller in the right-side armrest: Follow these instructions if you intend to operate the Roamer with your RIGHT hand. Identify the installation point (open hole) in front of the right-side armrest.
- Page 15 Move the power cable behind the seat until it reaches the left-side armrest. (Ensure that the power cable is NOT in the way of sitting down, or in the way of any parts that may move while the Roamer is in motion. Otherwise, there’s risk of damage to the power cable.) Install the controller (with the joystick and control buttons facing upward) by sliding the metal tube into the installation point, all the way to the end.
-
Page 16: Important Battery & Charger Warnings
- - - ASSEMBLY IS NOW COMPLETE - - - But wait! BEFORE you begin operating your Roamer, please read and comprehend ALL warnings and instructions outlined hereafter. If you are not certain that you are capable of fully understanding and following all warnings and instructions below, please do not attempt to operate the product and seek assistance. -
Page 17: Charging Instructions
Locate either of two charging port options: Charging port option #1: • Choose this option if you are able to charge next to your Roamer. • Plug the metal end of the charger into the charging port beneath the controller. - Page 18 Charging Instructions (cont.) Charging port option #2: • Choose this option if you are not able to charge near the Roamer, and must remove the battery box (located beneath the seat) in order to charge it. • How to safely remove the battery box for charging: First DISCONNECT the power cable from the back of the battery box.
- Page 19 Charging Instructions (cont.) Then plug the two-pronged end of the charging cable into an appropriate & functional electrical wall outlet. To prevent fire risk and suboptimal charging, DO NOT plug the charging cable into an extension cord or any other indirect power sources. Check the charging progress by observing the LED light on the charger.
- Page 20 Charge ONLY with the provided battery pack, charger, and charging cable. • Using a battery box or charger other than those provided by Reyhee VOIDS the manufacturer’s warranty. • The provided battery box and charger are intended for use ONLY with the Reyhee Roamer.
-
Page 21: Important Warnings And Safety Instructions
IMPORTANT WARNINGS & SAFETY INSTRUCTIONS FAILURE TO FOLLOW ALL WARNINGS & INSTRUCTIONS WILL VOID YOUR WARRANTY. WHEN THE ROAMER IS IN USE, HEED THE FOLLOWING WARNINGS & INSTRUCTIONS AT ALL TIMES: THIS PRODUCT IS NOT INTENDED TO BE RIDDEN OR OPERATED BY CHILDREN •... - Page 22 If transporting the product by ground vehicle, first ensure that it is POWERED OFF, fully disconnected from the charger, and safely stowed and properly secured. (See “How to Transport the Roamer” for full safety instructions.) Electric-powered wheelchairs such as this product may be susceptible to electromagnetic interference, which is interfering electromagnetic energy emitted from sources such as radio stations, TV stations, amateur radio transmitters, two-way radios, and cellular phones.
- Page 23 Reyhee is not responsible for any injuries, damage, or legal disputes that may result from improper usage, the user’s and/or any accompanying persons’ inexperience, extenuating...
-
Page 24: How To Operate Your Roamer
How to fold the Roamer First ensure the power is OFF, and that both armrests are LOCKED. Ensure no-one is seated in the Roamer, and that no-one else is touching it. Stand behind the Roamer. Locate the push handle and folding latch. -
Page 25: How To Fold The Roamer
Ensure your feet are safely out of the way of all wheels and both stability feet. Simultaneously PUSH DOWN on the push handle and PULL UP on the front bar to fold the Roamer properly. Also use the handle at the front of the footplate to fold the footplate in. -
Page 26: How To Transport The Roamer
Gradually pull the footplate handle until the Roamer’s stability feet are off the ground. Ensure the weight of the Roamer does not cause any risk of muscle strain. If you are having difficulty wheeling the Roamer, DO NOT make any further attempts and seek assistance. -
Page 27: How To Unfold The Roamer
How to Operate Your Roamer (Cont.) How to unfold the Roamer Ensure the Roamer is upright and resting both its stability feet on a flat, even, and dry ground-level surface. Ensure there is ample room for unfolding the Roamer. Grasp the push handle firmly with one hand. -
Page 28: Pre-Ride Checklist
(bar/post/joints), to prevent potential injury when lifting and lowering the armrest. • If intending to get in or out of the Roamer after lifting an armrest, ensure the armrest is lifted ALL THE WAY UP before safely getting in or out of the Roamer. •... - Page 29 To unlock and lift an armrest: BEFORE you unlock an armrest: Ensure the Roamer has come to a safe and complete stop. Ensure the power is OFF. Ensure that there are NO obstructions that may prevent the armrest from being safely lifted up (e.g.
-
Page 30: Getting In And Sitting In The Roamer
Ensure the dual rear levers are both in DRIVE mode. To ensure a safe sitting position: Stand with both feet firmly on the ground in front of the Roamer, with your back facing the seat. Mind the footplate, so that it does not create a tripping hazard. Do NOT stand on the footplate, as this could cause risk for falls/injuries and damage to the product. - Page 31 • Press down on both dual rear levers to engage Drive mode. • Drive mode must be used whenever the user is seated in the Roamer and operating it using the controller. • Drive mode ensures that the Roamer will be able to automatically brake whenever the user releases the joystick on the controller.
-
Page 32: How To Use The Controller
How to Operate Your Roamer (Cont.) How to use the controller Battery level indicator Joystick (Green lights: 70 - 100%) Power on/off button (Yellow lights: 30 - 70%) Horn alert button (Red light: 0 - 30%) Speed increase button (speed increases... - Page 33 0% during usage. • Note that while the Roamer is charging, the battery level indicator will NOT turn on to show charging progress. (Charging progress is indicated by the light on the charger itself.)
- Page 34 How to Operate Your Roamer (Cont.) How to use the controller (cont.) Headlight button • Press button once to turn on the headlight (located beneath the controller). • Press button again to turn off the headlight. The headlight is NOT intended for nighttime usage (or usage in any other environment or any other time with limited to no visibility).
- Page 35 • Moving the Roamer to the left Push the joystick to the left. Note that the Roamer has a turning radius, so movement to the left will NOT be a sudden 90 degree turn. • Moving the Roamer to the right Push the joystick to the right.
-
Page 36: Standing Up And Getting Out Of The Roamer
Gradually release the armrests and ensure the intended pathway is clear before walking. If you are leaving the Roamer (where it’s out of sight), ensure that it is in a safe and secure location where NO children, pets, or persons with limited physical/mental... -
Page 37: Maintenance
For any maintenance or replacement of a part/component that is not explicitly approved by Reyhee for the user to maintain or replace by themself, DO NOT ATTEMPT to conduct maintenance or replacement, and contact customer support to locate the nearest authorized service center. - Page 38 Maintenance (Cont.) Cosmetic maintenance: Before each use of the Roamer, check that all parts are CLEAR of debris, dirt, dust, and anything else that may cause obstruction or potential deterioration over time. Use a soft, dry cloth if needed. Ensure the power is OFF and exercise caution (e.g. wear protective gloves) when removing any debris, dirt, dust, etc.
-
Page 39: Technical Specifications
Technical Specifications Model name Roamer SKU number XW-LY001 Descriptive words used in listings Electric foldable wheelchair Frame material Aluminum alloy Maximum weight capacity * 300 lbs (136 kg) Drive type Motorized rear wheel drive Maximum built-in speed limit ** 3.7 mph (5.9 km/h) Turning radius 33.5 inches (85 cm) - Page 40 Technical Specifications (Cont.) Battery type Lithium ion NMC Total number of battery boxes Removeable? Battery voltage Battery amp-hours 12 Ah Battery watt hours 288 Wh Battery *** Total charging time from 0% to 100% 6 - 8 hours Total battery lifespan Approx.
-
Page 41: Troubleshooting
Troubleshooting Questions Possible causes Corresponding answers Why is the Roamer not Power cable and/or controller Check all cable connections powering on? cable are not properly and ensure proper connection. connected. Use charger and charging cable to charge the Roamer. Battery level is too low or empty. -
Page 42: Warranty
Product replaced under the limited warranty may be replaced with a brand new or factory refurbished product. If the defective product is discontinued, end of life, or out of stock, Reyhee will issue a replacement product of equivalent value or features. Product warranty periods do not... -
Page 43: Recycling And Disposal
Warranty (Cont.) Note that in the event of accidents, injuries, property damage, or death while using a Reyhee product, insurance coverage is not guaranteed. Check with your insurance provider for more details. International disclaimer: Reyhee’s products are currently produced for sale in the United States. Customers who purchase Reyhee’s products in the United States from an authorized reseller, but transport the products...
Need help?
Do you have a question about the Roamer and is the answer not in the manual?
Questions and answers