Kontax Tensegrity Phone Table Instructions Manual
Hide thumbs
Also See for Tensegrity Phone Table:
- Assembly instructions manual (46 pages) ,
- Instructions manual (14 pages) ,
- Assembly instructions manual (15 pages)
Advertisement
Quick Links
Tensegrity Phone assembly instructions page 1 of 18
These instructions are for the Tensegrity Phone Table.
Please read all the way through the assembly instructions to familiarise yourself with the process
before you start and pay close attention to the alignment of all the parts in the diagrams.
Assembly time should be approximately 15-20 minutes.
Copyright Kontax Engineering Ltd 13/1/23
Advertisement

Related Manuals for Kontax Tensegrity Phone Table


Summary of Contents for Kontax Tensegrity Phone Table
- Page 1 Tensegrity Phone assembly instructions page 1 of 18 These instructions are for the Tensegrity Phone Table. Please read all the way through the assembly instructions to familiarise yourself with the process before you start and pay close attention to the alignment of all the parts in the diagrams.
- Page 2 Tensegrity Phone assembly instructions page 2 of 18 Rear cable 2x 2x Centre cable Front cable 1x 1x 1x 1x Top plate Base 1x 1x 1x 1x Top Arm Bottom Arm 1x 1x 1x 1x Shuttle Rubber foot Assembly plate 1x 1x Copyright Kontax Engineering Ltd 13/1/23...
- Page 3 Hex key Short grub screw Long grub screw Countersunk screw Short roundhead screw Long roundhead screw Assembly screw Phone peg 1x 1x 4x 4x 1x 1x 4x 4x 3x 3x 3x 3x 2x 2x 2x 2x Copyright Kontax Engineering Ltd 13/1/23...
- Page 4 Tensegrity Phone assembly instructions page 4 of 18 Peel the backing off the 4x adhesive rubber feet and stick them over the four dimples on the bottom of the base. Copyright Kontax Engineering Ltd 13/1/23...
- Page 5 Tensegrity Phone assembly instructions page 5 of 18 Screw 2x countersunk screws through the base into the arm and tighten. It might help to have an assistant hold the base and arm together while you screw the screws in. Copyright Kontax Engineering Ltd 13/1/23...
- Page 6 You should be able to screw it in using your fingers, but if not you can use a small cross-point screwdriver. Do not tighten too much or you risk marking the arm. Copyright Kontax Engineering Ltd 13/1/23...
- Page 7 If they feel tight as you screw them in do 2. Fit screws not force them. Back the screws off, reposition the loops 1. fit cable and try again. Copyright Kontax Engineering Ltd 13/1/23...
- Page 8 Tensegrity Phone assembly instructions page 8 of 18 Position the top plate over the arm with the Kontax logo upwards and screw 2x countersunk screws through the holes in the top plate into the arm and tighten. Copyright Kontax Engineering Ltd 13/1/23...
- Page 9 If it feels tight as you screw it in do not force it. Back the screw off, reposition the loop and try again. Copyright Kontax Engineering Ltd 13/1/23...
- Page 10 If it feels tight as you screw it in do not force it. Back the screw off, reposition the loop and try again. Repeat for the other rear cable. Copyright Kontax Engineering Ltd 13/1/23...
- Page 11 Screw 1x short roundhead screw into the shuttle a couple of turns. Shuttle shown Repeat for the other two shuttles. cutaway for clarity 2. Fit long roundhead screw 1. Fit shuttle Couple of turns 3. Fit short roundhead screw Copyright Kontax Engineering Ltd 13/1/23...
- Page 12 2. Loop around screw Repeat for the two rear cables. When they are all fitted you can tuck the excess lengths underneath. 4. Make sure screw is fully inside pocket Copyright Kontax Engineering Ltd 13/1/23...
- Page 13 Tensegrity Phone assembly instructions page 13 of 18 Screw 2x phone pegs into the holes near the bottom edge of the top plate and tighten. Copyright Kontax Engineering Ltd 13/1/23...
- Page 14 Tensegrity Phone assembly instructions page 14 of 18 Remove the 2x assembly screws and then remove the assembly plate, the table will be quite wobbly at this stage. Copyright Kontax Engineering Ltd 13/1/23...
- Page 15 You can use a ruler to measure an equal height on each side of the back edge of the top plate. When the top edge is horizontal you can move on to the next step. Front screws Copyright Kontax Engineering Ltd 13/1/23...
- Page 16 The table is designed to carry the weight of most phones but is not suitable for tablets. Measure height here Between 57mm 59mm Copyright Kontax Engineering Ltd 13/1/23...
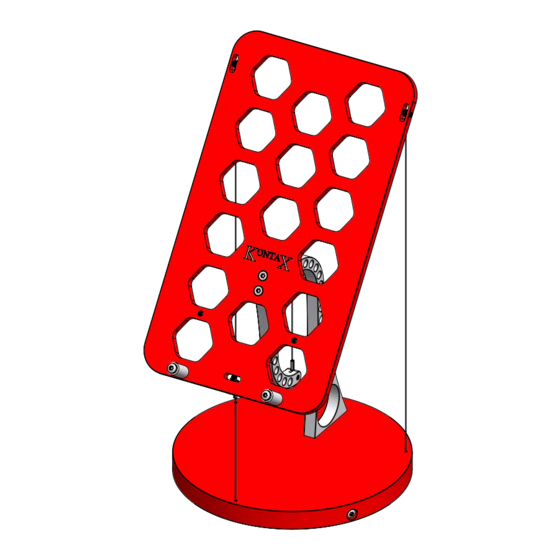
- Page 17 Tensegrity Phone assembly instructions page 17 of 18 Your Tensegrity Phone Table is now fully assembled. If you need help with your table you can email us at: support@stirlingengine.co.uk Copyright Kontax Engineering Ltd 13/1/23...
- Page 18 Our workshop is located in the Thames Valley, United Kingdom and is staffed by a skilled team of 9 designers, machinists and assemblers. We have 4 CNC mills, 3 CNC lathes and 3 CNC mill-turn centres. Copyright Kontax Engineering Ltd 13/1/23...
Need help?
Do you have a question about the Tensegrity Phone Table and is the answer not in the manual?
Questions and answers