iRobot H1 Series Manual
- Owner's manual (14 pages) ,
- Owner's manual (8 pages) ,
- Owner's manual (14 pages)
Advertisement
Safety Information
Important Safety Instructions
This owner's guide includes information for Regulatory Model(s): HVA-N1
SAVE THESE INSTRUCTIONS


When using an electrical appliance, basic precautions should always be followed.
Failure to follow the warnings and instructions may results in electric shock, fire and/or serious injury; including the following:
 READ ALL INSTRUCTIONS BEFORE USE
To reduce the risk of fire, electric shock, or injury, read and follow the safety precautions.
This appliance is not intended for use by persons (including children) with reduced physical, sensory or mental capabilities or lack of experience and knowledge, unless they have been given supervision or instruction concerning use of the appliance by a person responsible for their safety.

Indicates a hazardous situation that, if not avoided, could result in death or serious injury.

Indicates a hazardous situation that, if not avoided, could result in minor or moderate injury.
NOTICE: Indicates a hazardous situation that, if not avoided, could result in property damage.
GENERAL
- Do not use outdoors or on wet surfaces.
- Do not allow to be used as a toy. Close attention is necessary when used by or near children, pets or plants.
- Use only as described in this manual. Use only manufacturer's recommended attachments.
- Do not use with damaged charger. If appliance is not working as it should, has been dropped, damaged, left outdoors, or dropped into water, return it to a service center.
- Do not unplug by pulling on cord. To unplug, grasp the charger, not the cord.
- Do not handle charger, including charger plug, and charger terminals with wet hands.
- Do not put any object into openings. Do not use with any opening blocked; keep free of dust, lint, hair, and anything that may reduce air flow.
- Keep hair, loose clothing, fingers, and all parts of body away from openings and moving parts.
- Use extra care when cleaning on stairs.
- Do not use to pick up flammable or combustible liquids, such as gasoline, or use in areas where they may be present.
- Do not use without filter.
- Do not pick up anything that is burning or smoking, such as cigarettes, matches, or hot ashes.
- Prevent unintentional starting. Ensure switch is in the off-position before connecting to battery pack, picking up or carrying the appliance. Carrying the appliance with your finger on the switch or energizing appliance that have the switch on invites accidents.
- Always switch off the appliance before cleaning, when not in use or attempting any maintenance task. The charger must only be connected to an AC power supply at the voltage shown on the rating label. This cleaner should only be used for its intended purpose as described in this instruction manual. Never operate the vacuum cleaner without filters.
- Brush may start unexpectedly, switch off the unit and remove the battery pack before cleaning or servicing.
- Do not pull or carry by cord, use cord as a handle, close a door on cord, or pull cord around sharp edges or corners. Do not run appliance over cord. Keep cord away from heated surfaces.
- Always turn off this appliance before connecting or disconnecting motorized nozzle.
- Do not charge the unit outdoors.
- Do not incinerate the appliance even if it is severely damaged. The batteries can explode in a fire.
- Have servicing performed by a qualified repair person using only identical replacement parts. This will ensure that the safety of the product is maintained.
- Do not modify or attempt to repair the appliance or the battery pack except as indicated in the instructions for use and care.
BATTERY
- Recharge only with the charger specified by the manufacturer (charger model YLS0241A-T260060). A charger that is suitable for one type of battery pack may create a risk of fire when used with another battery pack.
- Use appliances only with battery pack Regulatory Model Number ABL-E1. Use of any other battery pack may create a risk of injury or fire.
- When battery pack is not in use, keep it away from other metal objects, like paper clips, coins, keys, nails, screws or other small metal objects, that can make a connection from one terminal to another. Shorting the battery terminals together may cause burns or a fire.
- Under abusive conditions, liquid may be ejected from the battery; avoid contact. If contact accidentally occurs, flush with water. If liquid contacts eyes, additionally seek medical help. Liquid ejected from the battery may cause irritation or burns.
- Do not use a battery pack or appliance that is damaged or modified. Damaged or modified batteries may exhibit unpredictable behavior resulting in fire, explosion or risk of injury.
- Do not expose a battery pack or appliance to fire or excessive temperature. Exposure to fire or temperature above 130°C may cause explosion.
- Follow all charging instructions and do not charge the battery pack or appliance outside of the temperature ranges specified below. Do not use or store the system outside the temperature ranges specified below.
Recommended ambient temperature range for charging the system: 0°C to 40°C, 32°F to 104°F
Recommended ambient temperature range for operating the system: 0°C to 40°C, 32°F to 104°F
Recommended ambient temperature range for storing the system: -20°C to 40°C, -4°F to 104°F
- Disconnect the battery pack from the appliance before making any adjustments, changing accessories, or storing appliance. Such preventative safety measures reduce the risk of starting the appliance accidentally.
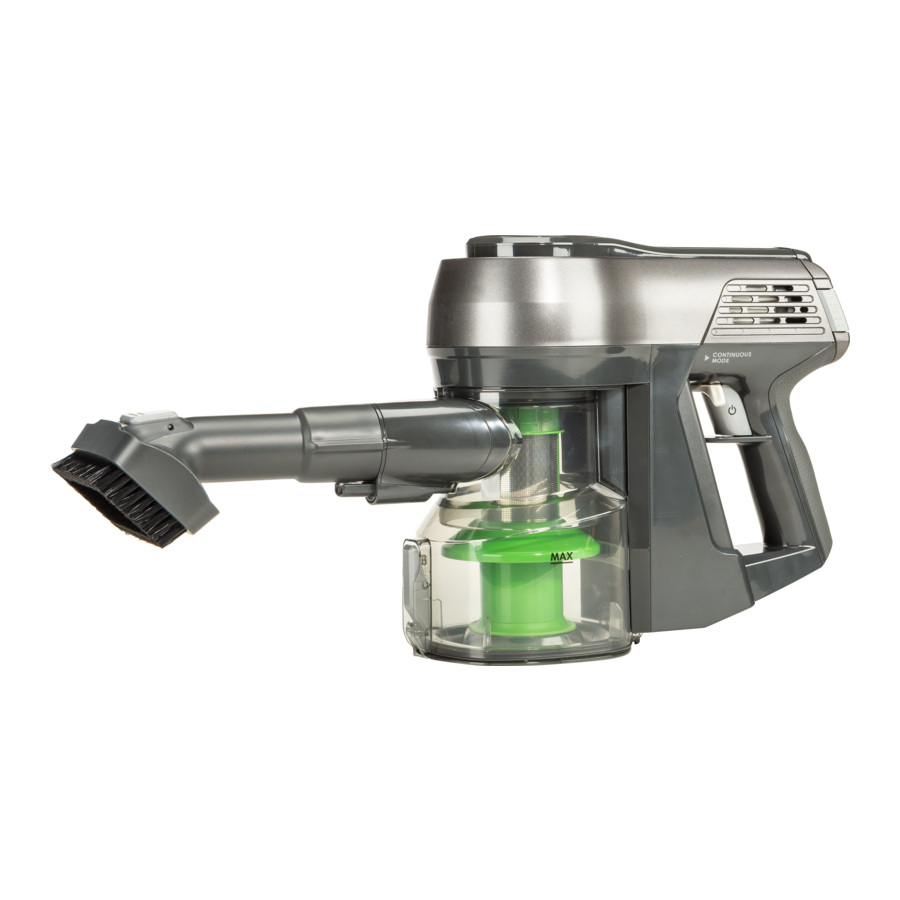
About Your Handheld Vacuum
Side View

Bottom View

Using Your Handheld Vacuum
 Note: For household indoor use only.
Charging
- Insert the charger into the charging port of your handheld vacuum. The LED light will flash blue when charging. Once fully charged, the LED light will turn off.
![]()

Note: The vacuum requires up to 4 hours to be fully charged.
- The LED light will flash red when your handheld vacuum is low on battery.
- It is recommended to charge your vacuum after each use to maintain maximum performance.
Note: As a safety precaution, the vacuum cannot be switched on while charging.
Storage
Your handheld vacuum can be wall-mounted using the wall mount bracket, drywall anchors, and screws provided.
When selecting a location, ensure there are no utility/service lines
(electrical wiring, water supply, gas supply, air, etc.) located directly behind the mounting location. Mount the bracket in accordance with all applicable codes and requirements. The use of personal protective equipment, such as safety glasses and gloves, is recommended.
- Using the wall mount bracket as a template, mark the location of the screw holes.
Do not mount the bracket at a height greater than 3 feet (1 meter) from the floor.
- Using a 5/16 inch (8mm) drill bit, drill two pilot holes and insert the drywall anchors into the pilot holes.
Note: If mounting directly onto a wall stud, it is not necessary to install the drywall anchors. Use the screws to secure the bracket onto the wall stud.
- Install the screws and bracket until the wall mount is held firmly in place. Do not over tighten.
![]()

Cleaning
To start cleaning, hold down on the trigger to start the vacuum.

Continuous Cleaning
- Your vacuum can be operated without the need to continuously hold down the trigger. To enable continuous cleaning, press the continuous cleaning switch until it clicks into place.
- To disable continuous cleaning, push the switch in the opposite direction until it clicks into place.
![]()

Note: After each use, please ensure that the continuous cleaning switch is disabled. Failure to do so may cause battery failure.
Power Selector
Your vacuum has two power modes - High Power & Low Power. The vacuum will begin in High Power. To select Low Power press the power selector. Pressing the power selector a second time will return the vacuum to High Power.

Attachments
To reduce the risk of personal injury, always switch off the vacuum before changing accessories.
Upholstery Tool
Ideal for picking up pet hair from furniture & upholstery.
Note: As a safety feature, the upholstery tool will not switch on when it is inserted into the vacuum during operation.
Safety Precautions:
- Keep hair, hands and feet away from the rotating brush while the motorized brush is running.
- Do not run the motorized brush over electric cables and string.
- Do not use the motorized brush on pets.
- If children are present, make sure to turn the vacuum off when leaving the motorized brush unit unattended.
- Do not attempt to service or unclog the motorized brush while the vacuum is running.
![]()

Crevice Tool
Ideal for cleaning in between hard to reach places.

Combination Tool
2 tools in 1 for cleaning multiple surfaces without changing attachments.

Troubleshooting
| Fault | Problem | Solution |
Reduced suction |
|
|
The LED light flashes red and blue during charging |
|
|
Insufficient run time after charging |
|
|
The LED light does not turn on while charging |
|
|
The LED light flashes red during operation |
|
|
If you need further support, please contact our Customer Care Team.
Care and Maintenance
Care and Maintenance Instructions
To keep your vacuum running at peak performance, perform the procedures on the following pages.

Always remove the battery from the vacuum before performing any maintenance.
| Part | Care Frequency | Replacement Frequency* |
| Bin | Empty bin after each use or when dust reaches "MAX" fill line | |
| Dust Bin Filter | Clean after heavy use | Every 3 months |
| Exhaust Filter | Clean after heavy use | Every 6 months |
*Replacement frequency may vary. Parts should be replaced if visible wear appears.
Note: If you think you need a replacement part, please visit global.irobot.com. If you need additional assistance, please contact iRobot Customer Care.
Emptying the Bin
- Press the bin empty button to open and empty the dust bin.
![]()
- Close the dust bin lid after emptying.
![]()


Cleaning the Bin
- Wipe the dust bin with a clean, damp cloth. Do not use the vacuum until after it is completely dry.
![]()

Cleaning the Dust Bin Filter
- Gently pull the filter to remove it from the vacuum.
![]()
- Use cold water when cleaning the filter. Insert the filter back into the vacuum after it is completely dry.
![]()


Cleaning the Cyclone Separator
- Press the bin empty button to access the cyclone separator.
![]()
- Turn the cyclone separator to unlock and remove it from the dust bin.
![]()
- Use cold water when cleaning the cyclone separator.
Insert the cyclone separator back into the vacuum after it is completely dry.
![]()


Cleaning the Exhaust Filter
- Remove the exhaust filter by pressing down on the buttons on both ends and pulling out.
![]()
- Wash the filter under cold water.
![]()
- Reinsert the filter back into the vacuum once it is completely dry.
![]()


Customer Care
USA & Canada
If you have questions or comments about your handheld vacuum, please contact iRobot.
You can start by visiting global.irobot.com for support tips, frequently asked questions and information about accessories. If you need further assistance, call our Customer Care team at (877) 855-8593.
iRobot USA Customer Care Hours
- Monday to Friday, 9AM – 9PM Eastern Time
- Saturday and Sunday 9AM – 6PM Eastern Time
Outside USA & Canada
Visit global.irobot.com to:
- Learn more about iRobot in your country
- Get hints and tips to improve your handheld vacuum's performance
- Get answers to questions
- Contact your local support center
Regulatory Information
FCC Supplier's Declaration of Conformity
iRobot Corporation Handheld Vacuum Model: HVA-N1
This device complies with part 15 of the FCC Rules and ICES-003. Operation is subject to the following two conditions:
- This device may not cause harmful interference, and
- this device must accept any interference received, including interference that may cause undesired operation.
iRobot Corporation, 8 Crosby Drive, Bedford, MA 01730.http://global.irobot.com
or call 1-800-822-8837
For battery recycling go to call2recycle.org;
VideosiRobot H1 Handheld Cordless Vacuum Review Video
Documents / Resources
References
Download manual
Here you can download full pdf version of manual, it may contain additional safety instructions, warranty information, FCC rules, etc.
Advertisement


Need help?
Do you have a question about the H1 Series and is the answer not in the manual?
Questions and answers