Advertisement
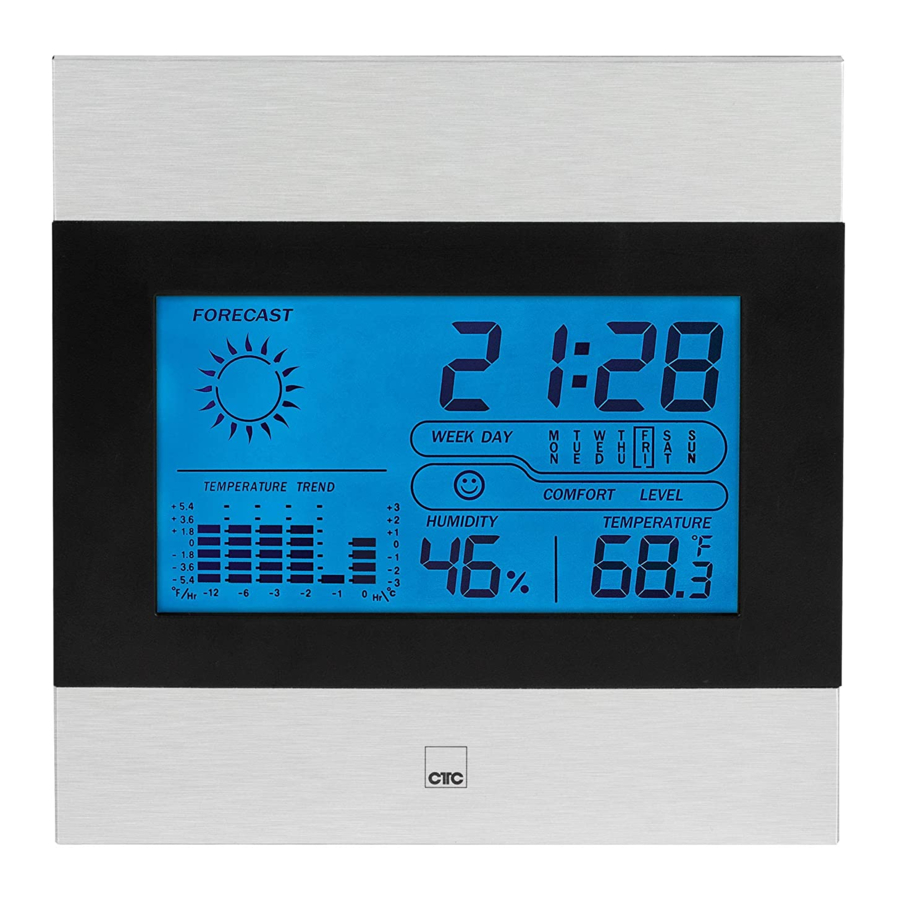
Display

- Display for "empty battery"
- Alarm time active, snooze function
- Display for "afternoon" (PM) on the 12-hour display
- Display of current time and date (MONTH = month, DATE = day), of alarm time
- Weekday (MON = Monday, TUE = Tuesday, WED = Wednesday, THU = Thursday, FRI = Friday, SAT = Saturday, SUN = Sunday)
- Comfort level (COMFORT LEVEL)
- Display of temperature (TEMPERATURE), of temperature unit (°C or °F)
- Air humidity (HUMIDITY)
- Evaluation of indoor temperature (trend during the last 12 hours)
- Weather forecast (FORECAST)
Commissioning the Device
Sensitive surfaces may be protected by plastic foil. Remove this foil.
Inserting the Batteries
Batteries not Supplied
- Open the battery compartment lid on the back.
- Insert 2 1.5 V R 03 / AAA type batteries. Match the polarities correctly (see the inside of the battery compartment).
- Close the battery compartment.
NOTE:
A battery symbol in the display indicates that the batteries need to be replaced.

- Batteries can leak battery acid. If the device is out of use for a long period of time, remove the batteries.
- Different battery types or new and used batteries must not be used together.
- Batteries are not to be disposed of together with domestic wastes. Dispose of the used batteries at the relevant collection bin or at your dealer's.

The batteries shall not be exposed to excessive heat such as sunshine, fire or the like. Danger of explosion!
Operation
With the use of an internal sensor, the appliance calculates not only the room temperature and air humidity, but also displays an evaluation of the indoor temperature. However, the measurement does not reflect the actual weather conditions. To receive an approximation of weather trends, place the appliance near an open window.
MODE Button
The normal time display is the standard time display. The appliance automatically switches back to this display every approx. 7 seconds.
Press the MODE button repeatedly to alternate between the following displays:
Date  Alarm time normal time display
Set Preferences
- Set preferences with the UP / DOWN buttons.
- Confirm preferences using the MODE button.
Adjust Time
- While the time display is active, press the MODE button and hold it down for 3 seconds. The hours will begin to blink.
- Now adjust the hours and the minutes one after the other.
Select 12 or 24 Hour Display
While the time display is active, press the UP button and hold it down for 3 seconds. On the 12-hour display, the PM display appears for "afternoons".
Set Date
- Press the MODE button to switch to the date display.
- While the date display is active, press the MODE button and hold it down for 3 seconds. The year will begin to blink.
- Now adjust the year, month and day, one after the other.
NOTE:
The correct weekday will be automatically displayed.
Set Alarm
- Select the alarm using the MODE button.
- While the alarm display is active, press the MODE button and hold it down for 3 seconds. The hours will begin to blink.
- Now adjust the hours and the minutes one after the other.
Turn Alarm Time On / Off
While the time display is active, press the UP button to turn the alarm on and off. While the alarm is activated, the  symbol will appear next to the normal time display.
NOTE:
As soon as the adjusted alarm time is reached, the symbol will blink in the display. The interval of the signal tone will increase from slow to fast.
- Deactivate alarm until the following day:
Press the UP button, or use the snooze function. - Snooze Function (SNOOZE):
Press the SNZ button to switch off the signal tone for approx. 8 minutes. The![]() symbol will blink.
symbol will blink.
Toggle Temperature Display Between °C and °F
Press the DOWN button repeatedly to select °C or °F.
MAX / MIN Button
Press the button repeatedly to display the maximum, minimum, or current temperature / air humidity.
RESET Button
Any malfunction during operation can be resolved by pressing the reset button. Press the button with a wire or similar to reset the electronics.
Cleaning
Do not immerse the device in water.
- Any marks on the surface can be wiped off with a slightly damp cloth without any additives.
- Polish with a dry, soft cloth.
Technical Data
| Model: | WSU 7023 | |
| Temperature measurement range: | 0°C – 50°C (32°F – 122°F) | |
| Air humidity measurement range: | 20% – 90 % | |
| Battery operation: | 2 × 1.5 V, AAA / R03 | |
| Net weight: | approx. 0.15 kg | |
The right to make technical and design modifications in the course of continuous product development remains reserved.
This device has been tested according to all relevant current CE guidelines, such as electromagnetic compatibility and low voltage directives, and has been constructed in accordance with the latest safety regulations.

Documents / ResourcesDownload manual
Here you can download full pdf version of manual, it may contain additional safety instructions, warranty information, FCC rules, etc.
Advertisement


Need help?
Do you have a question about the WSU 7023 and is the answer not in the manual?
Questions and answers