Table of Contents
Advertisement
Quick Links
Be242
Be242RB Be242-22
OEM's Manual
V4.X.XX - March - 2023
page 1
Be242 AMF CONTROLLER
Be242-22 AMF CONTROLLER (*)
Installation Manual
The information in this document may be subject to change without prior notice. Bernini Design assumes no
responsibility for any errors that may appear in this instruction manual or in the wiring diagrams.
Although Bernini Design has taken all possible steps to ensure that the User Manual is complete, bug free and
up-to-date, we accept that errors may occur. If you encounter problems with this instruction manual, please
contact us.
Customer Support
e-mail:
bernini@bernini-design.com
mobile: +39 335 70 77 148 mobile: 0040 721 241 361
Warranty
Bernini Design SRL (hereinafter "BD") warrants that Be242 shall be free from defect in material or workmanship
for a period of 3 years from the BD delivery date. BD shall, at its discretion, repair or replace the product without
charge The buyer shall provide sufficient information on any alleged defects in the product, so as to enable BD
to determine their cause and existence. If the Be242 is not defective, or the product is defective for reasons
other than covered by this warranty, the buyer will be charged accordingly. This warranty shall not apply if the
Be242 has not been used in accordance with the User Manual and other operating instruction, particularly if any
defects are caused by misuse, improper repair attempts, and negligence in use or handling.
This equipment complies with EMC protection requirements
WARNING!!
High voltage is present inside the Be242. To avoid electric-shock hazard, operating personnel must not remove
the protective cover. Do not disconnect the Earth connection. The Be242 can start the engine at anytime. Do not
work on equipment, which is controlled by the Be242. When servicing the engine, disconnect the battery and
battery charger. We recommend that warning signs be placed on equipment indicating the above.
(*) Replacing the Be22 AMF CONTROLLER
When you use this controller to replace a Be22 controller, inform us first. We will supply, free
of charge, a suitable adapter kit. In this way, all connections will be 'plug-and-play'. You can
avoid the use of the adapter kit by re-wiring the connectors for Generator Voltage, Mains
Voltage and Current transformers asking for help to a qualified electrician. Contact us for
support.
1
Advertisement
Table of Contents
Troubleshooting

Related Manuals for Bernini Be242


Summary of Contents for Bernini Be242
- Page 1 The buyer shall provide sufficient information on any alleged defects in the product, so as to enable BD to determine their cause and existence. If the Be242 is not defective, or the product is defective for reasons other than covered by this warranty, the buyer will be charged accordingly. This warranty shall not apply if the Be242 has not been used in accordance with the User Manual and other operating instruction, particularly if any defects are caused by misuse, improper repair attempts, and negligence in use or handling.
- Page 2 Be242 Be242RB Be242-22 OEM's Manual V4.X.XX - March - 2023 page 2 Alphabetic index Measurements ....3.0 Alternator Failure E04 ..7.02B [P.15] Memory clear ...... 12.3 Alarms ......4.10, 8.0 Memory Events ....4.30 Alarm output control ..7.09, [39] Messages (Display) ....
-
Page 3: Table Of Contents
Table 7.09 Outputs Options list ......page 17 8.0 Alarms, Warnings & Shutdowns ....page 18 9.0 Hour Meter ............page 18 10.0 Be242; settings for Pump Set ...... page 18 11.0 Engine Running detect ....... page 19 12.0 Memory Clear ..........page 19 13.0 Troubleshooting guide ......... -
Page 4: Introduction
When you apply the DC supply, the display indicates for a second, the version of the software (example 1.0.01) and the detected kind of battery (12V or 24V) Should the battery supply be lower than 7,5V, the BE242 will trigger the [ER.13] alarm code; the software will not run. The modes of operation are selected by push buttons... -
Page 5: Off Mode
5 Every time the power supply is switched on, if the BE242 was in TEST or AUTO prior to power down, the Be242 returns to the “AUTO” mode. In the other cases, the Be242 will enter the OFF mode. The following table indicates the modes of operation. -
Page 6: Auto Mode
Generator if [P.17] is [on]. To stop the engine, select the AUTO mode (if Mains is present) or select the OFF mode. If you push the [STOP] push button when the Be242 is in AUTO or TEST, the [Er.09] will energize. -
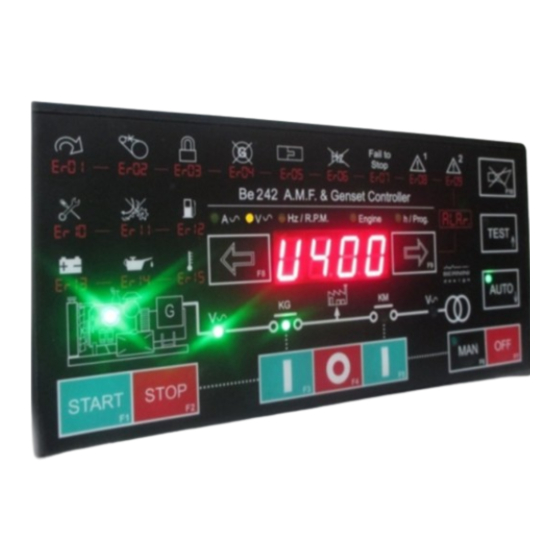
Page 7: Display Measurements
Be242RB Be242-22 OEM's Manual V4.X.XX - March - 2023 page 7 Section 3.0 Display measurements The Be242 features a 4 Digit display, two push buttons and 5 yellow LEDs as indicated below. Display and Menus OIL-°C-%FUEL-Vb Frequency-Speed Vac-Generator-Mains Display menu... -
Page 8: Display Messages And Log Events
Section 4.0 Display messages and LOG Events The Be242 displays alarms (table 4.10) and messages (table 4.20). The presence of alarms is indicated by the blinking message [ ALAr.]. Push the [→F9] push buttons to display the alarms one by one. Push the [←F8] push button to display additional information (section 8.0). -
Page 9: Log Events / Memory Events
3) - Push [TEST] or [AUTO] in order to choose the proper code (between 00 and 99, except 42). 4) - Push [ACK-F10] to confirm the password; if the password is ok, the Be242 will indicate [P.0] and the unit is ready for programming. -
Page 10: Programming
Press and hold the [ACK-F10] and [F9→] push buttons simultaneously until the [SaVE] message appears (approximately 5 seconds); the Be242 saves the settings and will enter the OFF mode. You can select the mode of operation as indicated in section 2.0. -
Page 11: Activating The Password
6) - Press and hold the [ACK-F10] and [F9→] push buttons simultaneously until the [SAVE] message appears; the Be242 saves the password and remains in PROGRAM mode. To exit, push the OFF push button. You can change the password at any time as indicated in section 6.50. - Page 12 P.2 Mains Restore time. 23 h The Be242 transfers the Load to the Mains once the MAINS is stable for at least [P.2] (seconds, minutes or hours). During [P.2], the engine will continue to run ON-LOAD. After [P.2], the [P.24] timer will take place to run the engine OFF-LOAD (the contactor of the generator will open).
- Page 13 The Be242 provides a warning if the parameters rise above the setting for the specified timing. The setting is allowed in step 5 Amps by using the push button on Be242 or in the step of 1Amp by using programming by Computer.
- Page 14 Be242 Be242RB Be242-22 OEM's Manual V4.X.XX - March - 2023 page 14 Table 7.03A - ENGINE PARAMETERS Note: [ xx " ] = seconds, [ xx ' ] = minutes, [ oFF ] = disabled Parameter Code & Description Default Options P.19...
- Page 15 Be242 Be242RB Be242-22 OEM's Manual V4.X.XX - March - 2023 page 15 Table 7.04 - ALARM OPTIONS Note: [ xx " ] = seconds, [ xx ' ] = minutes, [ oFF ] = disabled Parameter Code & Description Default Options P.33...
- Page 16 [ 27 ] Manual START push button [ 28 ] Manual STOP push button The Be242 detects the alarm if the engine is running (^^) We recommend the use of an AUTO-OFF-MAN switch 7.08 - Programmable Outputs Parameter Code & description Default Parameter Code &...
- Page 17 Be242 in TEST MODE (Status) [24] Maintenance SERVICE 1 (Er10) [56] Be242 in LOCK MODE (Status) [25] Maintenance SERVICE 2 (Er10) [57] Be242 runs the Automatic Periodic Test [26] Maintenance SERVICE 3 (Er10) [58] Cooling Timing [27] Engine Belt Break Shutdown [59]...
-
Page 18: Alarms, Warnings & Shutdowns
4A) - Press and hold the [ACK-F10] and [F9→] push buttons simultaneously until the [SaVE] message appears (for about 5 seconds); the Be242 saves the hour counter in the memory and will enter the OFF mode. 4B) - Press the [OFF] push button to exit the procedure without modifying the counter. -
Page 19: Engine Running Detect
The Be242 inhibits the starter motor when the engine starts running. When the engine is not running, the voltage in terminal D+/WL of the charger alternator (input #15) is 0 V. As soon as the Be242 starts the engine, a voltage appears in the D+/WL terminal (0.8 to 2.5 V). - Page 20 NOTE - At this stage of the TEST, if the display indicates one of the codes contained in Table 13.1 or 13.2, the Be242 is damaged and should be returned to Bernini Design. To exit the Troubleshooting, remove the Vdc supply at anytime 13.1 Testing the Push buttons...
-
Page 21: General Specifications
C) - Push a button on the front panel. According to Table 13.3, the display should indicate the proper message and the lamp must turn on. If a lamp fails to turn on, the Be242(RB) is damaged and should be returned for service. -
Page 22: Application Notes
E) - Connect the battery and select the 'AUTO' mode. The Be242 will start the engine after the programmed hours. The engine will run OFF-LOAD for 20 minutes. If the Mains fails during the automatic periodic test, the Be242 will transfer the load to the generator. -
Page 23: Typical Application Wiring
V4.X.XX - March - 2023 page 23 18.0 Typical Application Wiring Diagram The following drawing illustrates the recommended wiring diagram of the BE242 kit controller. In making the panel please consider the following information. - Always consult the international standard IEC 61439-1-2-34-5-6-7 IEC 60529 - Keep a reasonable distance between cables that carry 400V utility power and low-voltage cables committed to controlling the engine. - Page 24 Be242 Be242RB Be242-22 OEM's Manual V4.X.XX - March - 2023 page 24...
-
Page 25: Dimensions & Connections
JC SUB-D 25 Output 1 Input 4 Mains POLES JB Male Faston 6.3mm Running Plus Voltage (cable 1m included Input Battery Plus Running Minus in the Be242 kit) Battery Minus Contact Output BE242RB DIMENSIONS BE242 DIMENSIONS (DOWNLOAD FOOT PRINT FOR MAKING HOLES)
Need help?
Do you have a question about the Be242 and is the answer not in the manual?
Questions and answers