
Related Manuals for DANDELION DBWMSLBOX3


Summary of Contents for DANDELION DBWMSLBOX3
- Page 1 SKU: DBWMSLBOX3 SKU: DBWMSLBOX3 WALL-MOUNTED SLATWALL WITH SHELVES WALL-MOUNTED SLATWALL WITH SHELVES USER GUIDE USER GUIDE RESPONSIBLY CREATING BETTER PRODUCTS FOR A BETTER WORLD...
- Page 2 Table of Contents Parts Diagram Parts Diagram Assembly Assembly Instructions Instructions Contact Us Contact Us USER GUIDE USER GUIDE...
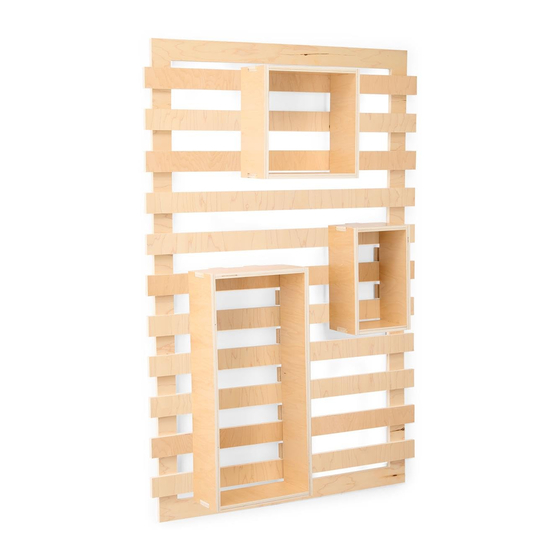
- Page 3 B. Medium Shelf X1 C. Small Shelf X1 A. Large Shelf x1 E. Screw and Anchor Set X9 D. Slatwall X1 F. Z-bar X2 PARTS DIAGRAM PARTS DIAGRAM...
- Page 4 NOTE: Choose apporpriate hardware for your wall type other than drywall. 1. Using a level, measure and align bracket at the desired height for your unit on wall. Mark the center of each hole on the wall. Be sure to account for the distance from the on-unit Z-bar to the top of the unit when measuring.
- Page 5 2. Remove Z-bar and drill holes at marked locations on the wall. Insert drywall anchor into drilled hole and use a rubber mullet to tap flush as needed. Replace Z-bar, insert and tighten screws through holes. Repeat Step 1 & 2 to attach the bottom Z-bar. NOTE: All brackets MUST be securely affixed to the wall.
- Page 6 3. Lift the slatwall and slide onto wall by slotting on-unit brackets onto the wall-mounted brackets. Ensure both Z-bars on the unit locks properly and securely into the wall bracket. ASSEMBLY ASSEMBLY INSTRUCTIONS INSTRUCTIONS...
- Page 7 4. Attach one shelf to the desired location and make sure it’s secured to the wall. Then attach other 2 shelves to the slatwall. NOTE: The large shelf and the small shelf can be hung onto the slatwall in protrait or landscape. Choose the orientation that better fit your needs.
- Page 8 AND HELPING TO PROTECT AND HELPING TO PROTECT OUR PLANET. OUR PLANET. Have a question? Get in touch with Have a question? Get in touch with our Dandelion representatives at: our Dandelion representatives at: 888-257-6639 888-257-6639 CONTACT US CONTACT US...
Need help?
Do you have a question about the DBWMSLBOX3 and is the answer not in the manual?
Questions and answers