Advertisement
Quick Links
User Manual For Depository Safe
Large Keypad Depository Safe
B
A
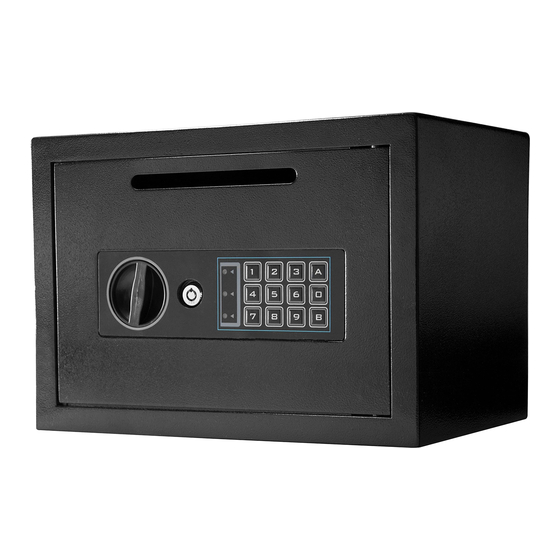
Parts of the Control Panel
A. Handle
B. Logo Plate and
Key Access
Standard & Compact Keypad Depository Safe
A
B
Parts of the Control Panel
A. Lock Knob
C. Indicator Lights
B. Key Cover and
Key Access
D. Key Pad
E
Parts of the Inside of the Safe Door
E. Initialization Button
F. Battery Compartment
WARNING: Avoid leaving door open and unattended; it will
allow unauthorized individuals to reprogram the safe,
gaining full access to the safe and contents.
OPENING THE SAFE WITH ACCESS KEY
For Large Keypad Depository Safe
1. To expose the key access, remove logo plate screws with
1
2
3
A
provided Allen wrench
4
5
6
0
2. Insert access key into key access, and turn clockwise to open
7
8
9
B
For Standard & Compact Keypad Depository Safe
1.
To expose the key access,
2. Insert access key into key access, and turn clockwise to open
C
D
NOTE: Store keys in a secure place. NOT inside of the safe
C. Indicator Lights
D. Key Pad
BATTERIES
1. Remove battery cover on the inside of the safe door
2. Insert 4 new AA batteries into the battery compartment and
pay attention to the polarity of the batteries
3. Replace compartment cover
1
2
3
A
CREATING PERSONAL PIN CODES
4
5
6
0
Safe retains only two 3-8 digit pin codes
7
8
9
B
1st Personal Pin Code
1. With safe open, press and release the
located on the inside of the safe door. Yellow
C
D
be on.
2. On the key pad input your
release
turn
off.
2nd Personal Pin Code
1. On the key pad press and release "0" twice. Press and
release the
safe door. Yellow
2. On the key pad input your
release
turn
off.
F
* Actual models may vary
gently lift off the key cover
initialization button
indicator light
3-8 digit pin code
and press and
either "A" or "B"
to confirm. Yellow
indicator light will
initialization button
located on the inside of the
indicator light
will be on.
3-8 digit pin code
and press and
either "A" or "B"
to confirm. Yellow
indicator light will
TESTING PERSONAL PIN CODES
1. With safe door open, and the handle/lock knob in the lock
position. Enter in 1st personal pin code
press and release
either "A" or "B" to confirm.
Successful Save
- You will hear 2 short beeps
- The green indicator light will flash
- Move handle to the right to retract bolts
Unsuccessful Save
- You will hear 9 short beeps
- Handle will not move and bolts will stay extended
- Repeat steps CREATING PERSONAL PIN CODES
2. To test 2nd personal pin code, enter in 2nd personal pin code
on the key pad
and
press and release
to confirm. See "Successful Save" and
"Unsuccessful Save" above
3. Test a pin code that is not registered to make sure the safe
does not open to complete testing process
OPENING & CLOSING SAFE WITH PERSONAL PIN
CODES
OPEN:
1. On the key pad enter in either of your
press and release
either "A" or "B"
2. Turn the handle/lock knob to the unlock position and pull the
safe door open
NOTE
After entering pin, you have 5 seconds to turn the knob before
the mechanism re-locks automatically
CLOSE:
To close safe, close door and turn knob to the lock position
will
LOCK OUT
Lock out mode is activated when the wrong personal pin code is
entered
- 3
consecutive
times, Lock out mode will last 20 seconds
-
6 consecutive times,
Lock out mode will last 5 minutes
CHANGING PERSONAL PIN CODES
Follow steps in "CREATING PERSONAL PIN CODES"
See reverse side for more information
on the key pad
and
either "A" or "B"
3-8 digit pin codes
and
to confirm.
12/20
BC657
Advertisement

Related Manuals for Barska AX11934


Summary of Contents for Barska AX11934
- Page 1 TESTING PERSONAL PIN CODES WARNING: Avoid leaving door open and unattended; it will allow unauthorized individuals to reprogram the safe, 1. With safe door open, and the handle/lock knob in the lock gaining full access to the safe and contents. position.
- Page 2 1 YEAR LIMITED WARRANTY SAFES LOW BATTERY WARNING BARSKA warrants this new safe to be free of original defects in After entering correct personal code and the green and red indicator material and/or workmanship under normal use for a period of lights are flashing this indicates that the batteries are low.