
Related Manuals for Beko HPD24414W


Summary of Contents for Beko HPD24414W
- Page 1 Front-Loading Dryer Owner’s Guide: Installation and Operation Instructions HPD24414W 2960313280_EN/230622.1443...
- Page 2 Dear Customer, Please read this guide prior to use this product! Thank you for choosing Beko product. We would like you to achieve the optimal efficiency from this high quality product which has been manufactured with state of the art technology.
-
Page 3: Table Of Contents
Your Dryer 6 Maintenance and cleaning 1.1 Overview ..........4 6.1 Loading Door Inner Surface ....27 1.2 Technical Specifications ......5 6.2 Cleaning the sensor ......29 6.3 Cleaning the condenser ......29 2 Important Safety Instructions 7 Troubleshooting 3 Installation Instructions 8 Warranty Statement 3.1 Electrical connection ......11 3.2 Grounding Instructions .......12 3.3 Appropriate installation location ..13... -
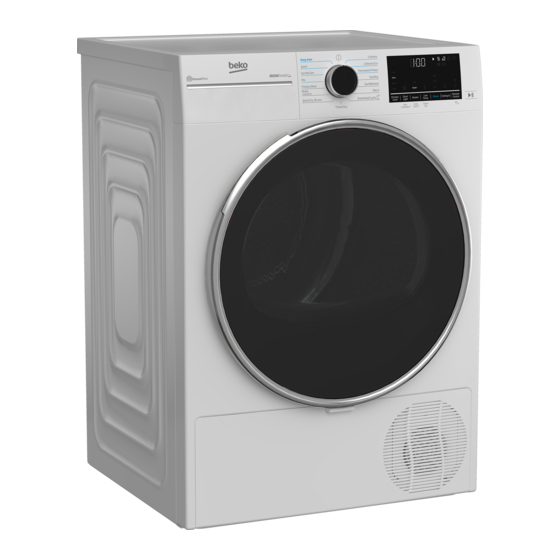
Page 4: Your Dryer
1 Your Dryer 1.1 Overview 1. Top panel 2. Control panel 3. Loading door 4. Kick plate opening tab 5. Ventilation grids 6. Adjustable feet 7. Kick plate 8. Type label 9. Lint filter 10.Power cable Dryer / User Manual 4 / EN... -
Page 5: Technical Specifications
1.2 Technical Specifications Heat Pump Dryer with Model electronic sensor control Height (in) 33 5/16 Width (in) 23 3/4 Depth (in) 27 1/2 Height adjustment of feet (in) Net weight (lbs) Voltage / Frequency 208-240V ~ 60 Hz Connected load 800 W - 4 A 8kg / 18 lb Dry Load Capacity... -
Page 6: Important Safety Instructions
2 Important Safety Instructions WARNING: To reduce the risk of fire or electric shock resulting in serious injury or death when using this appliance, follow the basic precautions including the following: • Read all instructions before using the appliance. Failure to follow these instructions will increase the risk of fire or electric shock and will void the warranty. - Page 7 • This appliance must be grounded. In the event of malfunction or breakdown, grounding will reduce the risk of electric shock by providing a path of least resistance for electric current. This appliance is equipped with a cord having an equipment-grounding conductor and a grounded plug.
- Page 8 • Beko does not recommend the use of fabric softening dryer sheets in our Electric Dryers. The contents of these sheets can clog the units filters, causing reduced air flow and possible damage to the heating system.
- Page 9 WARNING: Never stop the tumble dryer before the end of the drying cycle unless all items are quickly removed and spread out to dissipate heat. • Do not reach into the appliance if the drum is moving. • Do not allow children to play on or in the appliance.Close supervision of children is necessary when the appliance is used near children.
- Page 10 • Do not use replacement parts that have not been recommended by the manufacturer (e.g. parts made at home using a 3D printer). Also R290 is a flammable refrigerant. Therefore ensure that the system and pipes are not damaged during operation and transportation.
-
Page 11: Installation Instructions
3 Installation Instructions WARNING! Risk of fire Power Cable The clothes dryer (“appliance‘) installation must be performed by a qualified installer. Install the appliance according to the manufacturer’s instructions and local codes. Do not install a clothes dryer with flexible plastic venting materials. -
Page 12: Grounding Instructions
To change the cord: 1. Make sure that the dryer is not plugged into any power outlet. DO NOT plug end of dryer power cord into a live receptacle before connecting dryer power cord to Power Cable dryer terminals and closing junction/ splitter box as described below. -
Page 13: Appropriate Installation Location
cm) from top of door having a minimum area The appliance must not be operated of 46 sq. inches (294 cm2). unless it is repaired! There is the risk 3.5 Use on top of a washer of electric shock! • A stacking-kit (Part no: 2974640200) 3.3 Appropriate should be used between washer and... -
Page 14: Connecting To The Drain
3.8 Connecting to the drain In products equipped with condenser unit, water accumulates in the water tank during the drying cycle. Connecting the water drain hose Connect one end of the drain hose supplied with the dryer to the connection point from where you removed the hose of the product in previous step. -
Page 15: Preparation
4 Preparation 4.3 Preparing the laundry to be dried Items such as coins, metal parts, needles, nails, screws, stones etc. Read the “Safety Instructions” first! may damage the drum group of the product or may cause functional operation issues. Therefore check all laundry that will be loaded to the 4.1 Laundry suitable for product. -
Page 16: Correct Load Capacity
• On models with heat pump, check the condenser at least every six months and clean it if it is dirty. • If you are using environment friendly filter, you are not required to clean the filter after every cycle. When the environment friendly icon is lit on the screen, change the filter cloth. -
Page 17: Running The Product
5 Running the product 5.1 Control Panel 1.On/Off/Program Selection button. 2.Start / Stand-by button. 3.Remote control button. 4.End time selection button. 5.Steam level selection button. 6.Low temperature selection button and Time program selection button. 7.Audible warning and child lock selection button. 8.Wrinkle prevention selection button and drum light button.. -
Page 18: Preparation Of Drying Machine
5.3. Preparation of drying machine • Plug the drying machine. • Open the loading door. • Place the laundry to the drying machine without jamming them. • Push and close the loading door. Ensure that no laundry is jammed to the loading door. -
Page 19: Program Selection And Consumption Chart
5.4 Program selection and consumption chart Table of steam functioned cycles Programmes Programme Description 3,3 (6 Is a cycle aimed to reduce the wrinkle pieces) level on shirts and t-shirts using a steam function. This cycle usually 2,2 (3 eliminates the need for ironing for pieces) casual shirts after drying. - Page 20 Table of non-steam functioned cycles It is the programme that you can dry your washed products you want to provide with extra hygiene (baby SaniDry clothes, underwear, towels, etc.). It provides high hygiene for your textiles via heat effect. You can use this programme for your dry clothes and laundry that you SaniRefresh want to provide with hygiene without...
- Page 21 Downloaded Program Use to dry cotton and synthetic medium Bedding bedding sets. Provides drying for up to 2 double bedding sets It provides hygienic drying for your medium Underwear underwear via high temperature. Drying towels such as kitchen towel, medium Towel bath towel and hand towel.
-
Page 22: Auxiliary Functions
supported by the steam function. You can Allergy UK is the trademark of activate this function only prior to the start of a the British Allergy Foundation. program. The program duration will be longer The Seal of Approval has been after it becomes activated. -
Page 23: Warning Indicators
5.6 Warning indicators When the drying machine is operating and the child lock is Warning indicators may vary activated, double beep sound is depending on the model of your heard when the program selector drying machine. switch is turned. If the child lock Filter cleaning is cancelled without turning the program selector button back to... -
Page 24: Cancelling The Program
Adding laundry after the drying If the Wrinkle Prevention mode operation starts may cause the is active and the laundry is not dried laundry inside the drying removed after the program is machine to mix with wet laundry completed, the wrinkle prevention and leave the laundry damp at the function activates for 2 hours to end of operation. -
Page 25: Homewhiz Function
pressing the Start/Hold button. product will be added. You will need to tap on the ‘Steam’ option on Using the remote connection: the screen to be able to activate the steam function in Blend, Jeans, Cotton, Economic Switch the product to Download program Cotton, and Synthetic cycles. -
Page 26: Getting The Homewhiz Application
The remote control is cancelled when the door is opened. The remote control is cancelled when the program button is turned If the Wifi icon is illuminated continuously, it means that it is active and connected to network If the Wifi icon is flashing continuously, it means that it is active and trying to connect to network. -
Page 27: Maintenance And Cleaning
6 Maintenance and cleaning 6.1 Loading Door Inner Surface The hair and fibres that are separated from the laundry during drying process is collected by the Fibre Filter. Fibres are formed during wearing and washing clothes. You can clean the filter slot with a vacuum cleaner. - Page 28 • Clean the front door interior surface and its • Clean both filters under water running in gaskets with a soft damp cloth or with the reverse direction of fibre accumulation brush on air routing cover. or with a soft brush. Dry the filter before placing it back.
-
Page 29: Cleaning The Sensor
6.2 Cleaning the sensor Open the toe board by pulling its button. There are dampness sensors in the dryer that detect whether the laundry is dry or not. To clean the sensors: • Open the loading door of the dryer. •... - Page 30 The cleaning brush is inside the documentation bag. Get your brush from the documentation bag and insert it to its place on the air deflector to store it. Clean the fibre on the metal surface of the condenser with damp cloth or the brush on the air deflector in up - down direction.
- Page 31 When the air deflector cover is removed, it is normal to have water at the plastic section in front of the condenser. If you see fibre accumulation on the fan cover and the toe board, remove with a cloth. Do not have weight on the toe board when it is open.
- Page 32 7 Troubleshooting Drying operation takes too long. Clothes have shrunk, hardened or spoiled. Fibre filter (interior and exterior filter) pores may A program not suitable with the laundry type might be clogged. >>> Wash the fibre filters with warm have been used. >>> Check the maintenance water and dry.
- Page 33 The lighting inside the drying machine turns on. (In models with lamp) If the drying machine is plugged to the power outlet, the On/Off button is pressed and the door is open; the light turns on. >>> Unplug the drying machine or bring the On/Off button to Off position.
- Page 34 Please contact authorized Beko dealier original manufacturing site. Warranty terms for this or visit www.beko.us to locate and Beko household appliance is not valid if the product is get information for the closest authorized altered, tampered, modifed, additional parts Beko service center.
- Page 36 www.beko.us...
Need help?
Do you have a question about the HPD24414W and is the answer not in the manual?
Questions and answers