Table of Contents
Advertisement
Available languages
Available languages
TABLE OF CONTENTS
****************
General Power Tool Safety Warnings .....2-3
Router Safety Warnings ............................. 4
Symbols ..................................................... 5
Electrical .................................................... 6
Features ..................................................... 6
Assembly ................................................... 7
Operation ..............................................7-12
Adjustments ............................................. 13
Maintenance ............................................ 14
Accessories.............................................. 15
Illustrations ..........................................16-19
Parts Ordering and Service ......... Back page
WARNING:
To reduce the risk of injury, the
user must read and understand the
operator's manual before using this
product.
SAVE THIS MANUAL FOR
FUTURE REFERENCE
To register your RIDGID
product, please visit:
register.RIDGIDpower.com
Pour enregistrer votre
produit de RIDGID,
s'il vous plaît la visite :
register.RIDGIDpower.com
Para registrar su producto
de RIDGID, por favor visita:
register.RIDGIDpower.com
TABLE DES MATIÈRES
électriques ..............................................2-3
toupie......................................................... 4
Symboles ................................................... 5
Caractéristiques électriques ...................... 6
Caractéristiques ......................................... 6
Assemblage ............................................... 7
Utilisation .............................................7-13
Réglages ............................................13-14
Entretien ..............................................14-15
Accessoires .............................................. 15
Illustrations ..........................................16-19
Commande de pièces
et dépannage ...........................Page arrière
Pour réduire les risques de blessures,
l'utilisateur doit lire et veiller à bien
comprendre le manuel d'utilisation
avant d'utiliser ce produit.
CONSERVER CE MANUEL
POUR FUTURE RÉFÉRENCE
OPERATOR'S MANUAL
MANUEL D'UTILISATION
MANUAL DEL OPERADOR
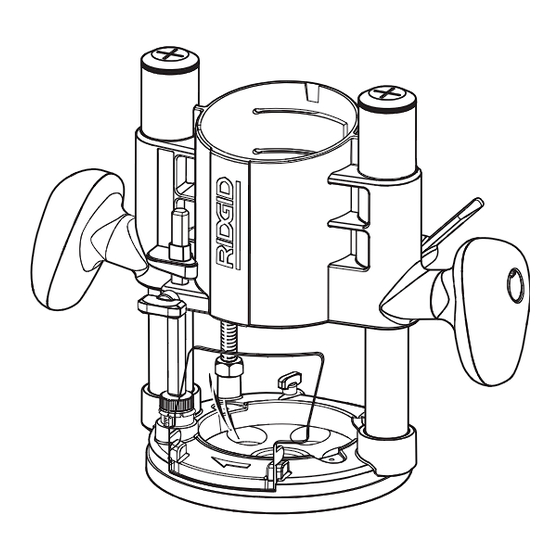
R29303 ROUTER WITH R2901
MOTOR, R2911 FIXED BASE,
AND R29202 PLUNGE BASE
R29303 TOUPIE AVEC R2901 MOTEUR,
R2911 BASE FIXE ET R29202 BASE PLONGÉE
R29303 FRESADORA CON R2901 MOTOR,
R2911 BASE FIJA Y R29202 BASE TIPO ÉMBOLO
****************
ÍNDICE DE CONTENIDO
****************
Advertencias de seguridad para
herramientas eléctrical ........................... 2-3
Advertencias de seguridad fresadora ........4
Símbolos ....................................................5
Aspectos eléctricos ...................................6
Características ...........................................6
Armado ......................................................7
Funcionamiento ................................... 7-13
Ajustes ............................................... 13-14
Mantenimiento ................................... 14-15
Accesorios ...............................................15
Illustraciones ...................................... 16-19
Pedidos de piezas y
servicio .................................. Pág. posterior
ADVERTENCIA:
Para reducir el riesgo de lesiones, el
usuario debe leer y comprender el
manual del operador antes de usar
este producto.
GUARDE ESTE MANUAL
PARA FUTURAS CONSULTAS
Advertisement
Table of Contents

Related Manuals for RIDGID R29303


Summary of Contents for RIDGID R29303
-
Page 1: Table Of Contents
MOTOR, R2911 FIXED BASE, de RIDGID, por favor visita: register.RIDGIDpower.com AND R29202 PLUNGE BASE R29303 TOUPIE AVEC R2901 MOTEUR, R2911 BASE FIXE ET R29202 BASE PLONGÉE R29303 FRESADORA CON R2901 MOTOR, R2911 BASE FIJA Y R29202 BASE TIPO ÉMBOLO TABLE OF CONTENTS TABLE DES MATIÈRES... -
Page 2: General Power Tool Safety Warnings
GENERAL POWER TOOL SAFETY WARNINGS Use personal protective equipment. Always wear eye protection. Protective equipment such as dust mask, WARNING: non-skid safety shoes, hard hat, or hearing protection Read all safety warnings and all instructions. used for appropriate conditions will reduce personal Failure to follow the warnings and instructions may injuries. - Page 3 GENERAL POWER TOOL SAFETY WARNINGS Maintain power tools. Check for misalignment or bind- SERVICE ing of moving parts, breakage of parts and any other Have your power tool serviced by a qualified repair condition that may affect the power tool’s operation. person using only identical replacement parts.
-
Page 4: Router Safety Warnings
ROUTER SAFETY WARNINGS Hold power tool by insulated gripping surfaces, when Inspect tool cords periodically and, if damaged, have performing an operation where the cutting accessory repaired at your nearest authorized service center. may contact hidden wiring or its own cord. Cutting Constantly stay aware of cord location. -
Page 5: Symbols
SYMBOLS The following signal words and meanings are intended to explain the levels of risk associated with this product. SYMBOL SIGNAL MEANING Indicates a hazardous situation, which, if not avoided, will result in death or DANGER: serious injury. Indicates a hazardous situation, which, if not avoided, could result in death or WARNING: serious injury. -
Page 6: Electrical
ELECTRICAL DOUBLE INSULATION round jacketed cords listed by Underwriter’s Laboratories (UL) should be used. Double insulation is a concept in safety in electric power When working outdoors with a tool, use an extension cord tools, which eliminates the need for the usual three-wire that is designed for outside use. -
Page 7: Assembly
ASSEMBLY WARNING: WARNING: Do not use this product if it is not completely Do not attempt to modify this product or create assembled or if any parts appear to be missing or accessories or attachments not recommended damaged. Use of a product that is not properly and for use with this product. - Page 8 OPERATION SWITCHING FROM PLUNGE BASE TO FIXED WARNING: BASE If you are changing a bit immediately after use, be See Figures 1 - 2, pages 16 - 17. careful not to touch the collet nut, bit, or collet with To remove the plunge base: your hands or fingers.
- Page 9 OPERATION SELECTING DEPTH OF CUT Turn the wrench counterclockwise to decrease the depth of cut or clockwise to increase the depth of cut. Proper depth of cut depends on several factors: the horse- NOTE: It should not be possible to make depth adjust- power of the router motor, the type of bit, and the type of ments with the lock lever tightened.
- Page 10 OPERATION To turn the router on, push the switch to the ( I ), or ON Turn the plunge depth stop knob counterclockwise until the scale on the front of the stop reads 1/4 in. position. Return the switch to the ( O ), or OFF position when routing operation is finished.
- Page 11 OPERATION INTERNAL ROUTING Whenever the workpiece thickness together with the desired depth of cut (as adjusted by router depth setting) are such Tilt router and place on workpiece without the bit contact- that only the top part of the edge is to be shaped (leaving ing the workpiece.
- Page 12 OPERATION FEEDING TOO SLOWLY When cutting shallow grooves in soft woods such as pine, a faster rate of feed can be used. When making cuts in See Figure 18, page 19. hardwoods such as oak, a slower rate of feed is required. It is possible to spoil a cut by moving the router forward too Several factors will help you select the proper rate of feed.
-
Page 13: Adjustments
ADJUSTMENTS ADJUSTING LOCK LEVER TENSION ON THE Insert the small end of the centering tool pin into the collet until it touches bottom and tighten the collet securely with FIXED BASE AND PLUNGE BASE ROUTER the wrench provided. See Figure 21, page 19. Release the spindle lock if necessary. -
Page 14: Maintenance
MAINTENANCE Electric tools used on fiberglass material, wallboard, spack- WARNING: ling compounds, or plaster are subject to accelerated wear and possible premature failure because the fiberglass chips Before inspecting, cleaning, or performing any and grindings are highly abrasive to bearings, brushes, maintenance, make sure the switch is in the OFF commutators, etc. -
Page 15: Accessories
NOTE: ILLUSTRATIONS START ON PAGE 16 AFTER FRENCH AND SPANISH LANGUAGE SECTIONS. This product has a 90-Day Satisfaction Guarantee Policy, as well as a Three-year Limited Warranty. For Warranty and Policy details, please go to www.RIDGID.com or call (toll free) 1-866-539-1710. 15 - English... -
Page 16: Règles De Sécurité Relatives Aux Outils Électriques
RÈGLES DE SÉCURITÉ RELATIVES AUX OUTILS ÉLECTRIQUES SÉCURITÉ PERSONNELLE AVERTISSEMENT : Rester attentif, prêter attention au travail et faire Lire tous les avertissements et toutes les preuve de bon sens lors de l’utilisation de tout instructions. Ne pas suivre l’ensemble des outil électrique. - Page 17 RÈGLES DE SÉCURITÉ RELATIVES AUX OUTILS ÉLECTRIQUES Débrancher l’outil et/ou retirer le bloc-piles avant Utiliser l’outil, les accessoires et embouts, etc. d’effectuer des réglages, de changer d’accessoire ou conformément à ces instrutions pour les applications de remiser l’outil. Ces mesures de sécurité préventives pour lesquelles ils sont conçus, en tenant compte des réduisent les risques de démarrage accidentel de l’outil.
-
Page 18: Avertissements De Sécurité Relatifs Au Toupie
AVERTISSEMENTS DE SÉCURITÉ RELATIFS AU TOUPIE Tenir l'outil électrique par ses surfaces de préhension Vérifier l’état des pièces. Avant d’utiliser l’outil de isolées étant donné que le fer peut entrer en contact nouveau examiner soigneusement les pièces et avec le cordon d'alimentation de l'outil. -
Page 19: Symboles
SYMBOLES Les termes de mise en garde suivants et leur signification ont pour but d’expliquer le degré de risques associé à l’utilisation de ce produit. SYMBOLE SIGNAL SIGNIFICATION Indique une situation dangereuse qui, si elle n’est pas évitée, aura pour DANGER : conséquences des blessures graves ou mortelles. -
Page 20: Caractéristiques Électriques
CARACTÉRISTIQUES ÉLECTRIQUES DOUBLE ISOLATION ci-dessous pour déterminer le calibre minimum de fil requis pour un cordon donné. Utiliser exclusivement des cordons à La double isolation est un dispositif de sécurité utilisé sur les gaine cylindrique homologués par Underwriter’s Laboratories outils à moteur électriques, éliminant le besoin de cordon (UL). -
Page 21: Assemblage
ASSEMBLAGE AVERTISSEMENT : AVERTISSEMENT : Ne pas utiliser le produit s’il n’est pas complètement Ne pas essayer de modifier cet outil ou de créer assemblé ou si des pièces semblent manquantes des pièces et accessoires non recommandés. ou endommagées. L’utilisation d’un produit De telles altérations ou modifications sont dont l’assemblage est incorrect ou incomplet considérées comme un usage abusif et peuvent... -
Page 22: Utilisation
UTILISATION INSTALLATION / RETRAIT DES MANDRIN ET Serrer le levier de verrouillage pour assurer la stabilité. DES FER / EMBOUTS Déprimer et tenir la levier de verrouillage de la profondeur. Voir les figures 3 et 4, page 17. ... - Page 23 UTILISATION RÉGLAGE DE LA PROFONDEUR DE COUPE Pour effectuer les réglages au travers de la table : Débrancher la toupie. La profondeur de coupe correcte dépend de plusieurs facteurs : la puissance du moteur de la toupie, le type de fer ...
- Page 24 UTILISATION Avant de régler la profondeur de coupe désirée, utiliser mm (1/16 po) à chaque révolution et il comprend des la barre de butée de profondeur et le bouton de butée de crans (indiqués par une flèche) à tous les 90˚ pour assurer profondeur des coupes en plongée afin d’établir le «...
- Page 25 UTILISATION TOUPILLAGE À MAIN LEVÉE Positionner la règle parallèlement à la ligne de coupe et reporter la distance du bord du fer au bord de la base. Voir la figure 13, page 18. Maintenir la base de la toupie contre la règle et pratiquer Utilisée à...
- Page 26 UTILISATION DIRECTION D’ENGAGEMENT Observer les copeaux produits par la coupe. Si la toupie est déplacée trop lentement, elle brûle le bois. Si la toupie Voir les figures 15 et 16, pages 18 et 19. est déplacée trop vite, elle taille de gros copeaux et laisse Le moteur de la toupie et la fraise tournent en sens horaire.
-
Page 27: Réglages
UTILISATION Une avance trop lente peut également causer la déviation (1/16 po) se brisent facilement lorsqu’ils sont soumis à une de la toupie de la ligne de coupe prévue. Toujours saisir et poussée latérale excessive. Bien qu’un fer de plus grande maintenir fermement la toupie lors du travail. -
Page 28: Entretien
RÉGLAGES Pour installer ou retirer l’adaptateur d’aspiration de la Au besoin, désengager le verrouillage de broche. basefixe : Desserrer le levier de verrouillage. Débrancher la toupie. Régler la profondeur pour que l’extrémité de l’outil de Retirer les vis de fixation de la semelle en les tournant centrage et la sous-base soient à... -
Page 29: Illustrations
Ce produit est accompagné d’une politique de satisfaction de 90 jours et d’une garantie limitée de trois (3) ans. Pour obtenir les détails de la garantie et de la politique, visiter le site www.RIDGID.com ou appeler (sans frais) au 1-866-539-1710. 15 - Français... - Page 30 ADVERTENCIAS DE SEGURIDAD PARA HERRAMIENTAS ELÉCTRICAS Si debe operar una herramienta en lugares húmedos, ADVERTENCIA: use un suministro protegido por un interruptor de circuito con pérdida a tierra (GFCI). El uso de un GFCI Lea todas las advertencias de seguridad reduce el riesgo de descargas eléctricas.
- Page 31 ADVERTENCIAS DE SEGURIDAD PARA HERRAMIENTAS ELÉCTRICAS EMPLEO Y CUIDADO DE LA HERRAMIENTA herramienta. Si está dañada la herramienta eléctrica, permita que la reparen antes de usarla. Numerosos ELÉCTRICA accidentes son causados por herramientas eléctricas No fuerce la herramienta eléctrica. Utilice la mal cuidadas.
- Page 32 ADVERTENCIAS DE SEGURIDAD FRESADORA Sostenga la herramienta eléctrica de las superficies Revise para ver si hay piezas dañadas. Antes de seguir de sujeción aisladas, debido a que la fresa puede utilizando la herramienta, es necesario inspeccionar hacer contacto con su propio cordón. Para cortar una cuidadosamente toda protección o pieza dañada cable cargado cargue las piezas metálicas expuestas de para determinar si funcionará...
- Page 33 SÍMBOLOS Las siguientes palabras de señalización y sus significados tienen el objeto de explicar los niveles de riesgo relacionados con este producto. SÍMBOLO SEÑAL SIGNIFICADO Indica una situación peligrosa, la cual, si no se evita, causará la muerte o PELIGRO: lesiones serias.
- Page 34 ASPECTOS ELÉCTRICOS DOBLE AISLAMIENTO cordón de un calibre insuficiente causa una caída en el voltaje de línea, la cual a su vez produce recalentamiento El doble aislamiento es una característica de seguridad de y pérdida de potencia. Básese en la tabla suministrada las herramientas eléctricas, la cual elimina la necesidad para determinar el grueso mínimo requerido del cordón de de usar el típico cordón eléctrico de tres conductores con...
- Page 35 ARMADO ADVERTENCIA: ADVERTENCIA: No use este producto si no está totalmente No intente modificar este producto ni crear ensamblado o si alguna pieza falta o está dañada. aditamentos o accesorios que no estén El uso de un producto que no está adecuadamente recomendados para usar con este producto.
- Page 36 FUNCIONAMIENTO MONTAJE Y DESMONTAJE DE LOS Afloje la palanca de fijación. PORTAHERRAMIENTAS Y LAS FRESAS Apriete el brazo de fijación para fines de estabilización. Vea las figuras 3 y 4, página 17. Deprima y tenga la palanca corta corriente de profundidad.
- Page 37 FUNCIONAMIENTO SELECCIÓN DE LA PROFUNDIDAD DE Para realizar ajustes a través de la mesa: CORTE Desconecte la fresadora. Afloje la palanca de fijación. La profundidad de corte apropiada depende de varios factores: la potencia del motor de la fresadora, el tipo de ...
- Page 38 FUNCIONAMIENTO Antes de configurar la profundidad de corte deseada, use 90˚ para configuraciones de precisión de 0,40 mm (1/64 la barra limitadora de profundidad y la perilla limitadora de pulg.). Al girar la perilla hacia la izquierda sus cortes serán profundidad tipo émbolo para establecer el “punto cero”...
- Page 39 FUNCIONAMIENTO NOTA: También hay a la disponibilidad guías para cantos para la fresadora. Vea el apartado Accesorios. ADVERTENCIA: Coloque la regla paralela a la línea de corte, tomando en No utilice fresas grandes para fresado a pulso. cuenta la distancia existente entre el filo de corte de la fresa El empleo de fresas grandes para fresar a pulso y el borde de la base de la fresadora.
- Page 40 FUNCIONAMIENTO parte, si la guía se coloca como se muestra en la figura 14 Hay varios factores que le ayudarán a seleccionar la (sobresaliendo del canto de la pieza de trabajo), la fresa no velocidad de avance correcta. efectúa un corte completo, lo cual altera la forma del canto Escoja una velocidad de avance que no aminore la acabado.
- Page 41 FUNCIONAMIENTO PROFUNDIDAD DEL CORTE del sonido del motor. Su zumbido de tono alto sonará más grave y más fuerte al perder velocidad. Además, el esfuerzo Vea las figuras 19 y 20, página 19. para sostener la herramienta aumenta considerablemente. La profundidad de corte es importante porque afecta la velocidad de avance, la cual, a su vez, afecta la perfección AVANCE DEMASIADO LENTO del corte y con la posibilidad de dañar el motor de la...
- Page 42 AJUSTES portaherramientas de 6,35 mm (1/4pulg.) debe retirarse Con la llave suministradas sostenga la tuerca del antes de que se pueda usar el centrador. portaherramientas y mantenga oprimido el seguro del husillo hasta fijarlo en su lugar. Para desmontar la placa de la base de la fresadora: Afloje la tuerca del portaherramientas y retire el centrador.
- Page 43 Este producto tiene una política de satisfacción garantizada de 90 días y una garantía limitada de tres años. Para obtener detalles sobre la garantía y la política de satisfacción garantizada, diríjase a www.RIDGID.com o llame sin cargo al 1-866-539-1710. 15 - Español...
- Page 44 R29303 / R2901 / R2911 / R29202 Fig. 1 A - Chip shield (pare-copeaux, protector contra virutas) B - Slide switch, (commutateur à glissière, interruptor deslizante) C - Variable speed dial (commande vitesse variable, selector giratorio de velocidad) D - Depth indicator slide (glissière de l’indicateur...
- Page 45 Fig. 2 Fig. 4 Fig. 6 A - Collet (écrou collet, tuerca del portaherramientas) B - To loosen (pour desserrer, para aflojar) A - Lock lever (levier de verrouillage, palanca C - To tighten (pour serrer, para apretar) de fijación) D - Spindle lock (verrouillage de broche, seguro B - Adjusting nut (écrou de réglage, tuerca de del husillo)
- Page 46 Fig. 8 Fig. 13 Fig. 10 Fig. 14 A - Depth stop bar (barre de butée de profondeur, barra limitadora de profundidad) A - Variable speed dial (vitesse variable, selector B - Depth stop bar lock knob (bouton de giratorio de velocidad) verrouillage de la barre de butée de B - To decrease speed (pour réduire la vitesse, profondeur, perilla de fijación de la barra...
- Page 47 Fig. 16 Fig. 20 Fig. 23 A - 1st pass (1ère passe, primera pasada) B - 2nd pass (2ème passe, segunda pasada) Fig. 21 A - Guide inside (guide à l’intérieur, guía en el interior) B - Rotation (rotation, giro) C - Guide (guide, guía) D - Thrust (poussée, empuje) E - Feed (engagement, avance)
- Page 48 R2911 FIXED BASE, AND R29202 PLUNGE BASE R29303 TOUPIE AVEC R2901 MOTEUR, R2911 BASE FIXE ET R29202 BASE PLONGÉE R29303 FRESADORA CON R2901 MOTOR, R2911 BASE FIJA Y R29202 BASE TIPO ÉMBOLO Customer Service Information: For parts or service, do not return this product to the store. Contact your nearest RIDGID authorized service center.
Need help?
Do you have a question about the R29303 and is the answer not in the manual?
Questions and answers