Table of Contents
Advertisement
Available languages
Available languages
Quick Links
5 8 . 24 . 0 0 1 . 0 0 0 1
M ay 2 0 2 2
Q S G 1 _ A
EN / D E / FR / I T/ E S
KEEN Ranger PT
Operational Instruction
@ my ke e n c a m e r a
my ke e n c a m e r a
K EEN Fa c e b o o k G ro u p : ht t p s : // w w w. f a c e b o o k . c o m /g ro u p s / ke e n c a m e r a
F o r um : ht t p s : //c o m mu ni t y. re o l i n k . c o m /
@ my ke e n c a m e r a
ke e n c a m e r a . c o m
Advertisement
Table of Contents

Related Manuals for KEEN Ranger PT

Summary of Contents for KEEN Ranger PT
- Page 1 M ay 2 0 2 2 Q S G 1 _ A EN / D E / FR / I T/ E S KEEN Ranger PT Operational Instruction @ my ke e n c a m e r a my ke e n c a m e r a K EEN Fa c e b o o k G ro u p : ht t p s : // w w w.
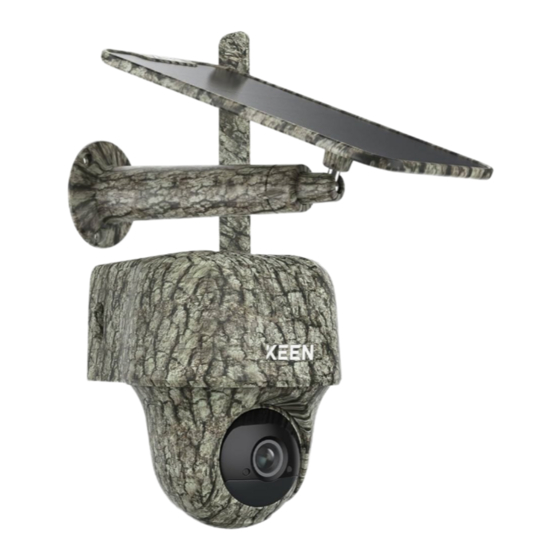
- Page 2 Content What's in the Box What's in the Box Camera Introduction Set up the Camera Charge the Camera Install the Camera Camera Camera Bracket Micro USB Cable Antenna Safety Instructions of Battery Usage Troubleshooting Specifications Notification of Compliance Reset Needle Quick Start Pack of Screws Mounting Guide...
- Page 3 Camera Introduction Set up the Camera Status LED Activate SIM Card for the Camera Lens Nano SIM • Choose a Nano SIM card that supports WCDMA and FDD LTE. Built-in PIR Sensor MicroSD • Some SIM cards have a PIN code. You may use your smartphone to disable the PIN first. Daylight Sensor NOTE: Do not insert the IoT or M2M SIM into your smartphone. Built-in Mic Nano SIM Card Slot Insert the SIM Card...
- Page 4 Register the SIM Card Nano SIM Nano SIM Nano SIM Nano SIM Nano SIM Nano SIM Nano SIM Nano SIM MicroSD MicroSD MicroSD MicroSD MicroSD MicroSD MicroSD MicroSD Nano SIM Nano SIM Nano SIM Nano SIM Nano SIM Nano SIM MicroSD MicroSD MicroSD...
- Page 5 Step 1 Scan to download the Reolink App from the App Store or Google Play store. Devices Cloud KEEN Powered You haven't added any device. Please click the"+"button in the top right corner to add by Reolink Step 2 Turn on the power switch to power on the camera.
- Page 6 Charge the battery with a power adapter. Charge the battery with the “Not registered on the SIM card. (not included) KEEN Solar Panel network. Please activate Camera fails to register to 2. The signal is weak at the (not included if you only purchase the your SIM cardand check the operator network.
- Page 7 Install the Camera Mount the Camera to Wall • For outdoor use, the camera MUST be installed upside Drill holes in accordance with the down for better waterproof mounting hole template and screw performance and better PIR the security mount to the wall. motion sensor’s efficiency.
- Page 8 Mount the Camera to Ceiling Install the Camera with Loop Strap You are allowed to strap the camera to a tree with both the security mount and ceiling bracket. Thread the provided strap to the plate and fasten it to a tree. Next, attach the camera to the plate and you are good to go.
- Page 9 2. Charge the rechargeable battery with a standard and high-quality DC 5V/9V battery If you fail to receive any push notifications power adapter. When the green light is charger or KEEN solar panel. Do not charge the battery with solar panels from any other when motion is detected, try the following on, the battery is fully charged.
- Page 10 If these won’t work, please contact Reolink FCC Compliance Statement or television reception, which can be Correct Disposal of This Product Support. determined by turning the equipment off This device complies with Part 15 of the and on, the user is encouraged to try to FCC Rules.
-
Page 11: Table Of Contents
Überblick camera to factory default settings and take out the inserted SD card before returning. Lieferumfang Terms and Privacy Allgemeine Einführung Use of the product is subject to your agreement to the Kamera-Einrichtung Terms of Service and Privacy Policy at reolink.com. Keep out of reach of children. -
Page 12: Lieferumfang
Lieferumfang Allgemeine Einführung Status-LED Objektiv Eingebauter PIR-Sensor Tageslichtsensor Eingebautes Mikrofon Nano SIM-Kartenslot Kamera Kamerahalterung Micro USB-Kabel Antenne * Drehen Sie das Objektiv der Kamera, um das Reset-Loch und den SD-Kartensteckplatz zu finden. Nano SIM Reset-Loch * Drücken Sie die Reset-Taste mit einem Stift und MicroSD halten Sie für 10 Sekunden zur Wiederherstellung der Werkeinstellungen. -
Page 13: Kamera-Einrichtung
Kamera-Einrichtung SIM-Karte aktivieren Nano SIM Nano SIM Nano SIM Nano SIM Nano SIM Nano SIM Nano SIM Nano SIM Nano SIM Nano SIM Nano SIM Nano SIM MicroSD MicroSD MicroSD MicroSD MicroSD MicroSD • Wählen Sie eine Nano-SIM-Karte aus, die WCDMA und FDD LTE unterstützt. MicroSD MicroSD MicroSD... - Page 14 Schritt 1 Herunterladen Sie Reolink App vom App Store oder Google Play Store. Nano SIM Nano SIM MicroSD MicroSD KEEN Powered by Reolink Legen Sie die SIM-Karte ein und dann Das rote Licht wird nach einigen Schritt 2 Schalten Sie die Kamera ein, um sie mit Strom zu versorgen.
- Page 15 Schritt 3 Öffnen Sie Reolink App, klicken Sie auf d e n „ “ Button, scannen Sie den HINWEIS: Sie können auch in die folgenden Situationen geraten: QR-Code auf der Kamera zum Verknüpfen mit der Kamera und befolgen Sie die Sprachansage Kamera-Status Lösungen...
-
Page 16: Aufladen Der Batterie
2-3 Meter Höhe ermöglicht den größten Erkennungsbereich des PIR-Erkennungsbereich: Laden Sie den Akku mit einem Netzteil auf Laden Sie den Akku mit KEEN Solarpanel 2-10 Meter PIR-Bewegungssensors. (nicht im Lieferumfang). auf (nicht im Lieferumfang enthalten, wenn Sie nur die Kamera kaufen). - Page 17 Installation an der Wand Installation an der Decke Bohren Sie Löcher gemäß der Schablone und schrauben Sie die Halterung an die Wand. Ziehen Sie den Knopf der Sicherheitshalterung und lockern Sie die HINWEIS: Verwenden Sie bei Bedarf Montageplatte, um die beiden Teile zu die im Lieferumfang enthaltenen trennen.
-
Page 18: Wichtige Hinweise Zur Verwendung Der Batterie
Sie die Kamera an dem Einsenblech, so ist es fertig. 1. Bitte laden Sie den Akku mit einem standardmäßigen und hochwertigen DC 5V oder 9V Ladegerät oder KEEN Solarpanel auf und laden Sie den Akku nicht mit einem Solarpanel von anderen Marken auf. -
Page 19: Fehlerbehebung
Fehlerbehebung installiert sind. • Stellen Sie sicher, dass die Kamera mit Allgemeines • Stellen Sie sicher, dass der PIR-Sensor dem Internet verbunden ist. Wenn die Betriebstemperatur: aktiviert ist oder der Zeitplan richtig LED-Anzeige unter dem Kameraobjektiv Die Kamera ist nicht -10°C bis 55°C (14°F bis 131°F) eingerichtet ist und ausgeführt wird. - Page 20 Schutz gegen schädliche Störungen bei Das Gerät wurde schon bewertet und bitte die Rückgabe und Sammelsysteme Endbenutzer-Lizenzvertrag einer häuslichen Installation bieten. Dieses erfüllt die allgemeinen Anforderungen an oder kontaktieren Sie den Händler, bei Durch die Verwendung der in das Gerät erzeugt, verwendet und kann die HF-Exposition.
- Page 21 Contenu Contenu de la boîte Contenu de la boîte Camera Introduction Configurer la caméra Recharger la batterie Guides d’installation Caméra Support Câble Micro USB Antenne Instructions de sécurité sur l’utilisation de batterie de caméra Dépannage Caractéristiques techniques Avis de Conformité Aiguille de Guide de Paquet de vis Gabarit de perçage réinitialisation démarrage rapide des trous de fixation Français...
- Page 22 Camera Introduction Configurer la caméra LED d’état Activer la carte SIM pour la caméra Objectif Nano SIM • Choisir une carte Nano SIM qui prend en charge WCDMA et FDD LTE. Capteur de PIR intégré MicroSD • Certaines cartes SIM ont un code PIN. Vous pouvez d’abord utiliser votre smartphone pour désactiver le code PIN.
- Page 23 Enregistrer la carte SIM Nano SIM Nano SIM Nano SIM Nano SIM Nano SIM Nano SIM Nano SIM Nano SIM MicroSD MicroSD MicroSD MicroSD MicroSD MicroSD MicroSD MicroSD Nano SIM Nano SIM Nano SIM Nano SIM Nano SIM Nano SIM MicroSD MicroSD MicroSD...
- Page 24 Google Play. Devices Cloud You haven't added any device. Please click the"+"button in the top right corner to add KEEN Powered by Reolink Étape 2 Allumez l’interrupteur pour mettre la caméra en marche. Installer la caméra sur un PC (facultatif) Étape 1 Téléchargez et installez le Client Reolink : Allez sur https://reolink.com/fr/ >...
- Page 25 Chargez la batterie avec le panneau 2. Le signal est faible à la réseau. Veuillez activer pas être enregistrée adaptateur secteur (non inclus). solaire KEEN (nécessite un achat séparé). localisation actuelle. Veuillez votre carte SIM et vérifier surle réseau de déplacer la caméra vers un la puissance du signal »...
- Page 26 Guides d’installation Monter la caméra sur le mur • Pour une utilisation en Percez des trous selon le gabarit extérieur, la caméra DOIT être de perçage des trous, puis vissez le installée à l’envers pour une support de sécurité au mur. meilleure étanchéité et une meilleure efficacité du capteur REMARQUE: Utilisez les ancrages de mouvement PIR. pour cloisons sèches inclus dans le paquet si nécessaire.
- Page 27 Monter la camera au plafond Fixez la caméra à un arbre Vous êtes autorisé à attacher la caméra à un arbre avec le support de sécurité et le support de plafond. Enfilez la sangle fournie sur la plaque et fixez-la à un arbre. Ensuite, fixez la caméra à la plaque et c’est parti ! Tirez sur le bouton du sommier de sécurité et dévissez le support pour séparer les deux parties. Install the bracket to the ceiling. Align the camera with the bracket and turn the camera unit clockwise to lock it in position. Français Français...
- Page 28 • Réinitialisez la caméra et réessayez. suivantes: 1. Chargez la batterie rechargeable avec un chargeur de batterie standard et de haute qualité Si cela ne fonctionne pas, veuillez 5V/9V en courant continu ou avec un panneau solaire KEEN. Ne chargez pas la batterie avec des • Assurez-vous que vous avez activé le contacter le support Reolink. panneaux solaires d’autres marques. bouton d’alimentation. • Chargez la batterie avec un adaptateur Impossible de recevoir la 2. Chargez la batterie lorsque les températures sont entre 0°C et 45°C et utilisez toujours la...
- Page 29 • Vérifiez que vous avez activé les notifi- Résistance aux intempéries: de la FCC. Ces limites sont conçues pour L’appareil a été évalué pour répondre aux cations sur votre téléphone. Allez dans les Étanchéité IP64 certifiée fournir une protection raisonnable contre exigences générales d’exposition aux Paramètres système de votre téléphone et Taille: 98 x 112 mm les interférences nuisibles dans une radiofréquences. L’appareil peut être autorisez-le à envoyer des notifications. Poids (batterie incluse): 485g (17.1 oz) installation résidentielle. Cet équipement utilisé sans restriction dans des conditions génère, utilise et peut émettre de l’énergie d’exposition portables. Si cela ne fonctionne pas, veuillez de radiofréquence et, s’il n’est pas installé...
- Page 30 Contenuti détaillant où le produit a été acheté. Ils Contrat de licence d’utilisateur final peuvent prendre ce produit pour un En utilisant le logiciel produit intégré au recyclage sans danger pour l’environnement. produit Reolink, vous acceptez les termes Cosa c’è nella Scatola du présent contrat de licence utilisateur Presentazione della Telecamera final (“CLUF”) entre vous et Reolink. Pour Garantie limitée en savoir plus: https://reolink.com/eula/ Configurare la Telecamera Ce produit est livré avec une garantie limitée de 2 ans. En savoir plus:...
- Page 31 Cosa c’è nella Scatola Presentazione della Telecamera LED di Stato Obiettivo Sensore PIR Incorporato Sensore di Luce Diurna Mic Incorporato Slot per Scheda Nano SIM Telecamera Braccio Cavo di Micro USB Antenna * Ruotare l’obiettivo della telecamera per di Telecamera trovare il foro di ripristino e lo slot per la scheda SD.
- Page 32 Configurare la Telecamera Attivare la Scheda SIM per la Telecamera Nano SIM Nano SIM Nano SIM Nano SIM Nano SIM Nano SIM Nano SIM Nano SIM Nano SIM Nano SIM Nano SIM Nano SIM MicroSD MicroSD MicroSD MicroSD MicroSD MicroSD •...
- Page 33 Passaggio 1: Scansionare per scaricare l’App Reolink dall’App Store o Google Play store. Nano SIM Nano SIM MicroSD MicroSD KEEN Powered by Reolink Con la Scheda SIM inserita, si può Attendi alcuni secondi e una luce rossa Passaggio 2: Accendere l’interruttore di alimentazione per alimentare la telecamera.
- Page 34 Passaggio 3 Avviare l’ App Reolink, cliccare il pulsante “ “ nell’angolo in alto a destra per AVVISO: Si può anche imbattersi nelle seguenti situazioni: aggiungere la telecamera. Scansionare il codice QR sul dispositivo e seguire le istruzioni Indicazione Vocale Stato della Telecamera Solutions per finire la configurazione iniziale.
- Page 35 Caricare la batteria con l’adattatore di Caricare la batteria con il Pannello Solare di rilevamento del sensore di Distanza di Rilevamento PIR: alimentazione (non inclusa). KEEN (Non è inclusa se si compra solo 2-10 Metri movimento. la telecamera). • Per un rilevamento di Indicatore di carica: movimento efficiente, installare...
- Page 36 Montare la Telecamera a Parete Montore la Telecamera al Soffitto Perforare a seconda della dima per fori di montaggio, serrare il Tirez sur le bouton du sommier de braccio di montaggio a parete. sécurité et dévissez le support pour AVVISO: Utilizzare il cartongesso séparer les deux parties. anchor nella confezione quando c’è...
- Page 37 1. Caricare la batteria ricaricabile con un caricatore DC 5V/9V standard e di alta qualità o con il pannello salare KEEN. Non caricare la batteria con il pannello solare di altre marche. 2. Caricare la batteria quando la temperature è tra lo 0°C e i 45°C e farla funzionare sempre quando la temperatura è...
- Page 38 Risoluzioni dei Problemi o che l’orario sia configurato in modo disconnessa dalla rete. Dimensione: 98 x 112 mm corretto e in esecuzione. • Assicurarsi che Consentire Notifiche sia Peso (batteria inclusa): 485g (17.1 oz) • Controllare le impostazioni della attivata nel cellulare. Andare su La telecamera non si accende sensibilità e assicurarsi che sia impostata Impostazioni del Sistema sul cellulare e Notifica di Conformità...
- Page 39 radiofrequenze. Il dispositivo può essere Garantie limitée Contratto di Licenza per l’Utente Finale e può irradiare energia a radiofrequenza e, se non installata e utilizzata secondo utilizzato in condizioni di esposizione Questo prodotto viene fornito con una Utilizzando il software prodotto le istruzioni, può...
- Page 40 Índices Contenido de la Caja Contenido de la Caja Introducción de Cámara Configure la Cámara Carga de Batería Instale la Cámara Cámara Soporte Cable Micro USB Antena Instrucciones de Seguridad para el Uso de Batería de Cámara Solución de Problemas Especificaciones Notificación de Cumplimiento Aguja Guía de Inicio Señal de Plantilla de Montaje de Reinicio Rápido Vigilancia...
- Page 41 Introducción de Cámara Configure la Cámara LED de Estado Active la Tarjeta SIM para la Cámara Objetivo Nano SIM • Seleccione una tarjeta nano SIM que es compatible con WCDMA y FDD LTE. Sensor Incorporado PIR MicroSD • Algunas tarjetas SIM tienen un código PIN. Puede usar su teléfono inteligente para desactivar el PIN primero. Sensor de Luz Solar Micrófono Incorporado NOTA: No inserte la SIM de IoT o M2M en su teléfono inteligente.
- Page 42 Registre Tarjeta SIM Nano SIM Nano SIM Nano SIM Nano SIM Nano SIM Nano SIM Nano SIM Nano SIM MicroSD MicroSD MicroSD MicroSD MicroSD MicroSD MicroSD MicroSD Nano SIM Nano SIM Nano SIM Nano SIM Nano SIM Nano SIM MicroSD MicroSD MicroSD MicroSD...
- Page 43 Paso 1 Escanee para descargar la App Reolink en App Store o Google Play Store. Devices Cloud KEEN Powered You haven't added any device. Please click the"+"button in the top right corner to add by Reolink Paso 2 Encienda el interruptor de encendido/apagado para activar la cámara.
- Page 44 1. Verifique si su tarjeta está activada. Si no, llame a su operador Cargar la batería con un adaptador de Cargar la batería con el Panel Solar KEEN para activar la tarjeta SIM. “No registrada en la red. alimentación (no se incluye).
- Page 45 Instale la Cámara Monte la Cámara en la Pared • Para uso en exteriores, la cámara DEBE instalarse boca Taladre los orificios de acuerdo con abajo para un rendimiento a la plantilla de montaje y atornille el prueba de agua y una mejor soporte de seguridad ala pared. eficiencia del sensor de movimiento PIR.
- Page 46 Monte la Cámara al Techo Adjunte la Cámara a un Árbol Puede atar la cámara a un árbol con el soporte de seguridad y el soporte de techo. Pase la correa proporcionada a la placa y fí jela a un á rbol. A continuació n, coloque la cá mara en la placa y estará...
- Page 47 1. Cargue la batería recargable con un cargador estándar y de alta calidad de DC 5V/9V o de alimentación. Si no funcionan, comuníquese con Panel Solar de KEEN. No cargue la batería con paneles solares de otas marcas. • Cague la batería con un adaptador de Soporte de Reolink.
- Page 48 su dispositivo se desconecta de Internet. Resistencia a la Intemperie: con los límites de un dispositivo digital de radio/TV con experiencia por ayuda. • Asegúrese de haber activado Permitir Resistencia a la intemperie certificada IP64 Clase B, de conformidad con Parte 15 de Notificaciones en su teléfono. Vaya a Tamaño: 98 x 112 mm normas FCC.
- Page 49 usado, utilice los sistemas de Contrato de Licencia de Usuario Final Technical Support If you need any technical help, please visit our official support site and contact our support team before devolución y recolección o comuníquese returning the products https://support.reolink.com Al utilizar el Software del producto que con el vendedor donde compró...
Need help?
Do you have a question about the Ranger PT and is the answer not in the manual?
Questions and answers