Table of Contents
Advertisement
Available languages
Available languages
Quick Links
Designed and Manufactured 100% in Italy
ITA
MANUALE DI ISTRUZIONI
Montaggio, Utilizzo & Manutenzione
INSTRUCTIONS MANUAL
ENG
Assembly, Operation & Maintenance
Istruzioni Originali / Translate of Original Instructions
Modello / Model: SPEEDY T 2022
Codice / Code: 1060010|1060011
Data / Date: 05082022
DOC0116 A01
Chiossi e Cavazzuti s.r.l.
Via Costituzione 50/D 42015 Correggio (RE) Italy
Tel: +39 0522 637224 Email: cc@chiossiecavazzuti.com
www.chiossiecavazzuti.com
Advertisement
Table of Contents

Related Manuals for CHIOSSI E CAVAZZUTI SPEEDY T 2022

Summary of Contents for CHIOSSI E CAVAZZUTI SPEEDY T 2022
- Page 1 MANUALE DI ISTRUZIONI Montaggio, Utilizzo & Manutenzione INSTRUCTIONS MANUAL Assembly, Operation & Maintenance Istruzioni Originali / Translate of Original Instructions Modello / Model: SPEEDY T 2022 Codice / Code: 1060010|1060011 Data / Date: 05082022 DOC0116 A01 Chiossi e Cavazzuti s.r.l.
- Page 2 INDICE / INDEX Manuale di Istruzioni: Montaggio, Uso e Manutenzione Instruction Manual: Assembly, Usage and Maintenance Introduzione / Introduction Regolazione delle palette Regulate the blades Certificazione CE CE Certification Manutenzione Maintenance Sicurezza Schema elettrico Safety Electric schematic Condizioni della macchina Schema pneumatico Machine condition Garanzia...
-
Page 3: Introduzione / Introduction
Chiossi e Cavazzuti srl reserves the right to modify the products and change their specifications at any time. It is prohibited without prior authorization from Chiossi e Cavazzuti srl to copy, modify, alter, publish, distribute, sell or transfer this material. All rights reserved. -
Page 4: Dichiarazione Di Conformità Ce
DICHIARAZIONE DI CONFORMITÀ CE DICHIARAZIONE DI CONFORMITÀ CE La ditta costruttrice: Chiossi e Cavazzuti s.r.l. Via Costituzione 50/D 42015 Correggio (RE) Italia Dichiara che la macchina: Matricola n°: ............Anno di fabbricazione: ............Denominazione commerciale: “SPEEDY T 2022” Codice:... -
Page 5: Declaration Of Conformity (Ce)
DECLARATION OF CONFORMITY CE DECLARATION OF CONFORMITY CE The manufacturer: Chiossi e Cavazzuti s.r.l. Via Costituzione 50/D 42015 Correggio (RE) ITALY Declares that the machine: Serial No............Manufacturing Year: ............Trade name: “SPEEDY T 2022” Code No. [ ]1060010 [ ]1060011... -
Page 6: Avvertenze Generali
SICUREZZA AVVERTENZE GENERALI L‘Operatore deve leggere con molta attenzione le informazioni riportate nel presente Manuale, con particolare riguardo alle opportune precauzioni per la sicurezza elencate in questo capitolo. E‘ indispensabile che l’Operatore segua le avvertenze di seguito elencate: mantenere Ia macchina e la zona di Iavoro in ordine e pulita;... -
Page 7: General Notices
SAFETY GENERAL NOTICES The Operator must read carefully and fully understand all the information given in this Manual and especially all the safety precautions given in this section. Keep the machine and its work area clean and tidy. Do not remove or alter the plates and stickers attached to the machine by the Manufacturer. -
Page 8: Condizioni Ambientali
CONDIZIONI DELLA MACCHINA CONDIZIONI AMBIENTALI La Macchina non richiede particolari condizioni ambientali. Deve essere installata all’interno di un edifcio industriale illuminato, aerato e provvisto di pavimento solido e livellato. Temperature ammesse da 5° a 40° C, con umidità non superiore al 50% a 40° C oppure, non superiore al 90% a 20°... -
Page 9: Machine Condition
MACHINE CONDITION ENVIRONMENTAL CONDITIONS The machine does not need any special environmental conditions. It should be installed in a well lighted and ventilated factory building with a level floor designed to handle the weight of the machine (90kg) . Working area temperature range: 5° 40° C, with humidity not above 50% at 40°C or not above 90% at 20°... -
Page 10: Certificato Di Garanzia
TEL / EMAIL: ......................Indirizzo dove spedire il certificato di garanzia: Chiossi e Cavazzuti S.r.l. : Via Costituzione 50/D ‐ 42015 Correggio (RE) ‐ Italia Tel: +39 0522 637224 ‐ Fax: +39 0522 631180 ‐ Email: cc@chiossiecavazzuti.com RICHIESTA DI ASSISTENZA In caso di manlfunzionamento o guasto, fermare immediatamente il macchinario e disconnetterlo dalla alimentazione. -
Page 11: Warranty Certificate
TEL / EMAIL: ......................The address to which the warranty certificate should be sent: Chiossi e Cavazzuti S.r.l. : Via Costituzione 50/D ‐ 42015 Correggio (RE) ‐ ITALY Tel: +39 0522 637224 ‐ Fax: +39 0522 631180 ‐ Email: cc@chiossiecavazzuti.com ASSISTANCE REQUEST In the event of malfunction or failure, stop the machine immediately and disconnect it from the power supply. -
Page 12: Dati Tecnici
CARATTERISTICHE CARATTERISTICHE Indispensabile per velocizzare e uniformare la piegatura delle maglie. Adattabile a tutti i formati e taglie in commercio. Le palette, facilmente regolabili e intercambiabili, consentono di adattare la piega alla misura desiderata in pochi istanti, permettendo di piegare sia gli indumenti da bambino che i formati extra large. -
Page 13: Technical Data
FEATURES FEATURES Speedy T is indispensable for fast and uniform folding of the Tshirts. Can be adapted to suit all shapes and sizes available on the market. The blades, which can be easily adjusted and are interchangeable, make it possible to suit the fold to the required size in a few seconds, so that it is possible to fold baby tshirts as well as extra large sizes. -
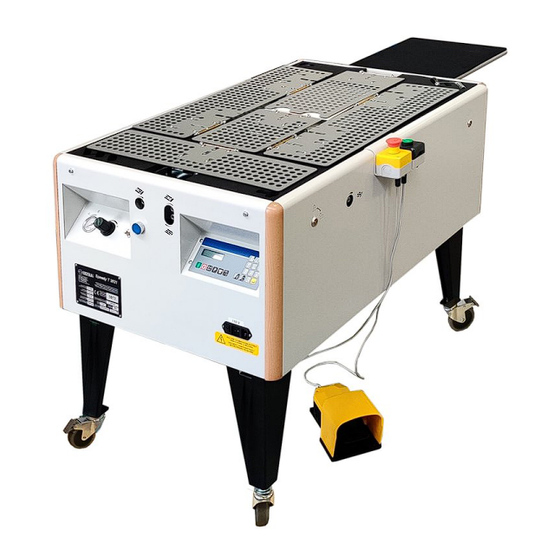
Page 14: Identificazione Delle Parti
IDENTIFICAZIONE DELLE PARTI PRINCIPIO DI FUNZIONAMENTO La piegatrice Speedy T è costituita da un tavolo dotato di palette mobili, azionate ad aria compressa, che consentono di piegare e preparare all’imbusto capi di tessuto (tipo tshirt) precedentemente distesi manualmente sul piano della macchina. Il dispositivo impilatore consente di immagazzinare una pila alta 200mm di capi piegati. -
Page 15: Parts Identification
PARTS IDENTIFICATION HOW THE MACHINE WORKS The Speedy T folding machine comprises a work top with mobile airoperated blades used to fold and prepare fabric garments for packing. The garment will be spread by hand on the work table. The stacker will hold a 200mm high stack of folded Tshirts. -
Page 16: Controlli Preliminari
MOVIMENTAZIONE IMBALLAGGIO E SPEDIZIONE Il trasporto deve essere effettuato da personale professionalmente qualifcato. La Macchina deve essere trasportata in modo tale da evitare qualsiasi danno alle parti. In relazione al tipo di trasporto, occorre proteggere la Macchina da tutti gli urti e sollecitazioni possibili. La macchina viene fornita su un pallet che ne permette la movimentazione tramite un carrello elevatore o un transpallet. -
Page 17: Packing And Shipping
HANDLING PACKING AND SHIPPING Transport must be done by professionally qualified personnel. The machine must be transported to prevent any damage to its parts. Depending on the type of transport vehicle, the machine must be protected against any type of impact or strain. The machine is delivered on a pallet and can then be moved with a forklift truck or transpallet. -
Page 18: Installazione
INSTALLAZIONE IMPILATORE E’ indispensabile sollevare il piano impilatore e incastrare l’archetto di sostegno nell’apposita sede. PEDALE START 1 Occorre togliere dall’interno della macchina il pedale e pulsante di Start e Stop. 2 E’ possibile agganciare il pulsante di Start e Stop in qualsiasi lato della macchina 3... -
Page 19: Installation
INSTALLATION STACKER The platform must be raised and the support bow should be snapped into its seating. FOOT PEDAL 1 Remove the foot pedal and Start and Stop button from inside the machine 2 The Start and Stop button can be attached on every side of the machine. -
Page 20: Collegamento Elettrico
COLLEGAMENTO ELETTRICO COLLEGAMENTO ELETTRICO 220V / 110V L’allacciamento elettrico della Macchina è realizzato a cura e responsabilità del Cliente. Il collegamento alla linea elettrica va effettuato tramite il cavetto in dotazione riposto all'interno della macchina. La Macchina può essere alimentata a con tensioni da 80 a 240V monofase. -
Page 21: Compressed Air Connection
ELECTRIC AND AIR CONNECTION ELECTRIC CONNECTION 220V / 110V The electric hook up is customer’s responsibility. The machine must be connected using the cable supplied in the installation kit, located inside the machine. The machine can be supplied with voltage in the range 80 240V. -
Page 22: Cambiare La Lingua
AVVIO E REGOLAZIONE CAMBIARE LA LINGUA Per accedere ai parametri sotterranei di difficile accesso del PLC (paragrafo 2.1.12 pag.4 manuale strumento elettronico) e modificare la lingua seguire la seguente procedura. Premendo consecutivamenti i tasti (invio) e (1) sul display apparirà: ‘... -
Page 23: Start Up And Adjustments
START UP AND ADJUSTMENTS CHANGE THE LANGUAGE To enter the embedded parameters not easily accessed (parag. 2.1.12 pag.4 electronic controller manual) and change the language follow this steps. Press consecutively the key (enter) and (1) the display will show: ‘ CODE ***** ‘ The cursor will flash under the first asterisk. - Page 24 AVVIO E REGOLAZIONE REGOLAZIONI Essendo la Macchina collaudata nella sede del Costruttore prima della spedizione, non è necessario procedere ad effettuare alcuna regolazione. Al primo avviamento della Macchina, è comunque indispensabile regolare la pressione di alimentazione aria agendo nel seguente modo: sollevare la manopola del regolatore di pressione per sbloccare il dispositivo.
- Page 25 START UP AND ADJUSTMENTS REGULATING THE MACHINE The machine is fully factory tested before being shipped and therefore no regulations need to be made. When the machine is started for the first time, the compressed air pressure should be adjusted as follows: Pull the air pressure regulating knob up to release it.
-
Page 26: Utilizzo Della Macchina
UTILIZZO DELLA MACCHINA FUNZIONAMENTO Si distende il capo da piegare col dorso in alto e il collo verso l’impilatore sul piano della macchina. Si preme il pedale Start, il pulsante verde sulla tastiera remotata o il tasto 1 sul pannello, la macchina esegue il ciclo di piegatura (programma) selezionato e si ferma. -
Page 27: Operate The Machine
OPERATE THE MACHINE OPERATE THE MACHINE The garment to be folded is spread on the work table with the back up and the neck towards the stacker. Pressing the Start pedal or green button on the remote keyboard or Start on the panel, the machine will execute the active folding cycle (from now on called “program”) and will then stop. - Page 28 UTILIZZO DELLA MACCHINA ARRESTO DI EMERGENZA E PULSANTE DI RESET Per arrestare in qualsiasi momento la macchina e togliere pressione alle palette, schiacciare il pulsante rosso di emergenza. Sul display comparirà la scritta: "A04: PULSANTE STOP PREMUTO" Nessun comando del pannello di controllo verrà eseguito finchè il pulsante di emergenza non viene riportato in posizione originale.
- Page 29 OPERATE THE MACHINE EMERGENCY STOP AND RESET BUTTON To stop the machine at any time and remove pressure from the blades, press the red emergency button. The display will show: "A04: STOP BUTTON PRESSED" No control panel commands will be executed until the emergency button is restored. By performing a semirotation anticlockwise on the emergency button, it will be raised and restored.
- Page 30 UTILIZZO DELLA MACCHINA MODIFICARE UN PROGRAMMA DI PIEGA E' possibile modificare i programmi di piega preimpostati. E' consigliata la modifica del programma "Libero" n°9 in quanto è la copia esatta del programma di piega n°8 "Impilatore normale". In ogni caso tutti i programmi sono modificabili a piacimento.
- Page 31 OPERATE THE MACHINE MODIFY A FOLDING PROGRAM It is possible to modify the preset folding programs. It is recommended to modify the "Free" n°9 as it is the exact copy of the folding program n°8 "Normal stacker". In any case, all programs can be modified. ...
- Page 32 UTILIZZO DELLA MACCHINA IMBUSTO ROVESCIATO Questa modalità si utilizza soprattutto su macchine senza impilatore che vengono abbinate a una macchina imbustatrice. In pratica il programma funziona esattamente come nel modo impilatore, ma il ribaltamento avviene su un qualsiasi altro piano o dispositivo posto in luogo dell‘impilatore. Questo programma non figura tra quelli standard, ma deve essere creato appositamente.
- Page 33 OPERATE THE MACHINE TIPPING MODE This mode is used particularly on machines without stackers combined with a bagging machine. In practice, the program works exactly like stacker mode but tipping will be onto any work table or packaging machine that will replace the stacker. This is not a standard program and must be asdjusted separetely.
- Page 34 UTILIZZO DELLA MACCHINA SCELTA DEL NUMERO DI PEZZI DA PRODURRE Premendo il tasto sul display apparirà: ' PROG:X n YYYY ' ' MIN 0 MAX 9999 ' X = numero del programma attivo YYYY = numero di pezzi da produrre Il cursore sarà...
-
Page 35: Counter Reset
OPERATE THE MACHINE SELECTING THE NUMBER OF ITEMS TO BE PRODUCED By pressing the key the display will show: 'PROG: X n YYYY' 'MIN 0 MAX 9999' X = number of the active program YYYY = number of pieces to be produced The cursor will be lit under the YYYY value and with the appropriate keys it is possible to modify the previous set point. - Page 36 PROGRAMMI DI PIEGA PROGRAMMA DI PIEGA N°0 FOLD SEQUENCE N°0 Nome: IMBUSTO CORTO Name: SHORT BAGGING Vengono piegati i due lati e il centro. Si utilizza per capi Used for small or sleeveless garments or medium weight piccoli o anche senza maniche, oppure sui capi di medio articles (fleece sweaters or pullovers) using large bags peso (felpe o pullover) che utilizzano buste grandi e dove and where sleeves, if any, are hand folded.
- Page 37 FOLDING PROGRAMS PROGRAMMA DI PIEGA N°2 FOLD SEQUENCE N°2 Nome: IMBUSTO STRETTO Name: NARROW BAGGING Rispetto al programma “0” viene aggiunta una piega sul In addition to the folds in program “0”, it adds a bottom fondo. Si utilizza per capi lunghi o per buste corte. fold.
- Page 38 PROGRAMMI DI PIEGA PROGRAMMA DI PIEGA N°4 FOLD SEQUENCE N°4 Nome: IMBUSTO MANICA LUNGA Name: LONG SLEEVE BAGGING Rispetto al programma “3” viene aggiunta una terza In addition to the folds in program “3”, this adds a third piega sul lato sinistro. Si utilizza se, in un capo a manica fold on the left side.
- Page 39 FOLDING PROGRAMS PROGRAMMA DI PIEGA N°6 FOLD SEQUENCE N°6 Nome: IMPILATORE LARGO Name: WIDE STACKER Rispetto al programma “5” viene aggiunta una seconda In addition to the fold in program “5”, this adds a second piega sul lato. Si utilizza se una manica sporge dalla fold on the side.
- Page 40 PROGRAMMI DI PIEGA PROGRAMMA DI PIEGA N°8 FOLD SEQUENCE N°8 Nome: IMPILATORE NORMALE Name: NORMAL STACKER E’ la somma dei programmi 6” e “7”. This combine programs “6 and 7”. E’ il programma più utilizzato per piegare e imbustare T This is the program most used to fold shortsleeved T...
- Page 41 POSIZIONARE L’INDUMENTO / POSITION OF THE GARMENT POSITION OF THE GARMENT POSIZIONE DEL CAPO DA PIEGARE Some basic rules for placing the garment on the work table must be followed to guarantee Per ottenere un buon risultato di piega occorre good folding results.
- Page 42 REGOLAZIONE DELLE PALETTE REGOLAZIONE PALETTE Sostituendo le palette occorre regolare la loro posizione di conseguenza. Questa macchina permette un‘ampia possibilità di regolazione che consente di utilizzare palette di formati molto diversi. La regolazione delle palette si effettua avvitando o svitando le viti di registro che affiorano dai fori sulle pareti anteriore e destra.
- Page 43 REGULATE THE BLADES REGULATE THE BLADES When blades are changed, their position will have to be adjusted as needed. The machine is designed to facilitate a wide range of regulations so that different format blades can be used. Blades are regulated by screwing the adjusting screws in holes on the front and right panels in or out.
-
Page 44: Manutenzione
MANUTENZIONE ARRESTO DELLA MACCHINA 1) Portare a “0” l’interruttore di linea. Questa operazione scarica anche l’aria dai cilindri pneumatici. 2) Arresto di emergenza ferma immediatamente la macchina e scarica l’aria presente nei cilindri. Si aziona premendo l’apposito pulsante a fungo rosso che é posto sull’asta che sale dal pedale “START”. -
Page 45: Special Precautions
MAINTENANCE STOPPING THE MACHINE 1) Turn the power supply switch to “0” (OFF). This will also discharge the air from the pneumatic cylinders. 2) Emergency Stop. This will shut down the machine immediately and discharges the air from the pneumatic cylinders. The fact that the emergency button is on the control console ensures that it is always within easy reach of the operator, whatever work position is adopted. - Page 46 MANUTENZIONE MANUTENZIONE ORDINARIA: ROUTINE MAINTENANCE: SCARICO DELLA CONDENSA CONDENSATION DISCHARGE Eseguire settimanalmente lo scarico dell'acqua Every week drain the water that may have che può essersi raccolta nel sistema collected in the pneumatic system. The pneumatico. L'operazione varia in caso sia operation varies if there is a tap on the air line presente un rubinetto sulla linea dell'aria a upstream of the machine.
-
Page 47: Manutenzione Straordinaria
MANUTENZIONE MANUTENZIONE STRAORDINARIA SOSTITUZIONE DI UNA ELETTROVALVOLA Togliere presa di corrente e tubo dell’aria compressa. Togliere le 2 viti di fermo del pannello comandi e aprire il pannello. Individuare l’elettrovalvola difettosa attraverso il numero del cavo che vi è collegato, togliere i tubi aria e il connettore elettrico, togliere le viti di fissaggio e effettuare la sostituzione assicurandosi del corretto posizionamenti delle guarnizioni. -
Page 48: Extraordinary Maintenance
MAINTENANCE EXTRAORDINARY MAINTENANCE CHANGE A SOLENOID VALVE Unplug the machine from the power socket and disconnect the compressed air hose. Remove the two screws retaining the control panel and open the panel. Find the defective solenoid by means of the wire it is connected to. Detach the air hoses and the electric connector, remove its retainer screws and change the solenoid. -
Page 49: Schema Elettrico
SCHEMA ELETTRICO... -
Page 50: Schema Pneumatico
SCHEMA PNEUMATICO... -
Page 51: Technical Drawing
TECHNICAL DRAWING... - Page 52 TECHNICAL DRAWING...
Need help?
Do you have a question about the SPEEDY T 2022 and is the answer not in the manual?
Questions and answers