Grid Porsche 911 GT3 Cup Instruction Manual
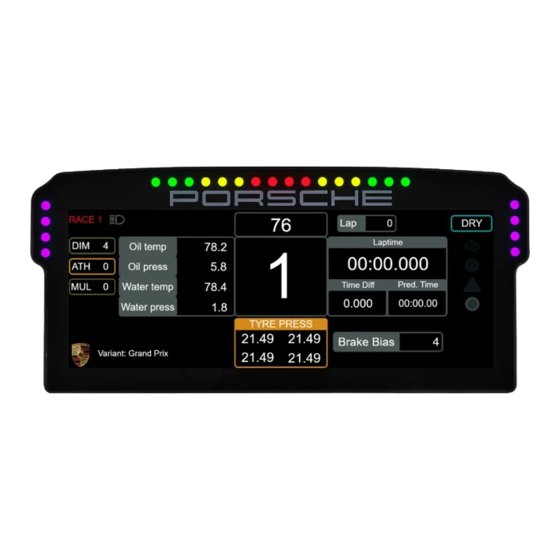
Dashboard display unit
Hide thumbs
Also See for Porsche 911 GT3 Cup:
- Instruction manual (17 pages) ,
- Instruction manual (5 pages)

Related Manuals for Grid Porsche 911 GT3 Cup


Summary of Contents for Grid Porsche 911 GT3 Cup
- Page 1 INSTRUCTION MANUAL PORSCHE 911 GT3 CUP DASHBOARD DISPLAY UNIT VERSION 1.2 Last updated: 13-04-2023...
-
Page 2: Before You Start
BEFORE YOU START: Thank you for your purchase. In this manual we will provide you with the means to get started using your new dash! Porsche 911 GT3 Cup Dashboard Display Unit Features: 10.3” 1920x720 LCD Contrast ratio 1000:1 60 FPS... - Page 3 Mounting the dash To be able to mount the dash on the hardware of your choice, we provide several mounting brackets. Which ones you have received may depend on your purchase and may be different from the following ones we show. However, mounting is all more of the same.
- Page 4 OSW/SC/VRS Replace the existing upper bolts which hold the motor in place with the countersunk ones included (A8). Use these bolts, including existing washers and locknuts to fix the mounting bracket to the front mount.
- Page 5 Fanatec DD1/DD2 Locate the accessory mounting holes on your Fanatec hardware and use the two bolts (A9) from our supplied hardware kit.
- Page 6 Preparation This dash isn’t just any dash, it’s an actual monitor! That means running a dashboard on it almost couldn’t be easier and is almost literally, plug and play. Just be sure to ‘extend’ from your desktop. Press ‘windows-key’+p and press ‘Extend’, now you can use the dash as a monitor.
- Page 7 Installation Unzip the downloaded file ‘RaceDirector.zip’ and extract the folder to a location of your choice, run the installer to start the installation. If you encounter a Windows Defender/Smart Control screen warning you of only software of trusted sources, please press ‘Run anyway’. This warning will dissapear when more and more people startbusing Race Director and the software has been proven safe for use.
- Page 8 Specify the location where to install the software: Press ‘Next’. Make sure all options are checked: Press ‘Install’.
- Page 9 Race DIrector will be installed: Press ‘Finish’.
- Page 10 In this case we tick the box for the ‘Porsche 911 GT3 Cup Display Unit’ (2). The ‘device icon’ (3) is activated now and once we press it, the device page will be shown.
- Page 11 Flashing for Race Director Out of the box our current products are ready for use with SimHub, since Race Director is in early stages of development. To switch your device working with Race Director instead of Simhub, we have added a method of adjusting the firmware of your device to allow for this.
- Page 12 Flash device A quick look at the first page of this menu gives the user the choice to flash a device for use with either Race Director or Simhub. The top option, ‘Used COM port’ (1) indentifies which device to flash. If only 1 Arduino based device with a specific ID has been connected, Race Director will automatically select that port.
- Page 13 You will be prompted to make sure you don’t accidentally have selected the wrong option or COM port. Make sure to double check the selected COM port and firmware. In case this all checks out, press ‘Yes’ (4) The flashing is taking place when you see this screen. Please follow the instructions on screen and simply wait for the process to finish.
-
Page 14: Configuration And Settings
Configuration and settings Almost all of the options found here speak for themselves, though for the sake of being complete, we will go over them on by one. For more detailed information about the functioanlity we offer within Race Director, please read the Race Director manual. - Page 15 - ‘Test LEDs’ (4) This opens up a pop-up window where you use test input to see what the LEDs do using the currently loaded profile. - ‘Select dash’ (5) This allows you to select a standard dash for a given car. We do not support all cars in every sim.
- Page 16 - ‘Next page’ (11) Cycle to the next page of the loaded dash. Select a controller of your choice, press ‘Select button’ and you have about 10 seconds to press the button you want to use. - ‘Previous page’ (12) Cycle to the previous page of the loaded dash, works like described above.
- Page 17 Inputs and indicators Since this dash is a bit more involved than our usual products, we will show the layouts for the input and indicator sections of the dash. Bottom - Inputs HDMI-IN DC-POWER Side - Indicator LEDs IR-SENSOR POWER-LED...
-
Page 18: Bill Of Materials
Bill of materials Bill of materials IN THE BOX Part QTY Note Porsche 911 GT3 Cup DDU USB B cable HDMI cable Remote control DC power supply Bracket Fanatec DD1/DD2 Bracket OSW/SC/VRS Bolt M8 X 50 DIN 7991 Bolt M6 X 12 DIN 7991 Used with Fanatec.
Need help?
Do you have a question about the Porsche 911 GT3 Cup and is the answer not in the manual?
Questions and answers