MAXHUB UC M40 User Manual
Hide thumbs
Also See for UC M40:
- User manual (2 pages) ,
- User manual (61 pages) ,
- User manual (12 pages)
Advertisement
Quick Links
Advertisement

Related Manuals for MAXHUB UC M40


Summary of Contents for MAXHUB UC M40
- Page 1 MAXHUB UC M40 User Manual...
-
Page 2: Table Of Contents
TABLE OF CONTENTS 1. Safety Warnings ..................02 2. Product Images..................03 3. How to Connect ..................04 4. Hardware Mode ..................05 5. Pro Mode ....................07 6. Quick Start Guide - PanoCam Studio ............09... -
Page 3: Safety Warnings
1. Safety Warnings Before using this device, please carefully read and observe the following precautions to avoid dangerous or improper operations. Working Environment ① DO NOT expose the camera to any heat source (such as electric heaters). ② Use it in an environment with ambient temperature of 0~40 °C and humidity of 10%–90% RH. ③... -
Page 4: Product Images
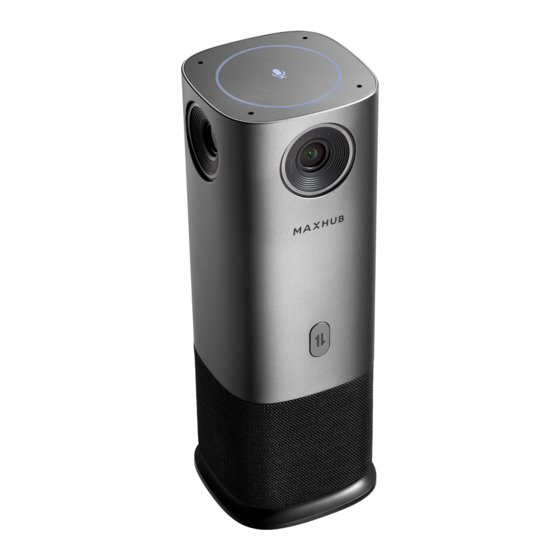
2. Product Images 1. Packaging content MAXHUB UC M40 User Manual UC M40 Power Adaptor (12 V/1 A) UC M40 User Manual USB 2.0 Cable (Type-A to Type-C) 1.5 meter 2. Appearance... -
Page 5: How To Connect
Camera Mode Switch USB Type-C Loudspeaker DC Port Indicator Light Touch Button Microphone 3. How to Connect Please connect the device according to the following figure before use. Adapter... -
Page 6: Hardware Mode
② Launch video platforms such as Google Meet, Zoom, or Microsoft Teams, and select MAXHUB UC M40 as the main camera source. ③ Select UC M40 as the main speaker and microphone source in your video platform and start your video meeting. Volume can be adjusted from your computer directly. - Page 7 Mode switch button Adapter Mode 5: Split mode Mode 1: Panoramic mode Mode 3: Grid mode Mode 6: AI Speaker Tracking (Dual) mode Mode 7: Al Speaker Tracking (Pano) mode Mode 4 Portrait mode Mode 2: Compose mode ⑤ Touch to mute/unmute the microphone;...
-
Page 8: Pro Mode
⑥ Device power off. *Note: Some video conferencing platforms require that you select MAXHUB UC M40 camera and microphone. 5. Pro Mode In the Pro Mode, you have access to additional AI features that are enhanced by the PanoCam software. - Page 9 B. Choose Angle Adjustment: FOV-Top: Vertical+ 45° Up/ -15°Down FOV-Center: Vertical± 30° FOV-Down: Vertical+ 20° Up/ -40°down A. Select the Display Layout to output. C. Turn Image mirror/Auto D. Select the required video effect; detect/Auto tracking on/off. Or customize the parameters in custom mode. Compose Mode Manual Mode Body-Fit Mode...
-
Page 10: Quick Start Guide - Panocam Studio
④ Launch video platforms such as Google Meet, Zoom, or Microsoft Teams, and select Studio Camera as the main camera source. ⑥ Select UC M40 as the main speaker and microphone source in your video platform and start your video meeting. Volume can be adjusted from your computer directly. - Page 11 ④ Click Finish to complete the installation. Instructions on Using PanoCam Studio ① Connect the USB Panoramic Camera Connect the camera to a computer or an IFP via USB. Run the PanoCAM Studio App on the computer or the IFP (with PC); the PanoCAM Studio App automatically searches for and connects the camera. If it didn’t work, click the “Try Again”...
- Page 12 Note: If the connections still fails, check to see if the camera is connected to the computer or the IFP, and if the camera is being used by other applications. ② Turn on face tracking Select the virtual “Studio Camera” for video conferencing—face tracking is automatically launched. At this point, the PanoCam Studio box shrinks to a minimum size.
- Page 13 Move the mouse over the selected area and right click to open a drop-down menu with 3 options as follows: Auto tracking: Automatically track the selected box. After selecting, the box turns blue. Pin: Fix the selected area so that it cannot be replaced by any other box. When selected, a Pin tag appears in the box.
- Page 14 • Image mirror When the image mirror is turned on, the output image from the studio Camera is mirror-inverted. • Tracking modes Compose Grid mode Presentation mode Speaker mode Manual mode Body-fit mode mode (1) Compose mode Also known as the conference mode. The output screen presents a panoramic view at the top and close- up boxes of the person being tracked or manually selected boxes at the bottom, with a maximum of 8 close-up boxes.
- Page 15 Output image: (2) Manual mode In the manual mode, the output screen shows the area of manual box selection, which can be resized by manually adjusting the box. Note: Face tracking is not available in manual mode. Output image: (3) Body-fit mode In the body-fit mode, the camera attempts to fit as much of the persons being tracked as possible on the screen.
- Page 16 Output image: (4) Grid mode Also known as the group discussion mode, recommended for 1–4 participants. Each person being tracked or each manually selected area, is in a separate close-up box, with up to four close-up boxes Note: a. When no person is detected and there is no manual box selected, the output screen shows the default icons.
- Page 17 (5) Presentation mode In the presentation mode, the output is a combo box, with the manually selected yellow box (for displaying content) at the top and the persons detected at the bottom right. Note: When no person is detected and there is no manual box selected, the output screen shows the area within the yellow box.
- Page 18 Output image: (7) Discussion mode In the discussion mode, the output screen presents 180° views both at the top and the bottom. Output image:...
Need help?
Do you have a question about the UC M40 and is the answer not in the manual?
Questions and answers