Blackstar Amplification DEPT.10 AMPED 3 Owner's Manual
100w 3 channel amp
Hide thumbs
Also See for DEPT.10 AMPED 3:
- Owner's manual (8 pages) ,
- Owner's manual (7 pages) ,
- Owner's manual (34 pages)
Table of Contents
Advertisement
Available languages
Available languages
Quick Links
Blackstar Amplification Ltd, Beckett House, 14 Billing Road, Northampton, NN1 5AW, UK
For the latest information go to: www.blackstaramps.com
Whilst the information contained herein is correct at the time of publication, due to our policy of constant improvement
1
and development, Blackstar Amplification Ltd reserves the right to alter specifications without prior notice.
Owner's Manual
Designed and Engineered by
Blackstar Amplification UK
2
Advertisement
Table of Contents

Subscribe to Our Youtube Channel
Related Manuals for Blackstar Amplification DEPT.10 AMPED 3


Summary of Contents for Blackstar Amplification DEPT.10 AMPED 3
- Page 1 For the latest information go to: www.blackstaramps.com Whilst the information contained herein is correct at the time of publication, due to our policy of constant improvement and development, Blackstar Amplification Ltd reserves the right to alter specifications without prior notice. Designed and Engineered by...
- Page 2 IMPORTANT SAFETY INSTRUCTIONS 1. Read these instructions. 2. Keep these instructions. 3. Heed all warnings. 4. Follow all instructions. 5. Do not use this apparatus near water. 6. Clean only with a dry cloth. 7. Do not block any ventilation openings. 8.
- Page 3 Warning! The U.S. Government´s Occupational Safety and Health Administration (OSHA) has specified the following permissible noise level exposures: Important safety information! READ FOLLOWING INFORMATION CAREFULLY. SAVE Duration Per Day In Hours Sound Level dBA, Slow Response INSTRUCTIONS FOR FUTURE REFERENCE! Follow all warnings and instructions marked on the product! Danger! High internal operating voltages.
- Page 4 Since our launch in 2007, Blackstar has led the way in the innovation of guitar products, this floorboard rig is the result of countless hours of painstaking Research amplification. The Dept.10 AMPED 3 represents the culmination of years of technical and Development by our world-class design team. Based in Northampton (UK), research and development.
-
Page 5: Volume
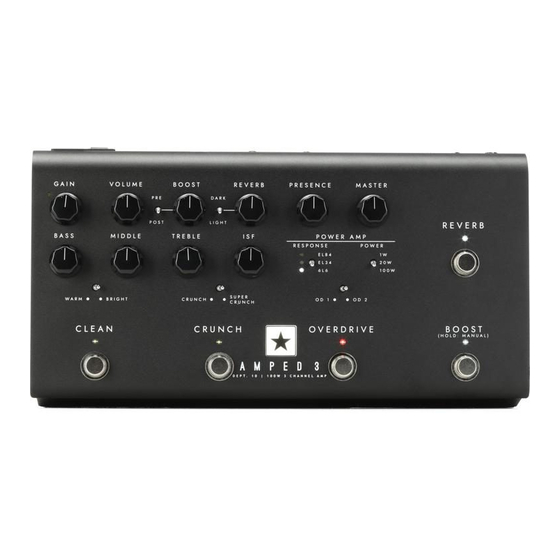
Front Panel 3. Gain 1. Channel Footswitches The Gain control adjusts the amount of overdrive or distortion. Low settings, counter clockwise, will deliver a cleaner sound. As the Gain control is turned Your AMPED 3 has two modes: “Patch” mode and “Manual” mode. clockwise the sound will become more overdriven, with maximum distortion in the When in Patch Mode, the Channel LED colours will be as follows: full clockwise position. - Page 6 9. Boost Dark - Warm and resonant This control affects how much your signal level is boosted when the boost is active. Light - Airy and smooth Higher settings (clockwise) will increase the amount your signal is boosted. The Boost The Reverb level and Reverb type settings are saved when you store a patch.
- Page 7 the signal chain. This setting can be changed using Blackstar’s Architect software and saved to the amp. 20W - This setting reduces the output power to a maximum of 20 Watts. Use for smaller gigs, when rehearsing, or when a more power amp overdriven tone is 22.
- Page 8 IMPORTANT NOTE: The protection sensing is at the speaker output jacks on the These audio streams can be recorded simultaneously within your chosen unit. Do not disconnect at the speaker end only. Disconnect at the amp! recording software/DAW. Control the output levels of Channels 1 and 2 using CabRig within Blackstar’s Architect software.
- Page 9 control (35). The USB stereo line input will also be affected by the Level control when it is monitored through the Line Out. NOTE: This signal is taken after the Master volume control. Ring Right channel Saving Patches to mixer Left channel Screen to mixer...
- Page 10 Audio Settings NOTE: For use with 3rd party IR (Impulse Response) loaders, select the DI option. The DI is taken from after the power amp emulation. Click on the ‘Audio Settings’ icon to open the Audio Settings panel. Adjust MIDI channel, FX Loop and Reverb settings here.
- Page 11 Room Microphone Character Bright and cutting, with controlled lows. A classic microphone choice for recording guitar cabinets. Use 57 - Dynamic this microphone off-axis for a less sharp, mid-focussed tone. Aggressive and tight. Use this microphone for an up- 421 - Dynamic front sound or off-axis for a more mellow sound.
- Page 12 The channel EQs provide the ability to shape the tone of each of your cab and mic combinations individually. The EQ can be bypassed for a quick comparison. LOW-CUT: Controls a 2nd order high pass filter LOW: Controls a low shelf filter at 120Hz +/- 10dB ...
- Page 13 Patches and Presets Settings Panel Click the gear icon to open the settings panel. Audio Adjust MIDI channel, FX Loop and Reverb settings here. Changes made here will automatically update, but will not be permanently saved to the amp. To save your changes, click “Save Amp Settings”...
-
Page 14: Table Of Contents
MIDI Table Function CC Number Value Volume 0-127 0-127 Bass 0-127 Preamp Middle 0-127 Treble 0-127 Gain 0-127 EL84 127 = On EL34 127 = On Response 127 = On Presence 0-127 Master Volume 0-127 Clean Patch 127 = On Clean Warm Voice 127 = On... - Page 15 Das amerikanische Amt für Sicherheit und Gesundheitsschutz am Arbeitsplatz Einschalten, bis das Gerät die Raumtemperatur erreicht hat. (OSHA) hat folgende Grenzwerte für Lärmbelastung festgelegt: Nicht autorisierte Modifikationen am Gerät sind von Blackstar Amplification Ltd. Dauer pro Tag in Stunden Lärmpegel in dBA, langsame Ansprechzeit ausdrücklich untersagt.
- Page 16 Seit unserer Gründung im Jahre 2007 hat Blackstar viel für die Innovation im entschieden haben. Dieses Bodeneffekt-Rig ist wie alle unsere Produkte das Bereich der Gitarrenverstärker beigetragen. Der Dept.10 AMPED 3 ist das Ergebnis Ergebnis unzähliger Stunden akribischer Forschungs- und Entwicklungsarbeit durch jahrelanger technischer Forschung und Entwicklung.
-
Page 17: Isf
3. Gain Oberseite 1. Kanal-Fußschalter Mit dem Gain-Regler steuern Sie den Grad der Übersteuerung bzw. Verzerrung. Niedrige Einstellungen (gegen den Uhrzeigersinn) sorgen für einen unverzerrteren Ihr AMPED 3 bietet zwei Betriebsarten: „Patch“-Modus und „Manual“-Modus. Klang. Wenn der Gain-Regler im Uhrzeigersinn aufgedreht wird, nimmt die Verzerrung kontinuierlich zu. -
Page 18: El84
8. Volume Ab Werk oder nach dem Auslösen der Reset-Funktion startet Ihr Verstärker im Patch-Modus. Die Einstellung kann über die Blackstar Architect Software Nutzen Sie diesen Regler, um die Lautstärke des Vorstufenkanals zu justieren. Im geändert werden. Navigieren Sie zum Bereich „Settings“ und deaktivieren Sie Uhrzeigersinn heben Sie die Lautstärke an. - Page 19 14. Presence Rückseite Der Presence-Regler steuert die allgemeine Ansprache der Röhrenendstufe im 18. Netzanschluss Höhenbereich (13). Mit diesem Regler können Sie die Ansprache und die Aggressivität Hier wird das mitgelieferte IEC-Kaltgerätenetzkabel angeschlossen. Die Dept. 10 der Höhenanteile einstellen. Diese Einstellung wird beim Sichern eines Patches AMPED-Produkte verfügen über ein Universalnetzteil.
- Page 20 23. Schalter FX Loop Level 27. USB Audio - CabRig Output Mit dem Level-Schalter können Sie den Effekt-Loop wahlweise mit +4 dBu oder Verwenden Sie das mitgelieferte USB-C-Kabel, um Ihren AMPED 3 direkt -10 dBV betreiben: Entsprechend können Sie professionelles Equipment (+4 dBu) mit Ihrem Computer zu verbinden.
- Page 21 TIPP: Um den Sound mit Raumklang aufzunehmen, pannen Sie den linken bzw. Sound, mit Endstufen- und CabRig Lautsprecher-Emulation. Der Sound ist von rechten Kanal von CabRig im Mix zu 100% nach links bzw. rechts. der Stellung des CabRig-Schalters (32) und von den detaillierten Einstellungen in der CabRig-Sektion der Blackstar Architect Software abhängig.
- Page 22 zur Architect Software aufgerufen werden. „Device Patches“ können jederzeit Architect aufgerufen werden, indem Sie doppelt auf das Patch im Feld „Patches“ klicken Verstärker oder mit der rechten Maustaste klicken und „Load Patch“ wählen. „Local Patches“ werden auf Ihrem Computer und nicht in Ihrem Verstärker gespeichert.
- Page 23 Cab Channel Strip 2. Mic-Auswahl Mit dem Cab Channel Strip können Sie den Klang Ihrer virtuellen Lautsprecherbox Mikrofonieren Sie Ihre virtuelle Lautsprecherbox mit einer Auswahl von sechs anlegen und steuern. etablierten Mikrofonen. Verändern Sie die Achse des gewählten Mikrofons, um eine andere Klangfarbe zu erhalten.
- Page 24 1) Room-Auswahl 3. Mix-Regler Unterstützen Ihre Lautsprecher- Mikrofon-Auswahl mit einer Room Ambience. Steuern Sie die Pegel Ihrer Lautsprecherboxen über die Kanalfader aus. Verwenden Wählen Sie den Raum-Typ über das Dropdown- Sie die Solo-Taste, um Ihre Lautsprecherbox und den Raum voneinander zu Menü...
- Page 25 Master Sound noch weiter optimieren möchten. Die Kanal-EQs bieten die Möglichkeit, den Klang jeder Lautsprecher- und Mikrofon-Kombination individuell zu gestalten. Der EQ kann zu Vergleichszwecken Patches and Presets auf Bypass geschaltet werden. LOW-CUT: Steuert ein Hochpassfilter zweiter Ordnung LOW: Steuert einen Low-Shelf-Filter bei 120 Hz um +/- 10 dB aus ...
- Page 26 General Device (AMPED 3) Patches Hier passen Sie verschiedene Einstellungen für Architect an. Hierbei handelt es sich um die Patches, die aktuell in Ihren Verstärker geladen sind About und über den CabRig-Schalter ausgewählt werden können (32). Drücken Sie die Hier werden Informationen zu Ihrem Verstärker dargestellt. Save-Taste und „Save Patch to Device“, um Ihre aktuellen CabRig-Einstellungen auf eines Ihrer „Device Patches“...
-
Page 27: Clean Warm Voice Bright Voice Crunch Patch
MIDI Table Funktion CC Number Value Volume 0 bis 127 0 bis 127 Bass 0 bis 127 Preamp Middle 0 bis 127 Treble 0 bis 127 Gain 0 bis 127 EL84 127 = An EL34 127 = An Ansprech- verhalten (Response) 127 = An Presence... - Page 29 はじめに 特徴 この度は、 Dept.10 AMPEDをお買い上げいただきありがとうございます。 このフロアボードの 2007年の設立以来、 Blackstarはギターアンプの技術革新をリードしてきました。 Dept.10 ペダルは、 他の製品と同様、 弊社のワールドクラスのデザインチームによる、 数え切れないほど AMPED 3は、 長年の技術的な研究と開発の集大成です。 AMPED 3は、 従来のアンプのよう の時間を費やした研究開発の成果です。 英国のノーザンプトンを拠点とするBlackstarのチー に直感的なコントロールでありながら、 プログラマビリティとプロ ・ デジタル ・ テク ノロジーによ ムは、 全員が経験豊富なミュージシャ ンです。 そして、 その開発プロセスのたったひとつの目的 る汎用性を備えています。 は、 自己表現のための究極のツールをプレイ ヤーに提供すること。 Blackstarの全製品は、 信 AMPED 3は、 伝統的な真空管アンプのトーンと質感を実現できる100Wの妥協のないフロア 頼性、...
- Page 30 Overdrive Channel フロントパネル OD1 - ホッ トロッデッ ド ・ マスター ・ ボリューム ・ オーバードライブサウンド 1. Channel Footswitches ( Channel フットスイッチ) OD2 - タイ トでアーティキュレートなアグレッシブ ・ オーバードライブサウンド AMPED 3には2つのモードがあります : “パッチ “モードと “マニュアル “モードです。 この設定は、 パッチを保存するときに保存されます。 パッチモードでは、 チャ ンネルLEDの色は以下のようになります : 3.
-
Page 31: Boost Footswitch
8. Volume 11. Reverb プリアンプ/チャ ンネルのボリュームを調整するために使用します。 時計回りに回すと、 ボリューム Reverbノブは、 ギタートーンに適用されるReverbの量をコントロールし、 低い設定は反時計回 が大きくなります。 マスターボリューム (15) と組み合わせてボリュームを大きくすると、 真空管パ り、 高い設定は時計回りになります。 ワーアンプの歪みと圧縮の効果が現れますが、 その特性は選択したレスポンス (13) の設定に基 Reverbタイプ ・ スイ ッチを使用して、 Reverbのキャラクターを変更します : づきます。 設定は、 パッチを保存するときに保存されるようになっています。 Dark - 暖かく、 響きのあるサウンド 9. Boost Light - エアリーでなめらかのあるサウンド このコントロールは、... - Page 32 ▪ 100W - 最も大きなクリーンヘッ ドルームを得られる、 フルパワーのセッティングで す。 ライ の設定は、 BlackstarのArchitectソフトウェアで変更し、 アンプに保存することができます。 ブやステージでの使用に最適です。 22. FX Loop Return ▪ 20W - この設定では、 出力パワーを最大20Wまで下げます。 小規模なライブやリハー サ ここで外部エフェクターの (モノラル) 出力に接続します。 デフォルトでは、 Effects Loopは直列 ル、 よりパワーアンプのオーバードライブ ・ トーンを低レベルで得たい場合に使用します。 に動作するように設定されています。 BlackstarのArchitectソフトウェアを使用して、 エフェク ト ルー プをパラレルに動作させるように設定し、 アンプに保存することができます。 パラレルで動作 ▪...
- Page 33 26. Outputs (出力端子) ▪ 2 : ライン入力、 右チャ ンネル-バランスXLRとラインアウトCabRig出力によるオーディオ ・ モニ タリングまたはバッキング ・ トラック ・ プレイ バックに使用さ れます。 2 つの DC9V出力を使用して、 最大合計電流 500mA までの外部ペダルに電力を供給します。 28. MIDI In (MIDIイン) 注意 : 2つの出力の合計電流が500mAを超えないようにして ください。 MIDI信号を受けるには、 付属のTRS MIDI - 5 ピン MIDI アダプターを使用して、 ここにMIDI デ 27.
- Page 34 32. CabRig Switch (CabRigスイッチ) 「パッチの保存 ペダルに保存されている3つのCabRig設定を切り替えることができます。 ソフトウェア ツールバーの 「保存」 アイコンをクリックして、 アンプのパッチを保存します。 ポッ プアッ プウィンド ArchitectのCabRigセクションを使用して、 3つのファク トリーパッチをカスタマイズすることが ウで、 「 デバイスにパッチを保存」 または 「ローカルパッチを保存」 を選択できます。 どちらのオプシ できます。 ョンでも、 アンプのフロントパネル設定が保存されます。 33. Level Control – CabRig Outputs (レベル ・ コントロール - CabRigアウト プット) このコントロールは、 XLR、 ライン ・ アウト、 USBオーディオ ・ チャンネル3の出力レベルに素早く アクセスし、...
- Page 35 CabRig CabRig の設定にア クセスするには、 Blackstar 社のソフ トウェア 「Architect」 が必 要です。 Blackstar 社のウェブサイ ト https://blackstaramps.com/architect からダウンロードし て く ださい。 Cab Channel Strip (キャブ ・ チャンネル ・ ストリップ) Cab Channel スト リ ッ プを使用すると、 バーチャルのキャビネッ トのトーンを作り、 コントロール することができます。 2. Mic Selection 6本の業界標準マイ クを選択して、 仮想キャビネッ トにマイキングできます。 マイ クの軸を切り替 えることで、...
- Page 36 Room マイク ・タイプ キャラクター ブライトでカッティング、 コントロールされた低 域を 持ちます。 ギターキャビネットのレコーディングに 57 - Dynamic 最 適なクラシックなマイクです。 このマイクをO F F A X I Sで使用すると、 シャープではないミッドフォー カスのトーンになります。 アグレッシブでタイトなサウンドです。 アップフロン 421 - Dynamic トなサウンドや、 O F F A X I Sでメロウなサウンドを 得たい場 合に使用します。 バランスが良く、 トップエンドが伸びる特 性となりま す。...
- Page 37 チャ ンネル EQ は、 キャビネッ トとマイ クの組み合わせのトーンを個別にシェーピングする機能 を備えています。 EQはバイ パスすることも可能で、 簡単に比較することができます。 ▪ LOW-CUT: 2 次オーダーのハイ パスフ ィ ルターをコントロールします ▪ LOW: 120Hz +/- 10dBのローシェル フ ・ フ ィ ルターをコントロールします。 ▪ LOW MIDS: 400Hz +/- 10dBのピークフ ィ ルターをコントロールします。 ▪ HIGH MIDS: 1KHz +/- 10dBのピーク ・ フ ィ ルターを制御します。 ▪...
- Page 38 歯車のアイコンをクリ ックすると、 設定パネルが表示されます。 Patches and Presets Audio MIDIチャ ンネル、 FXルー プ、 Reverbの設定をここで調整します。 ここで行なった変更は自動的に 更新されますが、 アンプに永久に保存されるわけではありません。 変更を保存するには、 ページ の一番下にある “Save Amp Settings “をクリ ックします。 General (一般設定) Architectの各種設定をここで調整します。 About ( アンプについて) アンプに関する情報 デフォルト ・ パッチと設定のリセット アンプ ・ パッチ、 CabRig パッチ、 セッティングは、 いつでも工場出荷時に戻すことができます。 こ れは、...
- Page 39 MIDI Table Funktion CC Number Value Volume 0 bis 127 0 bis 127 Bass 0 bis 127 Preamp Middle 0 bis 127 Treble 0 bis 127 Gain 0 bis 127 EL84 127 = An EL34 127 = An Ansprech- verhalten (Response) 127 = An Presence...
- Page 40 AMPED 3 Top View G A I N G A I N V O L U M E V O L U M E B O O S T B O O S T R E V E R B R E V E R B P R E S E N C E P R E S E N C E...
- Page 41 AMPED 3 Rear View O U T M A I N S I N P U T M I D I T H R U U S B B A L A N C E D O U T P U T S L I N E O U T ( O N L Y U S E O N E ) P H O N E S...
Need help?
Do you have a question about the DEPT.10 AMPED 3 and is the answer not in the manual?
Questions and answers