Advertisement
Quick Links
LED SMART SECURITY FLOODLIGHT
& CAMERA
Models: 65/900, 65/901, 65/902
INSTALLATION AND SAFETY INSTRUCTIONS
IMPORTANT: Read before installing fixture. Retain for future reference.
Thank you for choosing our Starfish Security Floodlight with Camera.
Getting started is easy.
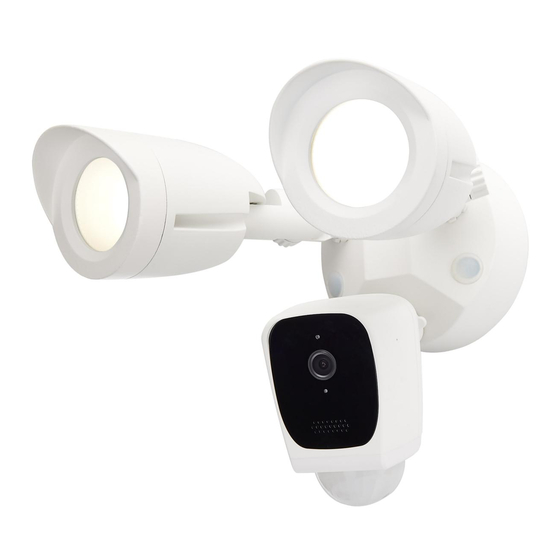
1. Parts Included
Security Flood
Camera
2. Product Details
Adjustment Locknut
Camera Lock Collar
Micro SD Card Slot
3. Safety Instructions
WARNING: Risk of Fire or Electric Shock.
• This fixture must be wired in accordance with the National Electrical Code and applicable local codes and ordinances.
Proper grounding is required to insure personal safety. Carefully observe grounding procedure under installation section.
• Make certain power is OFF before starting installation or attempting any maintenance. Risk of fire/electric shock. If not
qualified, consult an electrician.
• For proper weatherproof function, all gaskets must be seated properly and all screws inserted and tightened firmly. Apply
weatherproof silicone sealant around the edge of the Back Box and/or Junction Box. This is especially important with an
uneven wall surface. Silicone all plugs and unused conduit entries.
• Be sure fixture temperature is cool enough to touch. Do not clean or maintain while fixture is energized. Clean glass lens
with non-abrasive glass cleaning solution. Do not open fixture to clean the LED. Do not touch the LED.
WIRING: If wiring does not include a ground wire, consult your local electrical code for approved grounding methods.
For proper connection, place wire nut over wires and twist clockwise until tight.
© Copyright 2022 Satco Products, Inc. 7/22, v2.1
Gasket
M4*14 Bracket
Screws
LED Bullet Head
Reset
Wire Nuts
1900 Lm Output
1
Light Lock Collar
Microphone
Lens
LED Indicator
Speaker
PIR Motion Detector
Satco Products, Inc.
Brentwood, NY 11717
Advertisement

Related Manuals for Satco Starfish 65/900

Summary of Contents for Satco Starfish 65/900
- Page 1 WIRING: If wiring does not include a ground wire, consult your local electrical code for approved grounding methods. For proper connection, place wire nut over wires and twist clockwise until tight. Satco Products, Inc. © Copyright 2022 Satco Products, Inc. 7/22, v2.1 Brentwood, NY 11717...
- Page 2 After connecting power supply, the lights will turn on and your Starfish Security Floodlight Camera will make a sound to indicate that it’s in pairing mode. TROUBLESHOOTING 1. Check your power source. 2. Check electrical connections. 3. Check that the motion sensor is working properly. © Copyright 2022 Satco Products, Inc. 7/22, v2.1...
- Page 3 Wi-Fi network successfully. • Once the blue LED light is on, the camera Red light is successfully paired and ready to be used. blinks © Copyright 2022 Satco Products, Inc. 7/22, v2.1...
- Page 4 Screenshot the Live View to Mobile Device History Notifications Settings Main Settings Talk Speak through the Floodlight Speaker Zoom Zoom in on the Live View You’re done! Congratulations, your camera is ready to use. © Copyright 2022 Satco Products, Inc. 7/22, v2.1...
-
Page 5: Year Warranty
(4) directly, or indirectly related to the sale, use, or repair of the product. This warranty gives you specific rights, and you may also have other rights which vary from state to state. © Copyright 2022 Satco Products, Inc. 7/22, v2.1... -
Page 6: Technical Support
USER GUIDE START HERE DOWNLOAD STARFISH System Requirements Minimum iOS 9.3 or Wi-Fi 4.4 • Dedicated 2.4GHz Wi-Fi Network • TECHNICAL SUPPORT Support@satcostarfi sh.com... - Page 7 Launch the App and tap “Register” for new accounts or “Login” for existing accounts. Enter E-Mail address, then tap “Get verifi cation code”. Create a Password then tap “Done”...
- Page 8 Create/Share a Home Create a Home Tap the "Me" button on the bottom of the screen, and then tap "Home Management". Tap the "Create a home" button to setup your home.
- Page 9 Share a Home From the Home Management screen, select the Home that you would like to share. Tap "Add Member" and select the way that you would like to send the invitation johnsmith johnsmith@gmail.com Enter the user information and select if the new member will be an "Administrator"...
-
Page 10: Add Devices
Add Devices Tap the (+) button on the top right corner to access the action menu, then select "Add Device". First make sure your phone is connected to a 2.4GHz Wi-Fi Network, then select the type of device you would like to connect. If you have a BLE enabled device, make sure that you have Bluetooth turned ON for connection. - Page 11 Enter your 2.4GHz Wi-Fi Network name and password, and click "Next". Note: If the devices are not fl ashing, turn devices On and Off 5 times to enter pairing mode. Ensure that your Starfi sh device is installed and powered ON. Put the Device into pairing mode by turning OFF and then ON 5 times.
- Page 12 "next". The pairing status screen will appear. Note: If unsuccessful, please refer to the FAQs on Satco.com/Starfi sh To rename the device, tap the “Pen” icon, enter the new name and tap “Completed”. The device is now...
- Page 13 Features Individual Bulb On/Off Tap the Power Button to turn the device On or Off Individual Bulb Setting Tap the device icon for additional device features...
- Page 14 Dimming Slide the dimming bar left or right to set the brightness level Note: Screen shown for "dimming only" product. Please Note: Starfi sh products cannot be used with an in-wall dimmer. These products can only be used with a standard ON/OFF switch. For proper operation, all dimming must be done through the Starfi sh devices.
-
Page 15: Tunable White
Tunable White Tap on any part of the wheel or one of the preset colors to adjust color temperatures from Warm to Cool Slide the dimming bar left or right to set the brightness level... - Page 16 Color Changing Tap on any part of the color wheel or one of the preset colors to select your desired color Use the slide bars to adjust the brightness and color saturation...
- Page 17 Effects Tap on a preset effect, or create a custom effect by tapping on the edit button Some Starfi sh devices also include a “Music” function. Tap the music tab to have the color of light change based on the sounds in the room. Please note that this functionality utilizes the micro- phone of the mobile device to determine sounds.
- Page 18 Schedule Tap on the "Schedule" button Select a time for the event to occur Tap "Repeat" to repeat on certain days of the week, otherwise the event will only occur once. Select the days that you would like the schedule to repeat. Select if you would like the device to turn on or off.
-
Page 19: Advanced Settings
Advanced Settings Additional settings are available in the device settings menu. Tap the pen icon in the upper right corner to access the menu screen... -
Page 20: Create Groups
Create Groups From the "Home" screen, select the (+) button from the top right corner, and select "Create Group". NOTE: To create groups you will need at least 2 devices. Select the type of devices that you would like to group Select the devices you want to group and then tap “Confi rm”... -
Page 21: Edit Groups
Edit Groups Tap the pen icon in the upper right corner Rename the group or remove a device from the group. Once complete, tap “Confi rm” in the upper right corner. - Page 22 Automation and Scenes From the Home Screen, press the (+) button on the top right, then select "Create Scene" or "Create Automation".
- Page 23 When creating an Automation, you will need to assign a "Condition" Select "Automate by Weather" , "Automate by Schedule" or "Automate by Device Status" to have your devices run automatically based on the condition. For scenes or automations, you will then need to select your "Action".
- Page 24 Select the devices or groups that you would like to be controlled, and then select if you would like those devices to Turn On or Off, and the color. For devices and groups, you can designate On or Off, Brightness and Color (as applicable).
- Page 25 Tap "Next" and then review the Automation or Scene. Click "Save" to activate your Automation or Scene.
- Page 26 CONNECTING TO ALEXA Note: Make sure that your Alexa App is connected to your Amazon device and is working properly Log in to your Alexa App and tap the top left corner to access the menu.
- Page 27 Tap”Skills & Games”...
- Page 28 Type "Satco Starfi sh" and tap on the icon in the search results.
- Page 29 Tap "Enable to Use" to begin linking your account.
- Page 30 Enter your Satco Starfi sh username and password to link your accounts, then tap "Link Now". Note: You must use the same username and password from the Starfi sh App.
- Page 31 Tap "Authorize" on the next page to link your Starfi sh account to Alexa Once your Starfi sh account is successfully linked to Alexa, tap "Done" on the top left corner...
- Page 32 Tap "Discover Devices" to connect your Smart devices Wait for Alexa to detect the devices from the Starfi sh App Your devices will now be paired and can be controlled through the Alexa App or through your Alexa device...
- Page 33 CONNECTING TO GOOGLE HOME Note: Make sure your Google Home App is connected to your Google device and is working properly Open the Google Home App, then tap "Set up device".
- Page 34 Tap "Have something already set up?".
- Page 35 Type "Satco Starfi sh" and tap on the icon in the search results.
- Page 36 Enter your Satco Starfi sh username and password to link your accounts, then tap "Link Now". Note: You must use the same username and password from the Starfi sh App.
-
Page 37: Voice Control
VOICE CONTROL Now that you have linked your Starfi sh devices to Amazon or Google, you will be able to control them with voice commands from your Alexa or Google Assistant devices. Below are some common voice commands that can be used after you say "Alexa"... - Page 38 CONNECTING TO SMART THINGS Note: Make sure your SmartThings App is connected to your hub and is working properly Open the SmartThings App, then tap the top left corner to access the menu Tap "Devices" and then "Add new device"...
- Page 39 Select "Satco Starfi sh" from the "By brand" list, then select the location where you would like to add the device...
- Page 40 Enter your Satco Starfi sh username and password to link your accounts, then tap "Link Now" Note: You must use the same username and password from the Starfi sh App...
- Page 41 Tap "Authorize" on the next page to link your Starfi sh account to SmartThings Once your Starfi sh account is successfully linked to SmartThings, tap "Done" on the top left corner Your devices will now be paired and can be controlled through the Google Home App or through your Google device...
- Page 42 CONNECTING TO SIRI SHORTCUTS From the “Home” Screen, tap the “Smart” button on the bottom banner to see your scenes and automations In the “Smart” tab, make sure you have already created a custom scene. Any of your custom scenes can then be added to Siri Shortcuts...
- Page 43 Tap the “Add to Siri” button on the bottom right corner of the screen, and then select the scene that you would like to add to Siri. Review the Siri shortcut information and tap “Save Shortcut”can then be added to Siri Shortcuts Now you can activate this scene through Siri...
- Page 44 Recessed Fixtures Smart Lighting Controls String Lights For complete product information, videos and FAQ’s, please visit www.Satco.com/Starfi sh Copyright Satco Product’s Inc. 2020 Not responsible for typographical errors. Specifi cations / App features subject to change. See user agreement for full details. App images are representations of the actual App. Amazon, Alexa and all related logos and trademarks of Amazon.com, Inc.
- Page 46 General Status Active Finish White Project Name Wattage Style Utility Location Prepared By CCT (Kelvin) 3000K Color Temperature Warm White Width (in.) 8.27 Height (in.) 8.46 Extension (in.) 9.45 Indoor or Outdoor Fixture Outdoor Smart Product Info IOT Enabled Integrated Camera Operational Humidity 20% to 85% non-condensing 802.11b/g/n;...
- Page 47 Copyright 2020 Satco Products, Inc. For More Information Visit: All Rights Reserved http://www.satco.com/...
Need help?
Do you have a question about the Starfish 65/900 and is the answer not in the manual?
Questions and answers