Table of Contents
Advertisement
Quick Links
Advertisement
Table of Contents

Related Manuals for Arachnid E650FSRT-BK2


Summary of Contents for Arachnid E650FSRT-BK2
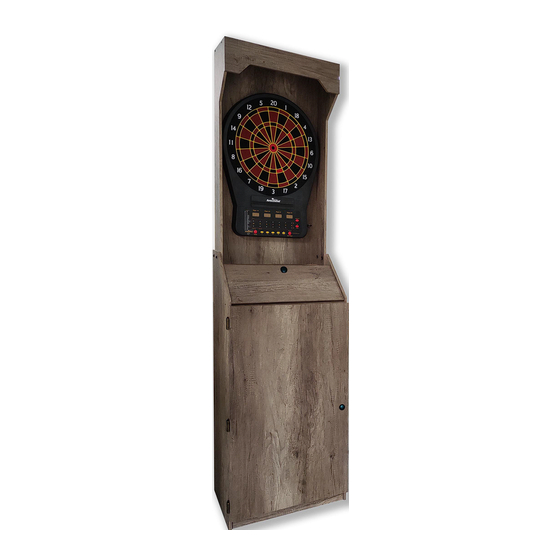
- Page 1 Phone: 1-800-526-0451 Toll-Free! Mailing Address (correspondence only): Escalade Sports PO Box 889 Evansville, Indiana 47706-0889 E-mail: customerservice@escaladesports.com Physical Location: Escalade Sports 817 Maxwell Ave. Evansville, Indiana 47711 E650FSRT-BK2 CPSIA#2-E650FSRT-BK2-1220-MW...
-
Page 3: Assembly Tips
Phillips Screwdriver Small rubber hammer Allen Wrench (Included) An electric screwdriver is helpful in assembly. However, please set at low torque and use extreme caution with an electric screwdriver because you could overtighten the hardware and strip the screws. Assembly Tips Make sure you understand the following tips before you begin to assemble your dartboard cabinet. -
Page 4: Important Battery Information
First Time Battery Installation: Locate battery compartment for this product . Use alkaline batteries for maximum performance . Using a small Phillips head screwdriver – loosen and remove the battery compartment cover screw(s). Remove battery compartment cover . Install new batteries only after reading the “ Battery Information NOTICE“ ! Replace compartment cover and secure cover with the cover screw . - Page 5 used together H2 - 6 x 25 mm H1 - 5 x 40 mm (Not to Scale) Panel Bolt Philips Flat Counter Sunk Head Bolt H3 - Panel Bolt Lock for Panel Bolt Lock 24 pcs 4 pcs 4 pcs H4 - 4 x 12 mm H5 - 8 x 25 mm H6 - 8.5 x 19 mm...
- Page 6 (LED light unit with cord preinstalled) - 1 pc 1 pc M - 57.5 x 20.5 cm Tilt-Down Door Panel 1 pc O - Arachnid Electronic Dartboard N - 56 x 102 cm with Accessories & Instruction Manual Upper Back Panel 1 pc...
-
Page 7: Parts Required
Install Parts C to Part A using 4 pcs H1 Phillips Flat Head Bolts. See Figure 1. Tighten, but do Not over tighten or strip out H1 Bolts. Insert H7 Pins into pre-drilled holes on Part A. Use a rubber hammer to lightly tap these H7 Pins into place if need be. -
Page 8: Important Note
Install Part E between Parts A and B and attach it using 4 pcs H1 Phillips Flat Head Bolts. See Figure 3. Tighten, but do Not over tighten or strip out H1 Bolts. PARTS REQUIRED Phillips Flat Head Bolt - 4 pcs Base Cross Panel - 1 pc Phillips Screw Driver Barrel Nuts... - Page 9 Install 2 pcs H14 Door Magnet Plate to predrilled pilot holes on Part G using 4 pcs H10 Phillips Flat Head Screws. See Figure 5. Install 3 pcs H12 Door Hinges to Pilot Holes on Part G using 6 pcs H9 Phillips Round Head Screws and 3 pcs H10 Phillips Flat Head Screws.
- Page 10 Install Part K to Part H using H1 Bolts. See Figure 7. Factory Preinstalled Barrel Nuts on Part K must be aligned to bolt holes for proper installation. See Figure 7A. Tighten, but do Not over tighten or strip out H1 Bolts. Must be flush Phillips Flat Countersunk Head Bolt Make sure LED lights...
- Page 11 Install Part J to Part H and Part I using H1 Phillips Flat Head Bolts. See Figure 9. Tighten, but do Not over tighten or strip out H1 Bolts. Screw 4 pcs H2 Panel Bolts into factory preinstalled plastic inserts on Part L. Tighten, but do Not over tighten or strip out H2 Bolts.
- Page 12 Install 2 pcs H4 Dartboard Hanger Bolts to T- Nuts inside Part N Upper Back Panel. See Figure 11. IMPORTANT NOTE: Screw the bolts till they feel snug and Do NOT overtighten them because they will break the back panel block. Recommended install these bolts using fingers only. Do not use Allen Wrench.
- Page 13 NOTE: With help from another adult, attach the Upper Cabinet Assembly to Lower Cabinet Assembly using 4 pcs H5 Allen Head Bolts, 4 pcs H6 Flat Washer and 4 pcs H1 Bolts. Tighten H5 Bolts using H15 Allen Wrench which is included in the Hardware Kit. Install 4 pcs H9 Phillips Round Head Screw to Part F top side back of Lower Cabinet Assembly.
- Page 14 Install Part Q Door Knob to the Part G using 1 pc H11 Screw. See Figure 14A. Install 2 pcs Part D onto 4 pcs H7 Pins for both shelves. See Figure 14. PARTS REQUIRED Phillips Round Head Bolt - 1 pc Door Knob - 1 pc Middle Shelf - 2 pcs Phillips Screw Driver...
- Page 15 Place Part P Battery Box into lower cabinet upper shelf by going through the hole on Part F. See Figure 16. Peel off 3M tape cover on battery box and stick on the inside the bottom cabinet upper row. See Figure 16A. PARTS REQUIRED Battery Box - 1 pc Peel off 3M tape cover on battery box and...
- Page 16 SAFETY L-BRACKET INSTALLATION GUIDE Contractor installation recommended. PARTS REQUIRED Safety L-Bracket - 1 pc Phillips Round Head Screw - 2 pcs Phillips Round Head Screw - 1 pc Phillips Screw Driver Decide where in room cabinet will be placed. An electrical outlet should be part of this consideration. Locate stud behind wall.
- Page 17 Upper Sction Bottom Panel E650FSRT-BK2-K Upper Panel (LED Light Unit Preinstalled) E650FSRT-BK2-L Upper Section Front Panel E650FSRT-BK2-M Tilt-Down Door Panel E650FSRT-BK2-N Upper Back Panel Arachnid Electronic Dartboard E650FSRT-BK2-O E650FSRT-BK2-P Battery Box E650FSRT-BK2-Q Door Knob E650FSRT-BK2-R Dartboard Installation Assistant Block E650FSRT-BK2-H1...
-
Page 18: Limited Warranty
LIMITED WARRANTY Escalade Sports (the Company) warrants the Product to be free from defects in workmanship and materials under normal use and conditions FOR A PERIOD OF 90 DAYS FROM THE DATE OF ORIGINAL PURCHASE in the United States and Canada. What Is Covered Except as provided below, this Limited Warranty covers all defects in materials and workmanship.
Need help?
Do you have a question about the E650FSRT-BK2 and is the answer not in the manual?
Questions and answers