Table of Contents
Advertisement
Advertisement
Table of Contents

Related Manuals for SensoScientific OTA Series

Summary of Contents for SensoScientific OTA Series
- Page 1 OTA Series User Guide V1.02...
-
Page 2: Table Of Contents
Contents OTA Series ....................2 Getting to Know Your Device ................ 2 SensoScientific Cloud ................... 3 Setting Up Your Device: App ................. 4 Step 1 – Download App ................4 Step 2 – Set Device to Provisioning Mode ..........5 Step 3 –... -
Page 3: Ota Series
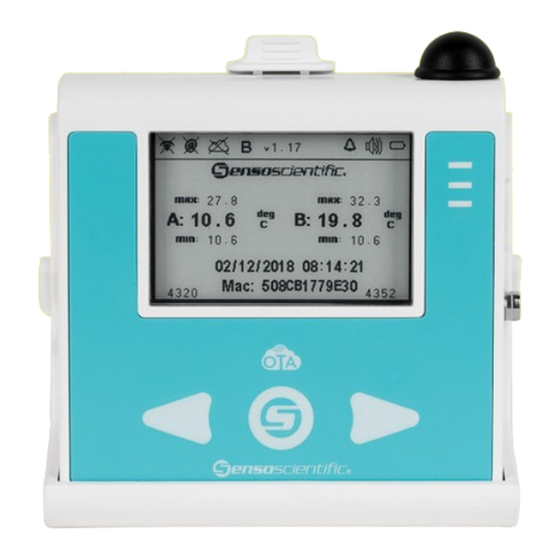
OTA Series The OTA series is the second generation of Wi-Fi Sensors from SensoScientific. This series of nodes boasts over-the-air upgrade (OTA) capabilities. This enable the devices to remotely upgrade firmware without the need to be manually serviced. The devices offer a large, 2.7” e-ink technology display which constantly shows the most current readings on the node. -
Page 4: Sensoscientific Cloud
SensoScientific Cloud The SensoScientific Cloud is the platform that all data is received and recorded. The cloud can be accessed via any internet enabled device using the following link: Cloud.SensoScientific.com Use the Login Information provided to you to login. Figure 2 – Installation Slip Figure 3 –... -
Page 5: Setting Up Your Device: App
If you opted for SensoScientific to pre-configure the device, please disregard this section. The device can be configured using the SensoScientific app available on iOS or Android devices. If you do not have a smartphone to use, go to the browser method (See Page 10). -
Page 6: Step 2 - Set Device To Provisioning Mode
LED with an audible beep. Figure 5 – Provisioning LED Flashing Now, press the left and right buttons simultaneously on the device to enter the provisioning mode. Figure 6 – Provisioning Activation OTA Series User Guide... -
Page 7: Step 3 - Connect To Wi-Fi
This will connect your phone to the OTA Node. See below for further instructions on how to connect your phone to a Wi-Fi network using an iOS or Android device: Figure 7 – Connect Phone to OTA Sensor OTA Series User Guide... - Page 8 3. Tap the name of the Wi-Fi network that you want to join - “mysimplelink-57D475” The digits after the hyphen will be the last 6 characters of the device’s MAC Address. 4. Tap Connect to join the network. Figure 9 – Android Set-Up OTA Series User Guide...
-
Page 9: Step 4 - Configure Wi-Fi
Step 4 – Configure Wi-Fi Now that you are connected to the OTA node from your cellular phone, go to the SensoScientific app. Figure 10 – SensoScientific App From the app, go to the Wi-Fi Setup link at the bottom of the main screen. - Page 10 Plug the probe into the device and place the probe wherever you are looking to monitor data. Go to cloud.sensoscientific.com to access your data. Use the username and password provided to you via email or in the Installation Slip within your shipment (See Figure 2) OTA Series User Guide...
-
Page 11: Setting Up Your Device: Browser
If you opted for SensoScientific to pre-configure the device, please disregard this section. The device can be configured using the SensoScientific app available on iOS or Android devices. If you do not have a Wi-Fi enabled device contact technical support (See contact page). The following are required to proceed: OTA Wi-Fi Node(s) 2.4GHz Wi-Fi Source... -
Page 12: Step 2 - Connect To Wi-Fi
OTA Node’s MAC Address. This will connect your phone to the OTA Node. See below for further instructions on how to connect your phone to a Wi-Fi network using an tablets, iOS, or Android device: Figure 15 – Connect Phone to OTA Sensor OTA Series User Guide... - Page 13 Network & Internet. If you opened Network & Internet from the Settings app, the following figure will also appear: 4. Tap the name of the Wi-Fi network that you want to join - “mysimplelink-57D475”. OTA Series User Guide...
-
Page 14: Step 3 - Configure The Node
If Static IP is required, go to the IP Config tab. Disable DHCP Client and enter all information in the fields (IP Address, Subnet Mask, Default Gateway, and DNS Server). Once all information is entered select Apply. Figure 19 – Static IP OTA Series User Guide... - Page 15 Figure 20 – Network Information For enterprise security, scroll down to the bottom of the page under Add Enterprise Profile. Input all information and select Add to save the profile. Figure 21 – Enterprise Security OTA Series User Guide...
-
Page 16: Step 4 - Verify Profile
Plug the probe into the device and place the probe wherever you are looking to monitor data. Go to cloud.sensoscientific.com to access your data. Use the username and password provided to you via email or in the Installation Slip within your shipment (See Figure 2) OTA Series User Guide... -
Page 17: Display Notifications
The display shows many different notifications which are critical for the operation of the device. Below are descriptions of each of the notifications on the notification panel. See the legend below: Figure 23 – Display Legend OTA Series User Guide... - Page 18 When a connection cannot be established, the temperature readings Buffering will be stored on the device. 4000 readings can be saved on the device. Firmware The firmware version line identifies which version of firmware that v1.03 Version the device is using. OTA Series User Guide...
-
Page 19: Led Status
The three LEDs at the front of the device are used to provide user feedback about the device. The LED colors are green, yellow, and red – much like a traffic light. Figure 25 – LED OTA Series User Guide... - Page 20 (Battery) device will sound every time the device wakes up until either speaker is turned off or the device reads data in the alarm limits. Table 2 – LED Status OTA Series User Guide...
-
Page 21: Push-Button Functions
To get the most current reading and time stamp, press the center button to wake up the device and reset the screen. The yellow light will turn on solid, and the screen will reset. Figure 26 – Wake Up Device OTA Series User Guide... -
Page 22: Silence Speaker
This will silence the audible alarm until the next time the device wakes up and take a reading. In order to permanently disable the audible alarm, it must be disabled from the cloud. Figure 27 – Turn Off Speaker OTA Series User Guide... -
Page 23: Min/Max Reset
1. Press and hold the center and right buttons simultaneously. The green and yellow light will flash. Figure 28 – Min/Max Reset Step 1 2. Release the center button but continue holding the right button. The yellow light will remain solid and the green light will flash. OTA Series User Guide... - Page 24 Figure 29 – Min/Max Reset Step 2 3. Once the green light becomes solid, release the right button. Figure 30 – Min/Max Reset Step 3 OTA Series User Guide...
-
Page 25: Turn Off Device
To turn off your device. Press and hold the center button for 10 seconds. The screen will flash and turn off. To turn the device back on, press the center button once to reset/wake up the device. Figure 31 – Turn Off Device OTA Series User Guide... -
Page 26: Delete Wi-Fi Ssid And Password
1. Hold the left and center button for 10 seconds until the device stops alarming and blinking red. Figure 32 – Delete Wi-Fi Information Once the Wi-Fi information has been deleted, follow the Wi-Fi setup steps under Setting Up Your Device. OTA Series User Guide... - Page 27 Standard Time. We also provide our clients 24/7 support for emergency support requirements. Phone: 1-800-279-3101 Support extension - option 4 at the prompt Sales extension - option 3 at the prompt Fax: 1-888-238-6002 E-Mail: salesinfo@sensoscientific.com support@sensoscientific.com SensoScientific’s 24/7 Online Help Desk Click for OTA Series User Guide...
-
Page 28: Document Information
MB / 07.18.2018 Browser Configuration, OTA Installation Slip, and ToC V1.01b MB / 07.30.2018 Authentication Update V1.02 MB / 08.29.2018 Associated forms and procedures Doc. No. Document Title Associated records Doc. No. Document Title DOCUMENT END OTA Series User Guide...
Need help?
Do you have a question about the OTA Series and is the answer not in the manual?
Questions and answers